Tag: finger food

  • Chicken Shashlik Sticks Recipe

    Chicken Shashlik Sticks Recipe

     Delicious, tender, juicy Chicken Shashlik Sticks the whole family loves in less than 40 minutes! These Shashlik Sticks are EASY to make and so versatile.

    Chicken Shashlik Sticks Recipe
    Photo: Chicken Shashlik Sticks

    Chicken Shashlik Sticks

    When a friend blogger posted Chicken Shashlik Sticks recipe on Instagram AND I saw it pinned on Pinterest on the same day, I knew it was a sign that I had to make this. The pictures looked so good, and the recipe seemed too easy to be true (spoiler alert, it isn’t!). So I added it to my weekly meal plan. I finally got a chance to make it yesterday, and I am praising the convenience and tastiness of this dish.

    This is an easy recipe for Tender & Juicy Chicken Shashlik Sticks. The shashlik sticks were loaded with tender pieces of chicken between juicy tomato chunks, sweet peppers and flavorful onions. The chicken was marinated in a sweet and tangy sauce before firing and the sticks were brushed with the leftover marination while they were being cooked. What a great combination of flavors!

    Chicken Shashlik Sticks recipe
    Photo: Chicken Shashlik Sticks

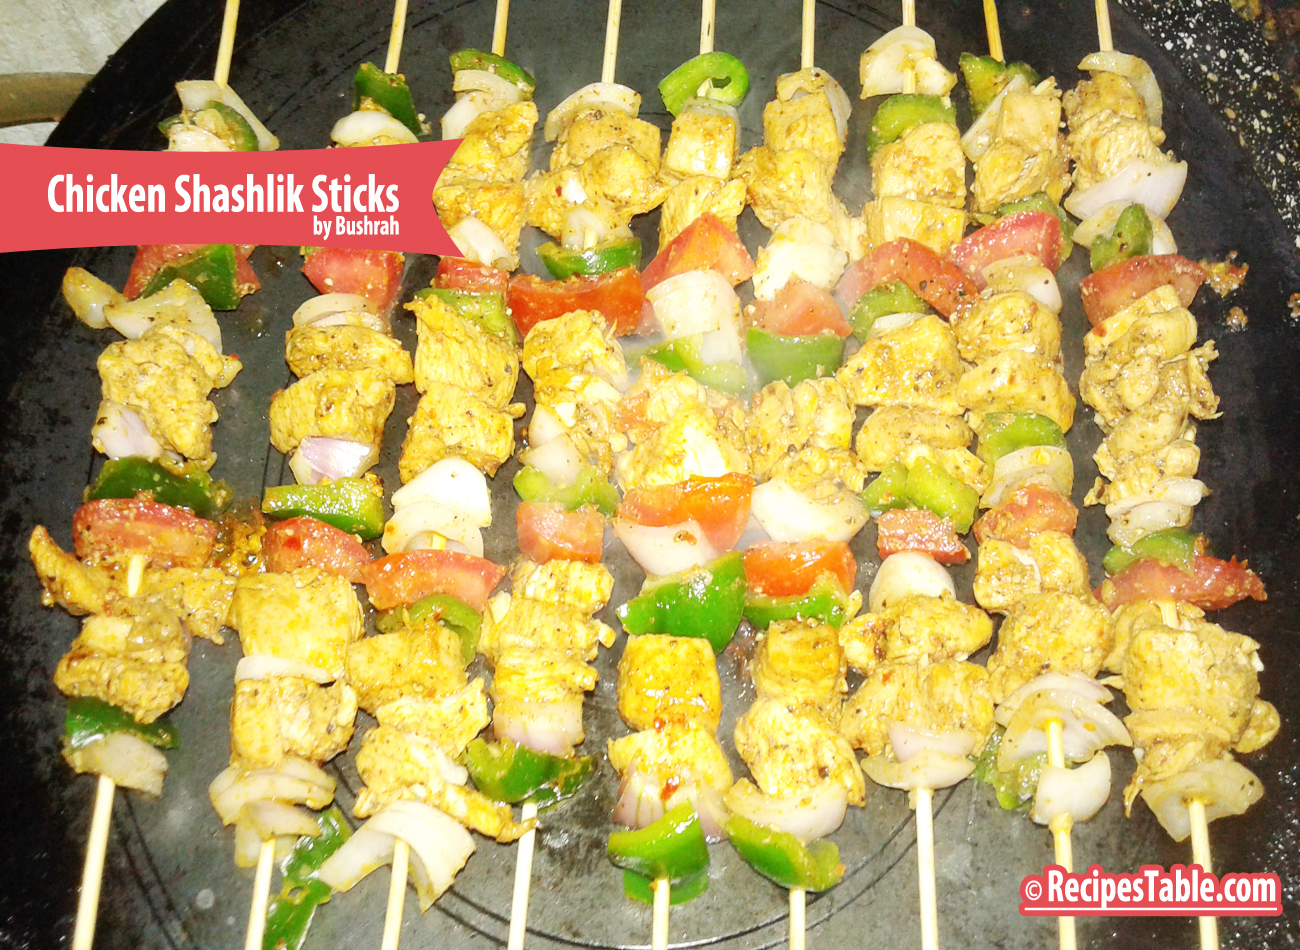
    Remove from the grill or griddle and serve immediately. The combination of the juicy chicken bites and colorful veggies with the Shashlik sauce is fantastic! I loved how juicy they turned out.

    Check it out the Chicken Shashlik Sticks recipe and printable version here!!

    Chicken Shashlik Sticks Recipe

    Delicious, tender, juicy Chicken Shashlik Sticks the whole family loves in less than 40 minutes! These Shashlik Sticks are EASY to make and so versatile.

    • 500 gm boneless chicken (cut into cubes)
    • 1 teaspoon ginger garlic paste
    • 1/4 cup tomato ketchup
    • 2 tablespoon soy sauce
    • 1 tablespoon mustard paste
    • 1/2 teaspoon red chili flakes
    • 1/2 teaspoon black pepper
    • salt to taste
    • 1 large green bell pepper (cubed)
    • 1 large tomato (deseeded and cubed)
    • 1 medium onion (cubed)
    • 2 tablespoon olive oil
    • 1 lemon
    • 12 wooden sticks
    1. Marinade chicken cubes in ginger garlic paste, ketchup, soya sauce, mustard paste, salt, black pepper, red flakes.
    2. Leave it for 30 minutes or you put it in fridge for overnight to enhance the flavuor.
    3. First, soak wooden sticks in cold water for five minutes.
    4. Now thread chicken, tomato, green bell pepper and onion in it.
    5. Repeat and fill all your sticks.
    6. Heat a griddle pan or grill and apply a little oil.
    7. Place chicken skewers on hot griddle or grill.
    8. Cook over medium-high heat, turning and brushing with leftover marination sauce often, for 12-15 minutes, until chicken is fully cooked.
    9. Squeeze lemon juice over all sticks when they are ready. Delicious Chicken Shashlik Sticks are ready to serve.

    Serving Suggestions:
    Serve with salad and your favorite dipping sauce for a complete satisfying meal.

    Extra-Bonus Tip: 

    Make sure you don’t use too big of pieces of chicken because you want everything to cook evenly. I have had one too many (okay, two total- but still that is more than necessary) meals ruined because my chicken wasn’t all the way cooked. 


    I have also posted Pineapple Chicken Tenders and Light Chicken Kabobs recipes which are another easiest & tastiest version of making Pasta home. Do check it out as well.  It’s finger lickin’ good. You’ll be coming back for more. 


    Put your own spin on it. And lemme know how it turns out. Post a photo on Facebook (Recipestable) or  on Twitter so I can see how lovely yours turn out.


    Happy Dinner Making!!

  • Veggie Pizza Cups Recipe

    Veggie Pizza Cups Recipe

    As a child I was not the veggie lover I am today.When my mommy cooked veggies, I was apprehensive. Vegetables? Ew! A few years have passed since then and I love veggies of all shapes and sizes.  

    This weekend, I had a day off and I decided to cook nothing but finger foods. I knew I wanted veggie pizza, but I wanted something more convenient and easier to eat. I have found that when I make veggie pizza in the flat pizza style, it can be a little messy to eat because the toppings want to fall off. So, I did a quick Youtube search and found the recipe I used as inspiration for my Veggie Pizza Cups.

    Veggie Pizza Cups

    Veggie Pizza Cups recipe
    Photo: Veggie Pizza Cups

    Ramadan is coming and with it comes family get-together’s and parties. And if you need an easy to make appetizer recipe for your next party, then you should try this Veggie Pizza Cups. There’s no reason for buying store made appetizers when they’re so easy to make, fun & cheap and are guaranteed to be a hit at your next party. Don’t slave away in the kitchen when you could be enjoying the party!

     Veggie Pizza Cups recipe

    The idea may seem daunting at first but I hope by now I’ve got you well acquainted with handling different types of pizza’s. Be it: my The Perfect pizza dough recipe used to make not just this beautiful Baby Chicken Bread but also these cute little Mini Pizza Cups. Or this super easy and frugal recipe for Pizza Paratha. And how can we forget, my all-time favorite, the soft puffy Pizza Rolls …O’so good!

     Veggie Pizza Cups recipe
    Cute little Veggie Pizza Cups in Oven

    It’s one of my favorite finger food. It’s amazing that just a few basic ingredients can come together into something so delicious.  For topping, I decided to use mixed veggies (corn, carrot, capsicum, green onion) and mushrooms in these because they’re my favorites veggies, but you could easily mix it up and use any toppings you like. I really do recommend making it as listed though, because these were just perfect. It tastes just like you’re eating a slice of pizza! Don’t skip out on the Italian Seasoning either – I think it adds a lot of flavor.

    They tasted delicious and impressed my family without making a mess. I will definitely be making them again this holiday season.

     Veggie Pizza Cups recipe
    Photo: These bite-sized Veggie Pizza Cups are perfect for picky eaters.

    These Veggie Pizza Cups can be used for appetizers, party snacks, a light lunch, the first course of a dinner. Perfect party for picky eaters.

    It would freeze well if you decided to double the batch. Enjoy 🙂

    Check it out the Veggie Pizza Cups recipe and printable version here!!

    I do hope that your plans for this holiday weekend teeter more to the side of savoring than that of to-doing.


    If you make this recipe, be sure to snap a photo and hashtag it #Recipestable. I’d love to see what you cook!

    Happy Cooking!!

  • Chapli Kebab Pizza Recipe (An Italian-Pakistani Twist)

    Chapli Kebab Pizza Recipe (An Italian-Pakistani Twist)

    Give pizza night a new twist by making spicy Chapli Kebab Pizza (Heavenly Double TREAT)!!

    Monday nights are for creativity. Or maybe, you’re like me and just have leftover Chapli Kebab’s wasting away in your fridge. Pinterest gave me the inspiration I needed to take dinner from a boring pizza night to an Italian-Pakistani Twist.

    This Chapli Kebab Pizza is my Pakistanized pizza makeover…..you could say that this is an Pakistani-Italian delight….hey, fusion food is the latest fad.  A delicious and easy to make pizza with crispy, juicy chapli kebab’s and  melty mozzarella cheese!  It is sure to be a hit! 

    Chapli Kebab Pizza (Desi Pizza)

    Photo: Chapli Kebab Pizza

    Chapli Kebab Pizza

    This pizza is so easy to make with left over Chapli Kebab’s with the cheesy topping….nobody could resist. I added dried Italian herbs to the pizza base and that gave a subtle Italian flavor with the Pakistani flavored topping. And just followed my heart to a logical conclusion. I took the shortcut and used the Chili Garlic sauce in place of pizza sauce and lessen cheese to keep it healthy and low fat( you can add more cheese). Well… I needn’t explain what the result was. The recipe finding its place in this blog itself says it all….. Right???

    chapli-kebab-pizza3

    So why go to pizza hut…when you can make healthy homemade ones?? This pizza was a huge hit with my family try it…you will love me more, honestly 🙂 

    Chapli Kebab Pizza recipe

    Photo: Chapli Kebab Pizza

    Bismillah, Let’s get started!

    Check it out the Chapli Kebab Pizza recipe and printable version below.

    Chapli Kebab Pizza Recipe

    A delicious and easy to make pizza with crispy, juicy chapli kebab’s and melty mozzarella cheese! It is sure to be a hit!

    For Pizza Dough

    • 2 cups plain flour
    • 1 egg (lightly beaten)
    • 4 tablespoon oil
    • 1-1/2 teaspoon dry instant yeast
    • 1/2 teaspoon salt
    • 1/2 teaspoon sugar
    • 1/2 cup warm milk

    For Pizza Topping

    • 8 leftover chapli kebab’s
    • 1 cup pizza sauce or Chili Garlic Sauce
    • 1/2 cup cheddar cheese (shredded)
    • 1/2 cup Mozzarella Cheese (shredded)
    • 1/2 teaspoon dried basil
    • 1/2 teaspoon dried oregano
    • fresh coriander leaves or parsley (for topping)

    To Make Pizza Dough

    1. In a large bowl, add yeast and sugar.
    2. Pour the lukewarm milk and let it stand for about 10 minutes or more until it becomes frothy.
    3. Place flour and salt in another large bowl.
    4. Add the yeast mixture and mix well until well combined.
    5. Now add the oil and knead well till you get a soft ball of dough.
    6. Cover the bowl with a wet cloth or a plastic wrap and keep in a warm place for 1 hour or until the dough is rise and volume is doubled.

    To Make Pizza

    1. Once it has doubled, turn the dough onto a well floured surface, pat down and divide into eight small balls.
    2. Preheat oven at 180 degree C.
    3. Roll dough into pizza crust’s.
    4. Transfer to a mini Pizza pans or baking sheets.
    5. Spread Pizza sauce or Chili Garlic Sauce evenly.
    6. Arrange chapli kebab’s on top of the sauce.
    7. Sprinkle the dried basil and oregano.
    8. Top with cheddar and Mozzarella cheese.
    9. Sprinkle coriander fresh leaves.
    10. If needed, you can sprinkle a bit more cheese.
    11. Bake, in the preheated oven, for 15 minutes or until the crust turn brown and cheese melts.
    12. Remove the pizza pans from the oven.
    13. Slices each into halves and serve warm. ENJOY!!

    Serving Suggestions:
    Serve alone as an appetizer, or accompany with a light pasta or salad.

     Recipe Note’s:

    I am a firm believer that every oven is different and you should check on your food periodically to make sure it is cooking properly.


    Put your own spin on it. And lemme know how it turns out by sharing a picture  on Instagram, Facebook (Recipestable) or Twitter with this hashtag #Recipestable so I can see how lovely yours turn out.


    Happy Baking!!

    If you like this post, Please Subscribe to my blog and let me know your feedback by commenting below.. I have lots more recipes to share with you.

  • Crispy & Cheesy: The Easiest Cheese Pakora (Paneer Pakora) Recipe!

    Cheese Pakora (Paneer Pakora)

    Ah fried cheese, is there anything more indulgent? Paneer Pakora is made with cottage cheese and besan. It makes a great snack at any party or on a rainy day.

    cheese pakora recipe
    Photo: cheese pakora

    Check it out the Cheese Pakora Recipe here!!

    Prep Time: 10 minutes

    Cook Time: 15 minutes

    Servings: 4

    Difficulty Level: Easy

    Ingredients:

    • 250 gm cottage cheese
    • 1 teaspoon red chili powder
    • 1/4 teaspoon mango powder
    • oil For deep frying

    For the batter:

    • 1 cup Gram flour (besan).
    • 1 teaspoon red chili powder
    • a pinch of baking soda
    • salt to taste
    • water as required


    Directions:

    Step 1

    Cut the cottage cheese into square, thick cubes.

    Step 2

    Sprinkle red chili powder and mango powder on each piece.

    Step 3

    Make the batter by mixing the gram flour with red chili powder, salt, soda and sufficient water to make a slightly thick batter.

    Step 4

    Dip each piece of cottage cheese into the batter and deep fry in heated oil till it turns golden brown. Paneer Pakora is ready to serve.

    Serving Suggestions:

    • Serve with green chutney.

    If you like Paneer Pakora recipe and make it then let me know your feedback by commenting below.

  • The Best Chicken Fingers Recipe You’ll Ever Try

     The Best Chicken Fingers 

    Restaurant food made at home! Did you know it could be so easy? Chicken Fingers recipe is an easy to make finger food, made with chicken, seasoned bread crumbs, eggs and ranch dressing. These chicken fingers are crispy, crunchy and moist. You can prepare them as a snack or meal in 30 minutes and they are always a hit.

    Prep Time: 15 minutes

    Cook Time: 12 minutes

     Servings: 6

    Ingredients

    • 6 chicken fillets
    • 2 eggs whites
    • 1 packet bread crumbs
    • 1/2 cup cornflour
    • 2 tbsp white flour
    • 2 tbsp soy sauce
    • 2 tbsp vinegar
    • 1 tbsp chicken cube white flour
    • 1 tsp sugar
    • 1 tsp black pepper, crushed
    • 1/2 tsp baking powder
    • salt to taste
    • Oil for frying

    Yield: 6 servings

    Directions:

    1. Rinse chicken fillets then cut into fingers.
    2. Place chicken pieces into a large bowl.
    3. Add cornflour, white flour, soy sauce, vinegar, chicken cube white flour and baking powder.
    4. Mix well.
    5. Season with salt and pepper.
    6. Beat egg whites in a separate bowl.
    7. Place bread crumbs in a shallow dish.
    8. Dip chicken fingers in the egg whites then roll into the bread crumbs.
    9. Deep fry chicken fingers for 10-12 minutes or until golden brown.
    10. Take it from the oil and drain on an absorbent paper.
    11. Chicken Fingers are ready to serve.


    • Serve with mayo dipping sauce.


  • Crispy & Delicious: The Perfect Fish Biscuits Recipe!

    Fish Biscuits 

    Among so many fish recipes,  Fish Biscuits is one of delicious recipe. Must try a Fish biscuits recipe !!

    Prep Time: 20 minutes

    Cook Time: 5 minutes

     Servings:4 

    Ingredients

    • 300 gm fish fillets
    • 1/2 cup plain flour, for dusting
    • 1 egg
    • 4 tbsp oil
    • 2 tbsp plain flour, for batter
    • 2 tbsp cornflour
    • 1 tbsp garlic paste
    • 1/2 tsp black pepper
    • salt to taste


    Directions:

    1. Cut fish fillets into square pieces.
    2. In a small bowl, combine together plain flour, corn flour and beaten egg.
    3. Season with salt and black pepper.
    4. Mix well and make a smooth batter.
    5. Place remaining plain flour in a shallow dish.
    6. Coat fish pieces in flour then dip in the batter.
    7. Heat oil in a deep wok.
    8. Fry fish pieces for 5 minutes or until golden brown.
    9. Remove from the oil and drain on paper towel.
    10. Fish Biscuits are ready to serve.
    • Serve with Tartar Sauce.
  • The Perfect Anytime Snack or Appetizer: Homemade Pizza Pockets Recipe!

    Homemade Pizza Pockets

    This week things are super crazy, so I decided to make a pizza pocket version. They are seriously so easy to make – and the perfect finger food!

    Bismillah, let’s get started!

    Check it out the Homemade Pizza Pockets Recipe and printable version below!

    Homemade Pizza Pockets Recipe

    For Dough

    • 2 cups flour
    • 2 tbsp oil
    • 1 tsp instant yeast
    • 1/2 tsp sugar
    • 1/4 tsp salt

    For Filling

    • 1 cup Mozzarella cheese (grated)
    • 1 cup chicken tikka (shredded)
    • 1 capsicum (cut into cubes)
    • 1 to mato (cut into cubes)
    • 1 onion (cut into cubes)
    • 1 tsp oregano leaves
    1. In a bowl, combine together flour, salt, sugar, Instant yeast and oil.
    2. Knead a soft dough with lukewarm water.
    3. Leave it to rise for 30 minutes.
    4. Preheat oven to 200 degree C.
    5. Grease a pizza pan with butter.
    6. Divide pizza dough into 3 equal portions.
    7. Roll pizza dough into 3 circles size of a quarter plate.
    8. On one half of each circle sprinkle cheese, tomato, onion, capsicum and shredded chicken Tikka.
    9. Sprinkle oregano over it.
    10. Top with grated cheese.
    11. Brush the edges of each pizza base with oil.
    12. Fold the plain half over to form a semi circle.
    13. Press the edges firmly.
    14. Place pizza pockets on greased pizza pan.
    15. Brush with oil.
    16. Bake for 20 minutes or until golden brown.
    17. Cut into half.
    18. Pizza Pockets are ready to serve.

    Serving Suggestions:
    Serve with Chili Garlic sauce.


    I have also posted Homemade Pizza Rolls Recipe which are another easiest & tastiest version of making Pizza at home. Do check it out as well.  It’s finger lickin’ good. You’ll be coming back for more. 


    Put your own spin on it. And lemme know how it turns out. Post a photo on Facebook (Recipestable) or  on Twitter so I can see how lovely yours turn out.


    Happy Dinner Making!!

  • Recipe: Cheese Chaat

    Cheese Chaat

    There are many ways to include cheese in your meals and here is one chatpata way _ that of cheese chaat. Cheese Chaat is an easy and quick recipe that is prepared with grated cheese, potatoes, sev, onion, sweet chutney and chaat masala.

    Check it out Cheese Chaat recipe here!

    Prep Time: 10 minutes

    Servings: 4

    Ingredients

    • 2 boiled potatoes, peeled & cubed
    • 1 small onion, chopped
    • 1 tomato, chopped
    • 1 cup cheddar cheese, shredded
    • 1/4 cup sev
    • 2 tbsp lemon juice
    • 2 tbsp sweet chutney
    • 1 tbsp green chutney
    • 1 tsp chaat masala powder
    • salt according to taste
    • Few coriander leaves, for garnishing

    Directions:

    Step 1

    Place the potatoes, tomatoes, and onions in a large bowl.

    Step 2

    Stir in the sweet chutney, green chutney and lemon juice.

    Step 3

    Season with salt and chaat masala. Toss to coat evenly.

    Step 4

    Top with sev and cheese.

    Step 5

    Garnish with coriander leaves. Cheese Chaat is ready to serve. Enjoy!!

  • Easy & Crispy: The Perfect Finger Fish Recipe for Everyone

    Finger Fish

    Simple and fun to make, these fish sticks are bound to become one of your family’s favorite quick dinners.
    Kids will love this homemade version of finger fish, and they can even help make them too, from Recipestable.com.

    Finger Fish Recipe
    Photo: Finger Fish Recipe

    Bismillah, let’s get started!

    Check it out the Finger Fish Recipe and printable version below!

    Finger Fish Recipe

    • 1 kg fish fillets
    • 2 tbsp lemon juice
    • 1 tbsp soy sauce
    • 1 tsp red chili powder
    • 1 tsp mustard powder
    • 1/2 tsp white pepper
    • 2 eggs (lightly beaten)
    • 1 cup plain flour
    • 1 cup breadcrumbs
    • salt to taste
    • oil for frying

    Method

    1. Rinse and drained fish fillets then cut the fish into finger shaped pieces.
    2. Place the fish in a bowl, add soy sauce, lemon juice, mustard powder, red chili, salt and pepper.
    3. Marinate fish for at least 2 hours.
    4. Place the flour, eggs and bread crumbs in 3 separate bowl.
    5. Roll each fish finger in flour, then dip in egg and again roll in breadcrumbs properly. Place them in a single layer on flat dish.
    6. Heat oil in a frying pan over a medium heat. Deep fry the finger fish for 8-10 minutes or until they turn golden brown.
    7. Drain on paper towel. Finger fish is ready to serve.

    Serving Suggestions:
    Serve with tartar Sauce.

    I have also posted Fish Biscuits Recipe which is another easiest & tastiest version of making Finger Fish  at home. Do check it out as well.  It’s finger lickin’ good. You’ll be coming back for more.


    Put your own spin on it. And lemme know how it turns out. Post a photo on Facebook (Recipestable) or  on Twitter so I can see how lovely yours turn out.


    Happy Dinner Making!!

  • Recipe: Chicken Russian Kebabs

    Chicken Russian Kebabs 

    Bismillah, let’s get started!

    Check it out the Chicken Russian Kebabs  Recipe and printable version below!

    Chicken Russian Kebabs Recipe

    • 4 boneless chicken breasts
    • 3 eggs
    • 2 tbsp butter
    • 1 green bell pepper (finely chopped)
    • 1 boiled carrot (finelt chopped)
    • 2 cups boiled potatoes
    • 1/2 cup sweet corn
    • 1/4 cup spring onion (finely chopped)
    • 4 tbsp plain flour
    • 1/2 cup milk
    • 3 tbsp fresh corinader leaves (finely chopped)
    • 2 green chilies (thinly sliced)
    • 1 tsp black pepper
    • 1/2 tsp all spice powder
    • 1 tsp salt
    • Oil for frying
    1. Cook chicken for 20-25 minutes or until tender then shredded properly.
    2. Set aside.
    3. Mash boiled potatoes.
    4. Place all ingredients except oil in a large bowl.
    5. Mix well.
    6. Wet the palms and shape the mixture into oval shapes.
    7. Beat egg with salt and pepper.
    8. Dip kebabs in egg.
    9. Deep fry for 2-3 minutes on each side or until golden.
    10. Remove from the oil and drain on paper towel.
    11. Russian Kebabs are ready to serve. ENJOY!!
    Serving Suggestions:
    Serve with tomato ketchup.


    I have also posted Chicken Gola Kabab Recipe which is another easiest & tastiest version of making Chicken Kebab’s at home. Do check it out as well.  It’s finger lickin’ good. You’ll be coming back for more. 


    Put your own spin on it. And lemme know how it turns out. Post a photo on Facebook (Recipestable) or  on Twitter so I can see how lovely yours turn out.


    Happy Dinner Making!!

  • Recipe: Keema Pakora (Minced Meat Fritters)

    Pakora is a famous snack of Pakistani cuisine and every one like to eat it. Chicken pakoras are common but chicken keema pokaras are rare and delicious so need to try it.I have used chicken keema in this Keema pakora recipe. You may use mutton keema or minced beef also. Do give it an attempt as its easy. In this recipe key ingredient of pakora is chicken mince. Serve these easy to make Keema pakora with imli sauce or ketchup at tea time. Super Easy to make and delicious too.

    Bismillah, let’s get started!

    Check it out the Keema Pakora Recipe and printable version below!

    Keema Pakora Recipe

    • 250 gm chicken mince (Keema)
    • 1 egg (beaten)
    • 1 medium onion (chopped)
    • 4 green chilies (thinly sliced)
    • 1/2 cup gram flour
    • 1/4 cup rice flour
    • 3 tbsp fresh coriander leaves (chopped)
    • 1 tsp ginger-garlic paste
    • 1 tsp red chili powder
    • 1/2 tsp hot spice
    • 1/4 tsp baking soda
    • salt to taste
    • oil for frying

    Method

    1. Put chicken mince in a large bowl.
    2. Add ginger garlic paste, chopped onion, egg, green chilies, coriander leaves, red chili, gram flour, rice flour, baking soda, hot spice and salt. Mix well.
    3. Add a little water to make a thick batter.
    4. Heat sufficient oil in a deep wok.
    5. Drop small portions of the batter into the oil with your fingers.
    6. Deep fry on medium heat for 10-12 minutes or until golden and crisp.
    7. Remove from the oil and drain on an absorbent paper. Keema Pakora is ready to eat. ENJOY!!
    Serving Suggestions:
    Serve hot with Pakora Dipping Sauce.

    I have also posted Crunchy Chicken pakora Recipe which is another easiest & tastiest version of making Pakora’s at home. Do check it out as well.  It’s finger lickin’ good. You’ll be coming back for more. 


    Put your own spin on it. And lemme know how it turns out. Post a photo on Facebook (Recipestable) or  on Twitter so I can see how lovely yours turn out.


    Happy Cooking!!

  • Easier Than Takeout: The Perfect Spicy Chicken Finger Recipe!

    Spicy Chicken Fingers

    Spicy Chicken Fingers

    • 2 boneless chicken breasts (cut into strips)
    • 1 medium onion
    • 1 capsicum
    • 4 cloves garlic (crushed)
    • 2 green chilies
    • 6 whole red chilies
    • 2 tbsp coriander leaves
    • 2 eggs
    • 4 tbsp vegetable oil
    • 4 tbsp plain flour
    • 4 tbsp cornflour
    • 2 tbsp semolina
    • 1/2 tsp black pepper
    • salt to taste
    • Oil for frying

    Method

    1. In a food processor or a chopper, add onion, capsicum, red chilies, coriander, green chilies and garlic.
    2. Process until well combined.
    3. Spread this batter on chicken strips.
    4. Season with salt and black pepper.
    5. Mix well.
    6. Marinate for 30 minutes then add beaten eggs, flour, corn flour, semolina and 4 tbsp oil in it.
    7. Toss well to coat evenly.
    8. Heat oil in a pan.
    9. Deep fry chicken strips for 8-10 minutes or until crispy and golden.
    10. Spicy Chicken Finger is ready to serve.
    11. ENJOY!!

    Serving Suggestions:
    Serve with Chili Garlic Sauce.

    I have also posted Nutty Baked Chicken Fingers recipe which is another easiest & tastiest version of making Chicken Fingers at home. Do check it out as well.  It’s finger lickin’ good. You’ll be coming back for more. 


    Put your own spin on it. And lemme know how it turns out. Post a photo on Facebook (Recipestable) or  on Twitter so I can see how lovely yours turn out.


    Happy Cooking!!