Tag: Pakistani

  • The Flavorful Mix Vegetable Chicken Pulao Recipe

    The Flavorful Mix Vegetable Chicken Pulao Recipe

    Loaded with veggies and flavorful chicken, warm spices like cumin, cinnamon, nutmeg and mace and the heat of green chilies this Mix Vegetable Chicken Pulao is a delight to the taste buds in every bite!

    The Flavorful Mix Vegetable Chicken Pulao Recipe
    The Flavorful Mix Vegetable Chicken Pulao Recipe

    Chicken broth and seasonings are added to give it lots of flavor and moisture. It’s a one-pot meal to prepare and cook in a pot that comes together quickly for a hearty and hot week-night dinner.

    There are some Rice Pulao that are overly packed with gorgeous spices flavors, but this isn’t one of those. This Chicken pulao is a medley of rice, chicken, spices, and vegetables. I just add a tiny sprinkle of green onion as a garnish, just to add a little more color when serving. Pairs perfectly with any raita or curry of your choice.

    The Flavorful Mix Vegetable Chicken Pulao Recipe
    The Flavorful Mix Vegetable Chicken Pulao Recipe

    What goes in Mix Vegetable Chicken Pulao

    The ingredients you need to make this Mix Vegetable Chicken Pulao are:

    • Best rice for pulao – basmati rice is the best for both flavor and fluffiness. Basmati is a type of long grain rice – the longer the grain, the fluffier the rice. It also has a lovely subtle fragrance that really compliments the flavors in this rice pilaf; You can use brown rice as well for this pulao recipe.
    • Chicken: The juicy thighs or chicken breast are the ideal meat choices for making pulao. You can use either the boneless pieces or the bone-in ones like leg pieces. I personally, like pulao with boneless chicken pieces.
    • Fat – Ideally desi ghee (clarifying butter) is the best choice for making the pulao. I choose the clarified butter (desi ghee) for flavor, but if the aroma and taste of ghee are too over-powering for you, use unsalted butter, coconut oil, or any other cooking oil.
    • Flavor Base – sautéed ginger and onion, to add savouriness;
    • Pulao Spices – I’ve used a combination of cinnamon, cloves, nutmeg, mace, bay leaves and cumin in this Mix Vegetable Chicken Pulao. It’s reminiscent of traditional Middle Eastern flavors but also a festive combination. Feel free to customize this to your own taste;
    • Broth OR water – For extra flavor, I almost always make my pulao with broth. However, water will work just fine as well, though I’d add an extra pinch of each of the spices;
    • Vegetables – Use any vegetables you like here. I like using carrot and green peas for a vibrant color, and potatoes because the flavor melds in nicely with the rice. Cabbage and Capsicum also work well but be aware that they provide a sharper pop of flavor. Broccoli would also be great.
    • Garnishing – I’ve used green onions in this mix vegetable chicken pulao recipe. I adore both the flavor and fresh green color that green onion bring to this pulao. Fresh Coriander and Mint Leaves are also great!

    How to make Mix Vegetable Chicken Pulao:

    Mix Vegetable Chicken Pulao is straight forward to make.

    1. Soak the rice for 30 minutes then drain.
    2. Sauté onion and whole spices in butter, then add the ginger and chicken along with seasoning. Cook for 20 minutes or until chicken is no longer pink and all juices run clear.
    3. Then add carrots, green peas and potatoes cook 5-7 minutes or until vegetables crisp-tender then add chicken broth and bring it to boil. Then add rice cover the pot and let it simmer on medium low flame or until the rice is tender and the liquid has been absorbed. This takes roughly 10 minutes.
    4. Now give a dum for a further 15 minutes. Fluff the rice and dish it out.

    But here are my tips for how to make the best Pulao every time!

    • Soaking Rice or not: Soaking white rice for about half an hour before cooking allows moisture to get to the middle of the kernel. During cooking, the heat transfers quicker to the middle and the rice will be done in about eight minutes, causing less damage to the outside of the kernel. Thus, it’s more evenly cooked, and easier to separate than the non-soaked rice.
    • Right liquid to rice ratio – 1 1/2 Cups of liquid to 1 cup of rice will yield perfectly cooked fluffy rice. Adding too much liquid to cook rice always results in a mushy and sticky pulao
    • Do not peek while rice is cooking! Escaped heat compromises the cooking of the rice;
    • Rest undisturbed – this is the most important step for cooking rice. This is when the rice finishes cooking and becomes fluffy!

    What To Serve With Mix Vegetable Chicken Pulao?

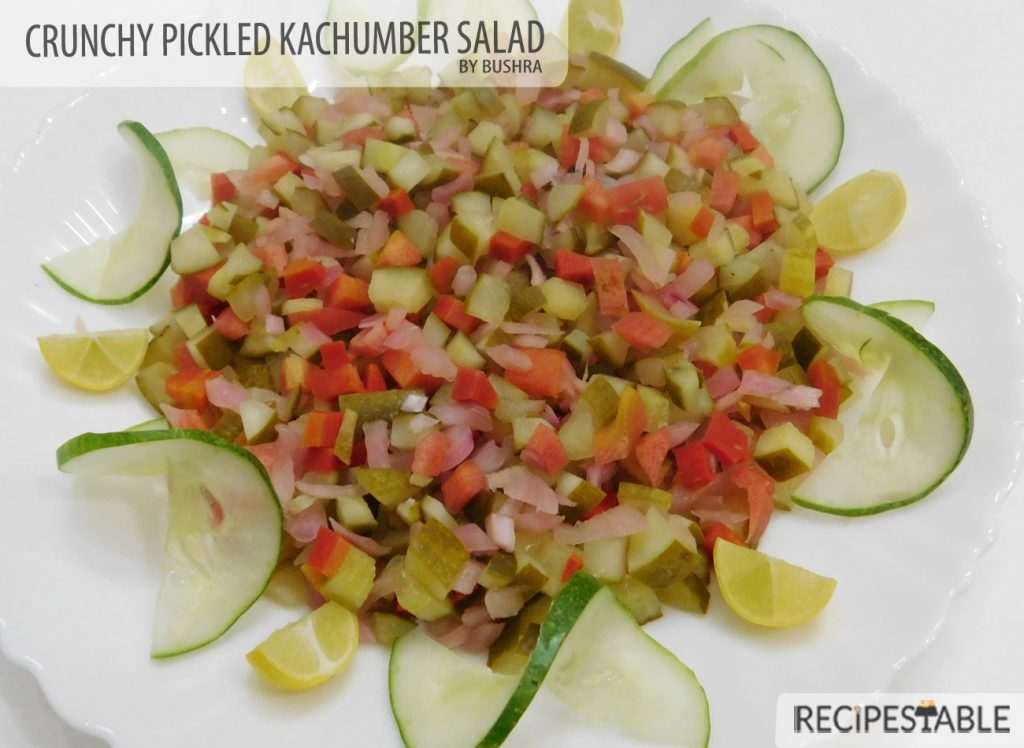
    This is home-style, hearty chicken pulao with delicious flavors full of spices and aroma. I suggest, serve it hot right after dum (steaming) with zeera raita, or mint raita and kachumber salad for best taste. It would also go really well with my Chicken Shorba– a mild flavored desi style chicken stew with a great combination of Oriental spices. 

    The Flavorful Mix Vegetable Chicken Pulao Recipe
    The Flavorful Mix Vegetable Chicken Pulao Recipe

    Bismillah let’s get started.
    Check it out The Flavorful Mix Vegetable Chicken Pulao Recipe and printable version here!!

    The Flavorful Mix Vegetable Chicken Pulao Recipe

    Nothing like a good plate of aromatic pulao! This Flavorful Mix Vegetable Chicken Pulao hits all the right spots with its wonderful aroma and exotic flavors! Spice up your week with this flavorful Pulao!
    Keyword Chicken, Chicken Pulao, Dinner, Iftar Recipes, Pulao, Quick and Easy, Ramadan, Rice, vegetables, Veggie Pulao
    Prep Time 20 minutes
    Cook Time 40 minutes
    Total Time 1 hour
    Servings 4
    Author Bushra Waheed

    Ingredients

    • 2 pounds Boneless Chicken
    • 3 cups long gran rice basmati rice
    • 1/2 cup clarified butter/ desi ghee or oil
    • 1 onion thinly sliced
    • 4 inch Ginger piece thinly sliced
    • 4 carrots peeled and cubed
    • 3 potatoes peel and cubed
    • 2 cups Green Peas
    • 2 green onions thinly sliced( only green part)
    • 4 Green Chilies thinly sliced
    • 1 large Cinnamon Stick daarcheeni
    • 2 Black Cardamom bari elachi
    • 5-6 Cloves (loong)
    • 2 Bay Leaves tezpaat
    • 1 tsp Cumin Seeds (zeera)
    • 1 tsp nutmeg and mace powder
    • 1/2 tsp Black Peppercorns (kali mirch)
    • 2 tsp Red Chili Flakes
    • 1 tsp all spice powder garam Masala powder
    • 2 tsp salt or according to your taste
    • 6 cups Chicken Broth Yakhni

    Instructions

    • Rinse the basmati rice till the water becomes clear. Then soak it in water for 20 minutes. After soaking, drain the rice and keep it ready.
    • Take a heavy bottom skillet or pot and melt clarified butter in it.
    • Add the onions and sauté until they are a deep golden brown. This can take up to 5-7 minutes over a low heat. You will need to check and stir a couple of times. Don’t be tempted to rush this stage because this adds a lot of flavor to the finished dish.
    • Add the cumin seeds, cinnamon stick, black cardamom, black peppercorns and cloves. Sauté for 2 minutes or until popping and fragrant.
    • Now add the ginger slices and Chicken, cook for 15-20 minutes or till chicken turns golden brown before adding the vegetables.
    • Now add Carrot, Potatoes and green Peas. Sauté and cook for 10 minutes or until vegetables are just tender-crisp.
    • Season with salt, red pepper flakes and some garam masala.
    • Next, add green chilies and sauté for a second and adjust the seasoning and add more salt if needed.
    • Add Chicken Stock and once the it starts boiling add the soaked basmati rice and mix it gently.
    • Now, wait for it to boil again, then cover and simmer on medium low flame or until the rice is tender and the liquid has been absorbed. This takes roughly 10 minutes.
    • Put the pot covered (give a dum) for a further 15 minutes.
    • Now, uncover the pot sprinkle green onion (only green part)and fluff the rice gently from the corners
    • Remove from the heat and dish it out.
    • Enjoy flavorful Mix Vegetable Chicken Pulao!!

    I can’t wait to hear what you think of this Mix Vegetable Chicken pulao. If you’ve tried both my chicken biryani and my chicken pulao you really have to let me know what you think!

    Want more Pulao Inspiration? 

    Here are some of the other Pulao Recipes that I love to make for my weekday meals.

    Pin it For Later:

    Like this recipe? Pin it to your favorite Pinterest board now so you will remember to make it later!

    HUNGRY FOR MORE? Subscribe to my newsletter and follow along on FacebookPinterest and Instagram for all of the latest updates.

  • Very Veggie Box Patties Recipe

    Very Veggie Box Patties Recipe

    Very Veggie Box patties, the name itself rings in your ear, doesn’t it?
    You must be wondering is it a box or a patty 😉

    The unique and interesting name is because of the way the these patties are folded and made, like wrapping a box. A savory veggie filling is put inside samosa wrappers and then deep fried.

    Very Veggie Box Patties Recipe

    So what exactly are Very Veggie Box Patties? 

    If you are not familiar with box Patties, they are a deep-fried Pakistani pastry snack usually filled with something savory. They are called box patties because their shape resembles a square box which is made by overlapping two samosa wrapper sheets. They are loved all throughout the year but they become almost a staple in every household during Ramadan on the Iftar tables.

    Very Veggie Box Patties Recipe ~ Ramadan snack doesn’t get better than this!

    Ingredients in This Very Veggie Box Patties?

    Not only are these simple to make (they require nothing more than few veggies, seasoning and samosa sheets), but the stuffing possibilities are endless!

    1. Veggies: I used carrots, green peas, sweet corn, capsicum, boiled potatoes, cabbage.
    2. Olives: Green and Black Olives
    3. Seasoning: Black pepper, red Pepper flakes, salt
    4. Sauce: red chili Sauce and soy sauce
    That’s all you need to make this Very Veggie Box Patties ! Surprisingly simple ?

    How to Make this Veggie Box Patties:

    This Very Veggie Box Patties recipe is so easy to make and simple that definitely it’s worth trying.

    1. Prepare the Filling: I start off with sautéing veggies to which I add boiled green peas, potatoes, carrot, capsicum, cabbage and sweet corn and olives. Then season it with salt, black pepper, red chili flakes, soy sauce and for an extra kick red chili sauce . 

    2. Prepare the Box Patties: Then put two samosa sheets in a cross pattern, one over the other so they make a + (plus) sign. Then put some veggie filling in the middle. Fold each of the edges one by one over each creating a parcel.
    3. Frying: Then deep fry on medium flame till crispy and golden. You can fry these in advance and keep them in the oven on warm mode and serve when required.

    Very Veggie Box Patties Recipe

    Can I play around with the filling?

    Yes, you can! In this recipe, I have used vegetables carrot, cabbage, capsicum, corn and olives. Some options that I suggest are:

    • For a meaty version use chicken or beef instead of veggies or use shredded cottage cheese (paneer) instead of meat for a vegetarian option. Just make sure that the protein in the filling is cooked through. As the box patties are only fried for a few minutes, I wouldn’t suggest to put raw meat.
    • Skip the vegetables, or add more vegetables. Such as French beans carrots, black olives, green chilies, mushrooms or broccoli. 
    • If you are using large vegetables like broccoli or carrots, make sure they are finely chopped. Pulsing them in the processor for a few seconds will work.
    • Add some taco seasoning for a Mexican twist or experiment with other spice blends. 😛
    • To give a different taste to the patties box, you can also add pizza seasoning or Oregano and Chili Flakes to the vegetable stuffing.
    Very Veggie Box Patties Recipe
    Very Veggie Box Patties Recipe

    Other variations to this Very Veggie Box Patties?

    • Healthy Alternative: These square shaped patties are filled with a flavorful veggie filling. The chewiness of the veggie stuffing and the crunchiness of the covering, is a delicious combination. There are two options, baking or frying. If you do not like oil, you can bake it in pre-heated oven for 15 minutes or until crispy and golden brown. Deep frying obviously gives best results but they can also be baked or air-fried.
    • Wrappers: If you do not get samosa sheets , then cut the spring roll sheets into strips. The trimmings you can fry and keep them to garnish your soups or salads.
    • Extra Crispness: For extra crispiness, roll them with Bread Crumbs before frying.
    Very Veggie Box Patties Recipe
    Very Veggie Box Patties Recipe

    Can I freeze them? 

    Definitely!

    1. Grease a tray (can be plastic or a baking tray) and lay out the box patties one by one on it, making sure there is space between each one of them.
    2. Keep them in the freezer for an hour or so till they are partially frozen. Once they are frozen, carefully remove them from the tray and place them in a plastic box or  zip lock bags.
    3. To make the box patties, just take them out of the freezer, thawed and deep fry on medium heat until crispy and golden brown. 
    4. This recipe actually makes a large batch that can be easily frozen and is just the thing to have on hand for impromptu guests or if you are in the mood for a light snack to enjoy with your evening tea.

    Bismillah let’s get started.
    Check it out Very Veggie Box Patties Recipe and printable version here!!

    Want more Tea Time Snack Inspiration? 

    Here are some other Snack recipes on my blog:

    Hope that you all enjoy this one as much as we have!  Cheers!

    Pin it for Later:

    Very Veggie Box Patties Recipe

    What are your favorite Tea Time Snacks? Leave me a comment below to inspire my next snack recipe!

  • Crunchy Pickled Kachumber Salad Recipe

    Crunchy Pickled Kachumber Salad Recipe

    Looking for something more adventurous than your usual Kachumber salad? Try this tasty Crunchy Pickled Kachumber Salad, a crunchy, squeaky pickle salad that would be amazing alongside a super fatty main dish, like this Chicken Biryani. But don’t worry, it’s not one briny mouthful, there are a lot of different textures going on between the crisp onions, crunchy pickles, red cabbage and juicy carrots.

    Crunchy Pickled Kachumber Salad Recipe
    Photo: Crunchy Pickled Kachumber Salad Recipe

    I like to experiment with creating no-cook dishes that can be easily thrown together at the last minute. I especially enjoy playing with the salads I’ve learned and putting a new spin on them, using whatever ingredients I have on hand to create something entirely new.

    This salad happened during one of my kitchen experiments. Things I really love in spring: 

    1. Super crisp, crunchy salads
    2. Juicy Colorful Veggies

    So clearly it make sense to combine these two faves into one, right?

    Crunchy Pickled Kachumber Salad

    I started with a simple family recipe for a Kachumbar salad. But for a change, I used the homemade pickled Cucumber, onion and baby carrots, vinegar, salt for this recipe. then tweaked the dressing and added some stuff I found in the fridge—red radishes and half a red cabbage. The result is a delightfully flavorful salad—cold, crunchy, pickled and easy to throw together at a moment’s notice. I call it my Crunchy Pickled Kachumber Salad.

    Crunchy Pickled Kachumber Salad Recipe
    Phot: Crunchy Pickled Kachumber Salad Recipe

    Some Useful Tips

    • If you like pickle vegetables, you’re going to love this salad. You can use store bought pickles or make your own by following my recipe.
    • Usually, we tend to favor pickles that are bright with acid and low on sugar; anything labeled “half-sour” usually fits the bill. If using sweeter pickles, add a bit more vinegar and black salt. And honestly, you can use whatever pickles you want in this recipe.
    • Organic cucumbers are smaller and thinner than non organic cucumbers.  They are smaller and slightly sweeter than the non-organic variety, and they have less seeds. Organic cucumbers are great for snacking. They have a wonderful mineral flavor to them. Unfortunately some grocery stores only carry Organic cucumbers seasonally, and some don’t carry them at all.
    • If you can’t find them, substitute Non-organic cucumbers—those are the long thin ones wrapped tightly in plastic. Avoid using regular fat cucumbers, as they are coated with wax and prone to bitterness.

    This is my favourite salad to serve with my Restaurant Style Lahori Mutton Karahi recipe. It just works so well with Tawa fish and the sweetness of the Apricot Chutney. I highly recommend serving this up with some extra Cucumber on the side. 

    Bismillah let’s get started. 

    Check it out Hot and Sour Noodles Recipe and printable version here!!

    Want more Salad Inspiration? 

    Here are some other salad recipes on my blog:

    Put your own spin on it. And lemme know how it turns out and do take a few seconds to rate it! I would love to see your recreations so tag me on instagram @recipestable or Facebook (Recipestable) or on Twitter so I can see how lovely yours turn out.

  • Restaurant Style Tawa Fish Recipe

    Restaurant Style Tawa Fish Recipe

    This Restaurant Style Tawa Fish is a thing of beauty, with its crispy golden crust and spicy, juicy flesh inside. It’s a super quick and can be ready in less than 20 minutes and tastes just like the restaurant’s you would think it’s  take-out. Recreate your favorite Tawa Fish cheaper and better at home!

    Restaurant Style Tawa Fish

    One of the things I find so much fun about food blogging as a living is putting myself up to the challenge of recreating restaurant favorites at home. Although often involving a series of trial and error, it’s very rewarding to come up with a homemade version that’s pretty close to, if not better, than the original.

    Restaurant Style Tawa Fish

    The way I cook this Tawa Fish is a little unorthodox – but it’s a highly effective, no fail method! A blast of heat in a griddle pan and a basting of mustard oil and fish own juices does wonders for plain fish.

    This Restaurant Style Tawa Fish is made with a basic combination of rice flour and desi seasonings. Don’t be fooled by the simplicity of this dish. The fish fries up crispy and delicious. The cooking time is so short that the smell — which, if your fish is fresh and not funky, should not be overpowering — will dissipate quickly. And in the meantime, you have an easy dinner of spicy fish with a toothsome crust, anointed with rice flour and spices, mustard oil , perfumed with fresh Lemon wedges, paired with apricot chutney and naan.

    Restaurant Style Tawa Fish

    Rohu and Catla (Thela) Fish are two excellent choices for Tawa Fish, but baam, cod, or any other mild white fish should work fine. You can use any fish but my preference is rohu, skin on or off, as long as it is not too thick. Be careful not to overcook thin fillets.
    If the fish starts browning too fast, reduce the heat and add a splash of mustard oil to prevent scorching, or squeeze in the juice of half a lemon.

    How to cook Perfect Tawa Fish every time!

    1. Use a heavy duty Griddle (Tawa) – it DOES NOT need to be a non stick griddle or pan! Contrary to popular belief, it’s not just about using a non stick pan. A thin, cheap non stick pan will cause the fish to be in closer and harsher contact with the stove, causing the fish to brown unevenly in the few minutes it’s on the stove. Some crispy patches, some not so crispy ones.
    Use a heavy duty Griddle (Tawa), like a cast iron pan or a good quality, heavy non stick frying pan. I love my Griddle Pan, it heats better, and more evenly, which really helps to get an even, golden, crispy crust.

    2. Heat the pan first before adding the oil – I have NEVER had problems with fish sticking to the pan since I adopted this technique. It’s just an easy way to ensure the oil is hot enough but not too hot (a common mistake people make).
    To do this, just heat a dry pan, and as soon as you see small wisps of smoke, add oil, swirl to coat base, then immediately add the fish.

    3. If it sticks a bit, do not move until it naturally releases – Most fish fillets will initially stick to the pan as they start to cook (unless you’re using so much oil you’re basically shallow frying them). But it naturally releases once the surface is cooked and golden.
    So give it a nudge, and if it doesn’t want to move, then it means that it’s not ready. So just leave it and try again in another 15 seconds or so!

    4. Pat fish dry – Dry fish = crispier surface. Especially important for thawed frozen fish.

    5. Keep Basting with a little oil and its own juices –  it will gives nice juicy flavor.

    Packed generously with a crunchy coating but there is so much more to it than what meets the eye! The flavor beneath the crunchy golden layer is delicious because of the magical spice that hits you with the first bite!! This is one fish that everyone is sure to love. Using this Restaurant Style Tawa Fish recipe, you’ll get perfectly flavored tawa fish.

    Restaurant Style Tawa Fish Recipe
    Restaurant Style Tawa Fish

    That’s one last picture before you go. So that you can get a close, hard look at this Restaurant Style Tawa Fish and get tempted. Oh so so tempted.

    Restaurant Style Tawa Fish
    Restaurant Style Tawa Fish Recipe

    Sauces or Chutney For Tawa Fish

    With well seasoned crispy golden texture outside and spicy juicy flesh inside, I don’t need anything more than a squeeze of fresh lemon. But I am a sauce person, so I never turn down a sauce even for fish! Here are my few favorite Sauces for Tawa Fish:

    • Apricot Chutney (Khubani Ki Chutney) for Tawa Fish – this is an absolute ripper. Totally restaurant worthy, few ingredients, the secret is to soak apricots before preparing the chutney.
    • Mint Tamarind Chutney for fish – a shop stopper kind of chutney with its tangy Minty flavor – made with fresh mint leaves and tamarind pulp.
    • Imli ki Chutney – traditionally thought of for fried fish but equally good with the Tawa Fish.
    • Data Chutney / Khajoor ki Chutney – This smooth chutney, which balances the tartness of vinegar with the sweetness of dates, is a delicious accompaniment to the Tawa Fish & Naan.
    • Brown Chutney – for Fish Mellow down the spice of fish by adding a little brown chutney.
    • Lemon Chutney  for Fish. Lip-smacking chutney to add more zesty flavor to Tawa Fish. It’s finger licking good!

    This Restaurant Style Tawa Fish recipe is ‘sea’riously worth trying , it’s cheaper to make at home and tastes so much better!

    If I may, ahem, say so myself, I’ve had quite a few successes with copycatting recipes. Here are a few of my favorites if you’d like to check them out:

    English Style Fish & Chips Recipe
    Fish Tikka Boti Recipe
    Tangy Pan Fried Fish Recipe
    Fish Steak Recipe
    Crumb Fried Fish Recipe
    Sweet and Sour Fish Recipe


    In the mood for more Pakistani food? Forget takeout and make your very own “combo plate” with Restaurant Style Lahori Mutton Karahi, Mutton Nihari Spicy Mutton Pulao , Angara Qeema.

    Put your own spin on it. And lemme know how it turns out and do take a few seconds to rate it! I would love to see your recreations so tag me on instagram @recipestable or Facebook (Recipestable) or on Twitter so I can see how lovely yours turn out.

  • The Flavorful Mint Chicken Curry Recipe

    The Flavorful Mint Chicken Curry Recipe

    Spice up your next dinner party with this Flavorful Mint Chicken Curry. Simple, Mild yet Flavorful Chicken curry with fresh mint and yogurt to shake up your weeknights! This Flavorful Mint Chicken Curry Recipe is ultra-easy to whip up on a weeknight, and completely customizable with your favorite seasonings. A nice change from the usual red curries, perfect with naan or rice.

    Flavorful Mint Chicken curry recipe
    The Flavorful Mint Chicken curry Recipe

    Truth be told – the curry and rice thing is probably my favorite type of food. Coriander, Basil, & Mint Leaves are hands down my favorite herbs of all time. If I could have the herb garden of my dreams, I would plant Mint and Basil everywhere!!

    While most of the Pakistani dishes that I cook require coriander as garnish, for this dish, the mint herb paste forms the backbone of the sauce. The combination of fresh coriander and mint makes the dish light and fragrant and gently simmering the chicken in the creamy yogurt ensures that you end up with juicy morsels of meat. 
    Please make sure that you use the tender , young leaves of Mint in this dish – the harder, older leaves will most probably end up making the dish taste bitter.

    The Flavorful Mint Chicken curry Recipe
    The Flavorful Mint Chicken curry Recipe

    This chicken curry bursts with flavors of mint and creamy yogurt and is bound to make you and your guests happy. The spice level of this dish will vary depending on your taste. I used just 2 green chilies and a pinch of cayenne pepper in this curry to make a mild, family-friendly dish. For more heat,  you can add a drizzle of red pepper, some of the seeds of the jalapeño, or some crushed green chilies.

    This is a quick and simple recipe to prepare using ingredients that I always have on hand. Less is more – focus on the true tastes by using fewer ingredients. Flavorful and very easy to prepare, this recipes will make your weeknight dinners stress-free . Do try it!

    Bismillah let’s get started. 
    First, You will need some boneless chicken. I prefer the breast because you get some super fine chunks out of it. But you can make both curries with bone-in pieces or boneless pieces of chicken. Obviously, boneless chicken will cook faster, and is my choice when I want to cook a quick curry. BUT, a GOOD chicken curry uses bone-in chicken pieces because the bones flavor the gravy/sauce.

    In a blender, pour 1/2 cup of yogurt yogurt, 1 small bunch of mint leaves, coriander leaves, green pepper, garlic ginger paste, cumin powder, a pinch of cayenne pepper, salt and squeezed lemon. Blend until well combined and put in the chicken; Cover and let it marinate for 30 minutes to blend flavors.

    You can marinade the chicken for a few hours or even overnight. If you really are in a rush, you can even cook the chicken straight away.

    The Flavorful Mint Chicken curry Recipe
    The Flavorful Mint Chicken curry Recipe

    Heat the oil over medium-low heat in a large nonstick pan.

    The Flavorful Mint Chicken curry  Recipe
    The Flavorful Mint Chicken curry Recipe

    Then add the marinated chicken along with the marination. Cook and stir for 10 minutes on medium flame. Then cover and let it simmer for 10-15 minutes or until chicken becomes soft .

    The Flavorful Mint Chicken curry Recipe

    Remove the lid and cook on high flame for just few minutes or until sauce is thickened or all water dries up. ( Make sure to not over cook it will ruined the mint taste).

    The Flavorful Mint Chicken Curry  Recipe
    The Flavorful Mint Chicken curry Recipe

    Taste and adjust seasoning with more lemon, green chili or pepper, if necessary. This Flaovrful Mint Chicken Curry is delicious with anything. We ate it with boiled rice but it is just as good with really soft naan bread.

    The Flavorful Mint Chicken curry Recipe
    The Flavorful Mint Chicken curry Recipe

    Check it out The Flavorful Mint Chicken curry Recipe and printable version here!!

    Consider serving this with:

    More Chicken Curry inspiration:

    Put your own spin on it. And lemme know how it turns out. Post a photo on Facebook (Recipestable) or Instagram on Twitter  with hashtag #Recipestable so I can see how lovely yours turn out.

  • Finger Lickin’ Butter Chicken Pasta Recipe

    Finger Lickin’ Butter Chicken Pasta Recipe

    How much do you love Butter Chicken (Murgh Makhani)? A lot, right? Then why not turn your favorite food into a magical new dish with this clever idea? Yes, Take the classic Pakistani favorite Butter Chicken (Murgh Makhani), and pair it with delicious pasta to create this ultimate weeknight meal. Sprinkle some extra chilies to add a kick and treat your family to a lip-smacking dinner that will be ready in just under 30 minutes. It is SUPER delicious, rich, creamy and addictive and is very easy to make.

    Finger Lickin Butter Chicken Pasta recipe

    BUTTER CHICKEN PASTA

    Finger Lickin Butter Chicken Pasta

    Here’s the truth. I have no idea how I came up with this recipe. A lazy saturday night lead to me cook up a quick, yet comforting, dinner where I had to use what I had on hand. I found some leftover butter chicken in my fridge and  I came up with this dish on the spur of the moment.

    butter chicken

    Butter Chicken

    I love creating recipes with what’s on hand, so I decided to use the noodles as a ‘pasta’ base, and create this Pakistani inspired spicy, creamy Butter Chicken Pasta with the remaining ingredients to go along. With a few twists, out came a perfectly balanced and super satisfying Pakistani Italian fusion that worked in every way, and came together in under 30 minutes

    butter chicken pasta2

    butter chicken pasta2

    Pasta tossed in creamy butter chicken or Murgh Makhani. The pasta noodles soaks up all the creamy buttery sauce from the butter chicken. It was a purely experimental and turned out to be one of the best pasta dishes I ever had.

    Butter Chicken Pasta

    Spicy, Rich, Buttery and creamy Butter Chicken Pasta

    If you’re looking for a way to switch up your meal-prep routine then this is a great way to do so. This Finger lickin Butter chicken pasta recipe is a yummy Italian Pakistani combo that you should try out. This one pot tasty meal will add spice and flavor to your normal dinner routine! Hope you will enjoy 🙂

    Spicy and creamy 30-minute butter chicken Pasta. 

    Bismillah let’s get started. 

    Check it out the finger lickin’ Butter Chicken Pasta recipe and printable version here!!

    Finger Lickin’ Butter Chicken Pasta Recipe

    Take the classic Pakistani favorite Butter Chicken (Murgh Makhani), and pair it with delicious pasta to create this ultimate weeknight meal. It is SUPER delicious, rich, creamy and addictive and is very easy to make. Sprinkle some extra chilies to add a kick and treat your family to a lip-smacking dinner that will be ready in just under 30 minutes.
    Keyword Butter, Chicken, Dinner, Lunch, Murgh Makhani, Noodles, Pasta, Quick and Easy
    Prep Time 5 minutes
    Cook Time 25 minutes
    Total Time 30 minutes
    Servings 4
    Author Bushra Waheed

    Ingredients

    • 2-1/2 cups Butter chicken curry for recipe click here
    • 1 packet (about 200 gm ) noodles or pasta of your choice
    • 2 green chilies thinly sliced ( optional)
    • few Coriander leaves for garnishing
    • red pepper flakes
    • salt to taste

    Instructions

    • Bring a pot of salted water to boil.
    • Add pasta and cook for 7-10 minutes or until al dente.
    • Drain and keep aside.
    • Meanwhiile, prepare butter chicken according to the recipe instructions (for reciep click here).
    • Add pasta to the prepared butter chicken(murgh makhani).
    • Toss to coat evenly.
    • Heat through.
    • Sprinkle red pepper flakes over it.
    • Garnish with green chilies and coriander leaves.
    • Dish it out.
    • Finger Linkin’ Butter Chicken is ready to serve.

    I have also posted Karahi Butter Chicken and Chicken Tikka Masala Macaroni  which are another easiest & tastiest version of making classic dinner at home. Do check it out as well.  It’s finger lickin’ good. You’ll be coming back for more.


    Put your own spin on it. And lemme know how it turns out. Post a photo on Facebook (Recipestable) or Instagram on Twitter so I can see how lovely yours turn out.

  • Fat Free Chicken Karahi Recipe

    Fat Free Chicken Karahi Recipe

    Starting a healthier diet can be easier than you think. But what happens when you start to get bored with the healthy foods you are eating?  Chicken Karahi in a hurry is a winner for everyone in our house. We all get to enjoy some delicious comfort food and I don’t have to spend long in the kitchen to make it. Hurrah! 


    Today I’am going to share a Clean eating Version of Chicken Karahi. It is very delicious and easy to make. A lighter and healthier version of the Pakistani Chicken Karahi, this tomato-based curry is packed with extra fragrant spices and creamy yogurt. Yummilicious treat that will have you wanting to savor every last bite! 
    Clean Eating Chicken Karahi Recipe
    Clean Eating Chicken Karahi
     If you are following a weight loss plan then take your taste buds on an exotic ride with this Fat Free chicken karahi recipe. This delicious Clean Eating Chicken Karahi recipe will keep you satisfied and still help you lose weight. This recipe is low fat, low sodium, and a good source of protein. 

    I have also posted Salmon Fish Fry recipe  which is another easiest & tastiest Clean Eating version of making Fried Fish. Do check it out as well.


    Put your own spin on it. And lemme know how it turns out. Post a photo on Facebook (Recipestable) or on Twitter so I can see how lovely yours turn out.

    Happy Clean Eating!!


  • Potato Egg Pakora Bites Recipe (Family Favorite Snack)

    Potato Egg Pakora Bites Recipe (Family Favorite Snack)

    Happy Ramadan to you all!

    May this month be full of blessings, happiness, and peace for you and your family. As much as we must be eating light, Ramadan is the month when we end up eating most of the greasy stuff. All kind of fried dishes are made in the name of iftar.

    The first word that comes into your mind when you think about an iftari is? Yes its pakora! Pakoras are one snack associated with Iftar here in Pakistan.  Truly, a Pakistani iftar is incomplete without the presence of a mighty pakora. The word pakora is derived from a Sanskrit word “pakvavata” which means small food lump (pakva means cooked and vata means small lump). Pakoras can be made out of anything, from a simple potato, daal mung, spinach, chicken or even cheese.

     Potato Pakora Sandwiches recipe
    Photo: Potato Pakora Sandwiches

    Today, I came up with an amazing idea of making Pakora’s. It’s our family favorite snack. I love these Potato Pakora sandwiches so much. Sinking your teeth into crisp Pakora sandwiches is a sensual pleasure. It has all the textures and flavors one would need in a Pakistani snack.  

    Try this recipe and turn your favorite Pakora’s into bite sized sandwiches, stuffed with eggs (or your favorite stuffing).  It’s a perfect recipe for a quick and easy Iftar Snack. A great new way to make Pakoras!

    To prepare this delicious pakora first egg slice covered in between 2 thin potato slices then dipped in spicy chickpea (besan) batter then deep fried.

    Within every bite of this snack you will enjoy a variety of flavors and textures. Spicy Red pepper flakes and herbs give nice pops of heat and a soft slice of boiled egg in between potato sandwich, and a crispy coating of the chickpea flour. You just need a hot cup of tea or coffee to complement it and turn it into a heavenly delight!

    Potato Pakora Sandwiches Recipe
    Photo: Potato Pakora Sandwiches Recipe

    I think I have talked enough about this mouth-watering Iftar or Rainy Day Snack. I insist you to make it ASAP, If you haven’t tried Potato Pakora sandwiches yet. Once you taste these heavenly, crispy and delish bites, you will know what pleasure I am talking about.
    Try this recipe and give your ordinary Pakora a delicious makeover with this Potato Pakora sandwiches recipe!It’s a perfect snack for get-together’s. And surely will be loved by everyone. Don’t be surprised if it disappears in a flash!

    Let’s learn to make Potato Pakora Sandwiches !!

    Peel hard boiled eggs and cut into slices with egg cutter. Set aside. Now peel potatoes then cut them into thin round slices. Soak in cold water. Meanwhile, Take a large mixing bowl. Add chickpea flour(besan), red chili, cumin seeds, coriander seeds, black pepper and salt and mix well. Add enough water to make a smooth batter, and whisk well to avoid any lumps.

    Now prepare pakora sandwiches, first take an egg slice covered in between two thin slices. Repeat this method with rest of the potato and egg slices. Sprinkle seasoning, chili flakes, garlic powder and a pinch of salt over it. Keep aside.

    Potato Pakora Sandwiches recipe
    Photo: Potato Pakora Sandwiches

    Heat the oil in a deep pan over medium heat. Dip one potato egg sandwich in the batter. Make sure to cover on all sides.

    Potato Pakora Sandwiches recipe
    Photo: Potato Pakora Sandwiches recipe

    Put sandwich in a hot oil and deep-fry on a medium heat till it turns crisp and golden brown in colour from both the sides.

    Photo: Potato Pakora Sandwiches recipe
    fry till they turn crispy and golden from the both sides.

    Remove from the oil and drain on kitchen paper. Transfer into a serving platter.  Sprinkle a pinch of red pepper flakes and fresh herbs. 

    Potato Pakora Sandwiches recipe
    Photo: Potato Pakora Sandwiches

    They pair well with coriander and mint sauce or ketchup and a strong cup of tea. Give your taste buds a treat with this crunchy Potato Pakora sandwiches. Perfect for when you’d like to serve something a little out of the ordinary. This evening tea time snack would rock at your place anytime. 

    Check it out the Potato Pakora Sandwiches recipe and printable version here!!

    I have also posted Sesame Chicken Pakora and Noodles Pakora which are another easiest & tastiest version of making pakora at home. Do check it out as well.  It’s finger lickin’ good. You’ll be coming back for more. 


    Put your own spin on it. And lemme know how ilet turns out. Post a photo on Facebook (Recipestable) or  on Twitter so I can see how lovely yours turn out.


    Happy & Blessed Iftar Making!!

  • Karahi Butter Chicken Recipe (Makhni Karahi)

    Karahi Butter Chicken Recipe (Makhni Karahi)

    Assalam-o-Alaikum, how are you? Yep, it’s been almost a month since we met. First things first…I had my mid-term exams, so I was lil busy with studying and the other stuff in my life.
    However this gap between us wasn’t planned. I was hoping to catch up with you in between, but it didn’t work out.

    My celebration “yay, exam is over!”

    Finally exams are over I’m finally free to do whatever I want (blogging, eating yummy food, spending time with my plants)😌
    Anyways, the first thing I wanted to do was to just pop in here & say a quick hi to you. I hope you roll into the weekend in a joyous mood! May your day be as fantastic as you are!

    Karahi Butter Chicken (Makhni Karahi)

    To release some exams stress, I made this butter karahi by twisting my Father’s recipe…delicious goodness. Can’t wait to share it with you. He used to make the best food. He was an expert on how to make a really good Butter Chicken. Saying that, I’m not too sure how He would feel about this Karahi Butter Chicken version that I’m currently loving.

    Karahi Butter Chicken (Makhni Karahi)
    Karahi Butter Chicken (Makhni Karahi)

    Name me one thing that doesn’t taste better with a few dollops of cream, a knob or so of butter, a splash of milk, lashings of ghee.

    I’ll bet you’re having a hard time thinking up something. It’s a truth of the culinary world that these things all enhance the eating experience of many foods, sweet and savory foods alike and curries are no exception to this.

    Karahi Butter Chicken (Makhni Karahi)
    Karahi Butter Chicken (Makhni Karahi)

    Take this Karahi Butter Chicken ( Makhni Karahi), for example. I’ve taken the traditional Chicken Karahi dish and made it the way we all love, with the very flavours we all adore and then finished it up with a hearty amount of butter. What does this do? This fills every bite with the very same flavours we desire, along with a moreish, rich bite to it. Every bite tastes like a buttery dream, I tell you. This creamy and velvety gravy will melt in your mouth. 

    Karahi Butter Chicken (Makhni Karahi)
    Karahi Butter Chicken (Makhni Karahi)


    Bismillah, let’s begin!

    Check it out the Karahi Butter Chicken (Makhni Karahi) recipe and printable version here!!

     Recipe Note’s

    My final words before I give you the recipe – my Father was an expert at Karahi’s and he always told me what with chicken Karahis, you must work fast. Have all the ingredients chopped up beforehand if you can, and cook the entire thing on high heat. Stirring constantly is imperative, otherwise you risk burning the curry or having it stick to the pan. Skimp on half the oil or butter if  you must, but I wouldn’t recommend it as a Karahi dish isn’t truly a Karahi dish without its butter or oil.


    I have also posted Restaurant Style Lahori Mutton Karahi and Kebab Karahi which are another easiest & tastiest version of making Karahi at home. Do check it out as well.  It’s finger lickin’ good. You’ll be coming back for more. 


    Put your own spin on it. And lemme know how it turns out. Post a photo on Facebook (Recipestable) or  on Twitter so I can see how lovely yours turn out.


    Happy Karahi Making!!

    If you like this post, Please Subscribe to my blog and let me know your feedback by commenting below.. I have lots more recipes to share with you.

  • Chapli Kebab Pizza Recipe (An Italian-Pakistani Twist)

    Chapli Kebab Pizza Recipe (An Italian-Pakistani Twist)

    Give pizza night a new twist by making spicy Chapli Kebab Pizza (Heavenly Double TREAT)!!

    Monday nights are for creativity. Or maybe, you’re like me and just have leftover Chapli Kebab’s wasting away in your fridge. Pinterest gave me the inspiration I needed to take dinner from a boring pizza night to an Italian-Pakistani Twist.

    This Chapli Kebab Pizza is my Pakistanized pizza makeover…..you could say that this is an Pakistani-Italian delight….hey, fusion food is the latest fad.  A delicious and easy to make pizza with crispy, juicy chapli kebab’s and  melty mozzarella cheese!  It is sure to be a hit! 

    Chapli Kebab Pizza (Desi Pizza)

    Photo: Chapli Kebab Pizza

    Chapli Kebab Pizza

    This pizza is so easy to make with left over Chapli Kebab’s with the cheesy topping….nobody could resist. I added dried Italian herbs to the pizza base and that gave a subtle Italian flavor with the Pakistani flavored topping. And just followed my heart to a logical conclusion. I took the shortcut and used the Chili Garlic sauce in place of pizza sauce and lessen cheese to keep it healthy and low fat( you can add more cheese). Well… I needn’t explain what the result was. The recipe finding its place in this blog itself says it all….. Right???

    chapli-kebab-pizza3

    So why go to pizza hut…when you can make healthy homemade ones?? This pizza was a huge hit with my family try it…you will love me more, honestly 🙂 

    Chapli Kebab Pizza recipe

    Photo: Chapli Kebab Pizza

    Bismillah, Let’s get started!

    Check it out the Chapli Kebab Pizza recipe and printable version below.

     Recipe Note’s:

    I am a firm believer that every oven is different and you should check on your food periodically to make sure it is cooking properly.


    Put your own spin on it. And lemme know how it turns out by sharing a picture  on Instagram, Facebook (Recipestable) or Twitter with this hashtag #Recipestable so I can see how lovely yours turn out.


    Happy Baking!!

    If you like this post, Please Subscribe to my blog and let me know your feedback by commenting below.. I have lots more recipes to share with you.

  • Pakistan Independence Day Cake Recipe

    Pakistan Independence Day Cake Recipe

    Happy Independence Day, Pakistan!

    Pakistan Independence Day Cake

    As the whole Pakistan is celebrating Independence Day today, desserts and sweets are must in your cooking list. But what if you are planning to make a Pakistan Independence Day Cake with green topping and White layers to celebrate the national event.

    Pakistan Independence Day Cake
    Pakistan Independence Day Cake

    Here’s a recipe for Pakistan Independence Day Cake!

    LONG LIVE PAKISTAN

  • How to: Make Karela Gosht (Meat Curry with Bitter Gourd)

    How to: Make Karela Gosht (Meat Curry with Bitter Gourd)

    Bitter Gourd (Karela)

    Bitter gourd, aka Karela In Urdu, is relished for its benefits and despised for its bitter taste – not many people like this veggie, but I die for it.

    Benefits of Bitter Gourd (Karela)

    Here are some Benefits of Mr. Bitter Gourd (Aka karela)

    Bitter gourds have many nutritional and health benefits and one of them is they are good for diabetes. It is an excellent source of vitamins B1, B2, and B3, C, magnesium, folate, zinc, phosphorus, manganese, and has high dietary fiber. It is rich in iron, contains twice the beta-carotene of broccoli, twice the calcium of spinach, and twice the potassium of a banana.

    As my Chronic illness  forces me to transform eating habits, I’ m always on the hunt for natural antioxidants ingredients and Bitter Gourd (Karela) is one of them. I try to eat bitter gourd at least twice in a month because of its antioxidant benefits. It is very good for you, specially if you are diabetic. This reduces your blood sugar level a lot than you can imagine..So try to include it in your everyday diet.

    Bitter Gourd aka 'Karela'
    Bitter Gourd aka ‘Karela’

    The people who have never had bitter gourd, I still know what you all must be thinking.

    Doesn’t it taste bitter??

    How can one eat it??

    Actually it is very much edible and likable.  Truth is that there are numerous ways in which Bitter gourd is prepared in Pakistan. It can be stuffed with tasty spice mix, it tastes delicious when deep fried with mince stuffing( Bharwan Karela ), it can be used to make a dry curry and my mommy makes amazing curry of bitter gourd (Karela Gosht) which doesn’t taste bitter at all. It just depends how it is prepared. So at times it depends on which ingredients and technique you use and also on individual preferences.

    Karela Gosht (Meat with Bitter Gourd)

    Karela Gosht (Bitter gourd cooked with meat) is a traditional Pakistani dish. Yet, there are many Pakistani’s who flee from the very name of Karela. 😛 

    Today, I am presenting one of the tried recipes that gained appreciation among random people. Signature style of using minimum ingredients to make a mouth-watering dish is again used. I am using mutton meat in this recipe, but if you like you can use beef or chicken too. 

    How to make Karela Gosht
    Photo: ‘Karela Gosht'{Bitter Gourd Cooked with Meat and Saute Onion}

    In my home, everyone loves bitter gourd and its diverse dishes. It tastes savory, tangy, wonderfully spicy and slightly bitter at the same time. Karela Gosht is my all time favourite. As I mention above,  I make them quite often and each time they turn out great.(Alhumdulillah)!

    How to make Karela Gosht
    Photo: Karela Gosht with Chapati

    It tastes great with roti / hot chapati or with tandoori roti along with zeera raita. 

    How to make Karela Gosht
    Photo: Karela Gosht

    How to make Karela Gosht

    Learn how to make easy and simple Karela Gosht by following the step by step instructions as shown in  pictures. The recipe is simple and very easy to follow. You would successfully cook it in first attempt. (InshaAllah)

    Bismillah Let’s Begin!

    Ingredients you will need:

    • 1 kg bitter gourd/ karela (peeled, cleaned and sliced)
    • 1 teaspoon salt, for sprinkling
    • 750 gm mutton or lamb meat
    • 1/2 cup cooking oil
    • 4 medium onion, thinly sliced, (divided into two parts)
    • 3 medium tomatoes, thinly sliced
    • 1 inch piece of ginger, thinly sliced
    • 1 garlic bulb, peeled & minced
    • 4 green chilies
    • 2 teaspoon red chili powder
    • 1 teaspoon cumin powder
    • 1 teaspoon coriander powder
    • 1/2 teaspoon turmeric powder
    • 1 teaspoon garam masala powder (all spice powder)
    • salt to taste
    • 4 cups water for meat tenderness
    Step 1:

    First wash bitter gourds thoroughly in cold running water. Now Scrape the outer peel of the bitter melon with a sharp peeler or paring knife to remove a thin layer of peel.

    karela gosht step 1
    Peel or Scrape skin of bitter gourd (Karela)

    Step: 2

    Cut the bitter gourd in half length-wise. Slit from one side to remove seeds and fibrous core using a teaspoon or a paring knife.  

    karela gosht recipe step 2
    Cut the bitter gourd and remove the seeds.

    Step 3:

    Sprinkle 1 teaspoon salt over the peeled bitter gourds, toss together to mix evenly and keep it in sunlight for an hour, it will help to reduce its bitterness.

    karela gosht recipe step3
    Sprinkle Salt and keep it in sunlight

    Step 4: 

    After one hour, You would see salt and sunlight is doing its magic and bitter gourd has started perspirating. Now rinse thoroughly with tap water and keep aside for 10 minutes in a strainer to dry access water.

    karela gosht recipe step 4
    Rinse thoroughly with tap water

    Step 5: 

    Now take the bitter gourd and squeeze it in your hands, the juices will come out and try to remove as much bitter juice out of it as possible. Squeeze and  Squeeze…. don’t give up!!!

    karela gosht recipe step 5
    Squeeze and Squeeze…. don’t give up!!!

    Step 6:

    Cut the bitter gourd into cubes, thin slices, rings or lengthwise. (any desired shape or sizes).

    karela gosht recipe step 6
    Cut into your desired shape

    Step 7: 

    Heat some oil and fry the bitter gourd (in batches) on medium heat for few minutes or until golden brown. Remove from the oil, drain and set aside.

    karela gosht recipe step 7
    Fry Bitter Gourd

    Step 8: 

    Heat 1/2 cup oil in a large pot over medium heat. Saute onion until transculant. Add garlic and ginger and cook for 30 seconds or  the garlic aroma to hit its peak.

    karela gosht recipe step 8
    Saute Onions and Ginger & Garlic

    Step 9: 

    When onion starts getting golden add meat and cook on high flame until meat change its color and turned brown, continuously stir.

    karela gosht recipe step 9
    Brown the meat

    Step 10:

    Now add chopped tomatoes and spices (turmeric, red chili, coriander, etc).  Stir and cook on low flame until tomatoes soften.

    karela gosht recipe step 10
    Add Tomatoes and Seasoning

    Step 11: 

    Add 4 cups of water. Heat to boiling, covered with a lid and simmer for 1 hour on low flame or until meat become tender and juicy. 

    karela gosht recipe step 11
    Cook Covered on low flame

    Step 12: 

    When meat gets cooked properly at this stage increase the flame and cook on high flame for 5 to 7 minutes or until oil comes on top and meat is tender fully. Now add leftover 2 onions and fried bitter gourd. Stir and cook on medium flame for 10-15 minutes or until onion turned caramelized and oil  separates.

    karela gosht step12
    Add fried bitter gourd and onions

    Step 13 

    Sprinkle garam masala and add green chillies and adjust seasoning to taste.. Its ready to serve. Take it out in a serving dish. Serve hot with Homemade Chapati or Roti.

    karela gosht step13
    Serve with garm garm (hot) chapati… ENJOY!

    Tip to First timers: Tasting is important before the final dish is served so that you can adjust the flavour. ENJOY 🙂 

    Check it out the Karela Gosht (Meat with Bitter Gourd) recipe and printable version below.

    Do try the recipe, and let me know how you find bitter gourd. Also there are many varieties and I will keep posting new recipes of bitter gourd in future. Till then see ya all!!!


    Put your own spin on it. And lemme know how it turns out. Post a photo on Facebook (Recipestable) or  on Twitter so I can see how lovely yours turn out.


    Happy Cooking!!

    If you like this post, Please Subscribe to my blog and let me know your feedback by commenting below.. I have lots more recipes to share with you.

  • Hot and Spicy Kebab Paratha Rolls Recipe

    Hot and Spicy Kebab Paratha Rolls Recipe

    Every day the same question pops up “What to make for Lunch today?” and when the same question is asked on a weekend the response has to be something that’s not the usual and really delicious. 

    What better way to spice up the weekend lunch than with a Kebab Paratha Rolls stuffed with flavorful hot and spicy sauces and bright colorful vegetables pickles.

    Hot and Spicy Kebab Paratha Rolls recipe
    Hot and Spicy Kebab Paratha Rolls recipe

    It’s the age of one pot meal and who says one pot meal has to be a rice dish. It can be bread based dish as well. I believe wraps or rolls loaded with meat, kebabs and veggies also come in the genre of one pot meal and why not, bread gives us starch while veggies help bring a balance diet while meat gives us protein.

    The best thing about it is, that its a wholesome meal and can be prepared with leftover kebab’s too. Its as simple as assembling it all together (if that makes sense). 

    Hot and Spicy Kebab Paratha Rolls recipe
    Hot and Spicy Kebab Paratha Rolls

    Ingredients in Hot and Spicy Kebab Paratha Rolls

    The ingredients you need to make this Hot and Spicy Kebab Paratha Rolls are:

    For Kebabs: meat, onion, ginger, green chilies, fresh coriander, red chili powder, cumin powder, coriander powder, all spices powder, salt, butter for busting
    For Parathas:  whole wheat flour, white flour, Salt, clarified butter, water for kneading and black seeds (optional)
    For Topping & Stuffing: mayo garlic sauce, mint chutney, pickle cucumber, onion, carrot, green chili, few salad leaves, red chili flakes (optional)

    Hot and Spicy Kebab Paratha Rolls recipe
    Hot and Spicy Kebab Paratha Rolls recipe

    How to make Hot and Spicy Kebab Paratha Rollso:

    Hot and Spicy Kebab Paratha Rolls are straight forward to make. Prepared kebabs then make paratha’s and stuff with kebabs, sauce and topping.
    Pretty simple!!

    For this recipe, I’ve prepared the homemade Paratha’s but you can use store bought frozen paratha in case you don’t feel like making your own and keeping it all quick and simple.

    Hot and Spicy Kebab Paratha Rolls recipe
    Hot and Spicy Kebab Paratha Rolls recipe

    You can pack them and stuff your lunch box too making it a totally mess free meal for yourself. As with all wraps, you can use filling of your choice. For me it had to be this kebab paratha rolls, with some garlic sauce, minty yogurt chutney and  colorful pickle that were wrapped in the paratha rolls and gave those hot, zingy and spicy flavors that were sure to tickle those taste buds! 

    Do try this recipe, these Hot and Spicy Kebab Paratha Rolls can become your ultimate comfort and nutritious food.

    Bismillah, Let’s get started!

    Check it out the Hot and Spicy Kebab Paratha Rolls recipe and printable version below.

    Pin it For Later:

    Pin it for Later ~ Hot and Spicy Kebab Paratha Rolls

    I have also posted Shami Kabab Paratha Rolls and Chicken Paratha Rolls which are another easiest & tastiest version of making Paratha Rolls at home. Do check it out as well.  It’s finger lickin’ good. You’ll be coming back for more. 


    Put your own spin on it. And lemme know how it turns out. Post a photo on Facebook (Recipestable) or  on Twitter so I can see how lovely yours turn out.

    Happy Lunch Making!!

    If you like this post, Please Subscribe to my blog and let me know your feedback by commenting below.. I have lots more recipes to share with you.

  • Phirni Recipe (Eid Special Dessert)

    Phirni Recipe (Eid Special Dessert)

    Eid Mubarak to all the readers of my blog. Eid has come and gone, and we are settling down to our routine and trust me it is very difficult after being spoiled by the easy going Ramadan timings. Lots happened during Ramadan even if it is considered to be a slow month. 

    Happy Eid Mubarak
    Happy Eid Mubarak to All my Readers!!

    Eid is a special time in Pakistan: “Festive season, Get together with friends , dinner party, dessert which comes to my mind immediately is ‘Phirni’.” After a heavy main course like Biryani or any spicy curries, phirni is something which cools and soothes you.

    Phirni: Eid Special Dessert
    Phirni: Eid Special Dessert

    Phirni is a wonderful, creamy dessert made with ground rice combined with milk, cream, sugar and some saffron strands for flavoring. Phirni is a kind of Rice Pudding, made with coarsely ground rice. It is similar to what we call “kheer” in Pakistan, but unlike Kheer, it does not use whole grains of rice. The dish is decorated with chopped or ground almonds or pistachio nuts.  The consistency of this pudding varies from thick,- where one has to really scoop out with a spoon, to creamy- where the dessert will gently coat a spoon.

    Phirni, firni: Eid Special Dessert
    Phirni: Eid Special Dessert

    The history of Phirni goes back a very long way; it seems to have originated in ancient Persia or the Middle East; and to have been introduced to Pakistan and India by the Mughul’s. In Indian and Pakistan, phirni is associated with Muslim festivals (like eid, ramadan etc.)

    Traditionally in Pakistan, Phirni is served chilled in earthen pots or small clay plates  called tothie’s. Other than just making it look pretty, the clay pot also absorbs some of the liquid giving it a thicker consistency. It tastes better when the flavors are allowed to mature for 6-7 hours or even  for a day.

    Phirni: Eid Special Dessert
    Phirni: Eid Special Dessert

    The recipe is a keeper and I really urge you to try this. This Phirni recipe is easy and simple steps with the list of all ingredients needed to prepare it.

    Phirni: Rice Pudding with Nuts

    Bismillah, let’s get started!

    Check it out the Phirni recipe and printable version below.

    Pin it:

    Phirni, Firni: Eid Special Dessert Phirni: Eid Special Dessert


    I have also posted Pineapple Phirni which is another easiest & tastiest version of making phirni. Do check it out as well.  It’s finger lickin’ good. You’ll be coming back for more. 


    Put your own spin on it. And lemme know how it turns out. Post a photo on Facebook (Recipestable) or  on Twitter so I can see how lovely yours turn out.


    Happy Eid!!

    If you like this post, Please Subscribe to my blog and let me know your feedback by commenting below.. I have lots more recipes to share with you.

  • The Easiest Chocolate Samosa Recipe

    Samosas are always hit appetizer or snack of tea party and iftar even now it’s included in wedding dinner’s appetizer also.
    Today, I m sharing my Chocolate Samosa recipe with all of you. Crispy samosas with chocolate and walnut is a classic snack for everyone. Try once you will love it for sure

    Bismillah, let’s get started!

    Check it out the Chocolate Samosa recipe and printable version below.

    If you like this post, Please Subscribe to my blog and let me know your feedback by commenting below.. I have lots more recipes to share with you.

  • Spicy Chickpea Salad (Chana Chaat) Recipe

    Spicy Chickpea Salad (Chana Chaat) Recipe

    I think it’s time that I take a quick break from the highly caloric Iftar snacks I’ve been posting about recently, and share a favorite healthy recipe.  This Spicy Chickpea Salad (Chana Chaat) is a traditional Pakistani Iftar Staple.  We love munching on it throughout the year, but it’s especially nice in the summer after a long day of fasting. Known as a salad in the West and a savory snack or “Chaat” in the East. This low-fat dish has traveled a long way from Pakistan to make its way onto Iftar tables in South Asia and lunch/dinner tables across the rest of the world.

    Spicy Chickpea Salad (Chana Chaat)
    Spicy Chickpea Salad (Chana Chaat)

    The acidic and tart flavors of tamarind chutney, the sweetness of the apricot chutney and the cooling taste of mint chutney balances the palette out immaculately. A well made Spicy Chickpea Salad (or Chana Chaat) will enable you to taste all these flavors independently with each spoonful.

    Spicy Chickpea Salad (Chana Chaat) with Tamarind and Apricot Chutney

    Playing around with food textures is also an important part of cooking, and creating this dish gives you that freedom with the crunchy onions, juicy tomatoes and soft chickpeas. Explore the art of South Asian cooking with this simple, low fat yet palette-exciting recipe.

    Spicy Chickpea Salad (Chana Chaat)
    Spicy Chickpea Salad (Chana Chaat)

    Bismillah, let’s get started!

    Check it out the Spicy Chickpea Salad (Chana Chaat) recipe and printable version below.

    I have also posted Garbanzo Beans Chaat Recipe and Lobia Chaat which are another easiest & tastiest version of making Chana Chaat. Do check it out as well.  It’s finger lickin’ good. You’ll be coming back for more. 


    Put your own spin on it. And lemme know how it turns out. Post a photo on Facebook (Recipestable) or  on Twitter so I can see how lovely yours turn out.


    Happy & Productive Ramadan!!

    If you like this post, Please Subscribe to my blog and let me know your feedback by commenting below.. I have lots more recipes to share with you.