Category: Condiments

Looking for recipes for condiments? Find great additions to your meals with condiments like jellies, jams, seasonings, gravies, and more condiments.

  • Crunchy Pickled Kachumber Salad Recipe

    Crunchy Pickled Kachumber Salad Recipe

    Looking for something more adventurous than your usual Kachumber salad? Try this tasty Crunchy Pickled Kachumber Salad, a crunchy, squeaky pickle salad that would be amazing alongside a super fatty main dish, like this Chicken Biryani. But don’t worry, it’s not one briny mouthful, there are a lot of different textures going on between the crisp onions, crunchy pickles, red cabbage and juicy carrots.

    Crunchy Pickled Kachumber Salad Recipe
    Photo: Crunchy Pickled Kachumber Salad Recipe

    I like to experiment with creating no-cook dishes that can be easily thrown together at the last minute. I especially enjoy playing with the salads I’ve learned and putting a new spin on them, using whatever ingredients I have on hand to create something entirely new.

    This salad happened during one of my kitchen experiments. Things I really love in spring: 

    1. Super crisp, crunchy salads
    2. Juicy Colorful Veggies

    So clearly it make sense to combine these two faves into one, right?

    Crunchy Pickled Kachumber Salad

    I started with a simple family recipe for a Kachumbar salad. But for a change, I used the homemade pickled Cucumber, onion and baby carrots, vinegar, salt for this recipe. then tweaked the dressing and added some stuff I found in the fridge—red radishes and half a red cabbage. The result is a delightfully flavorful salad—cold, crunchy, pickled and easy to throw together at a moment’s notice. I call it my Crunchy Pickled Kachumber Salad.
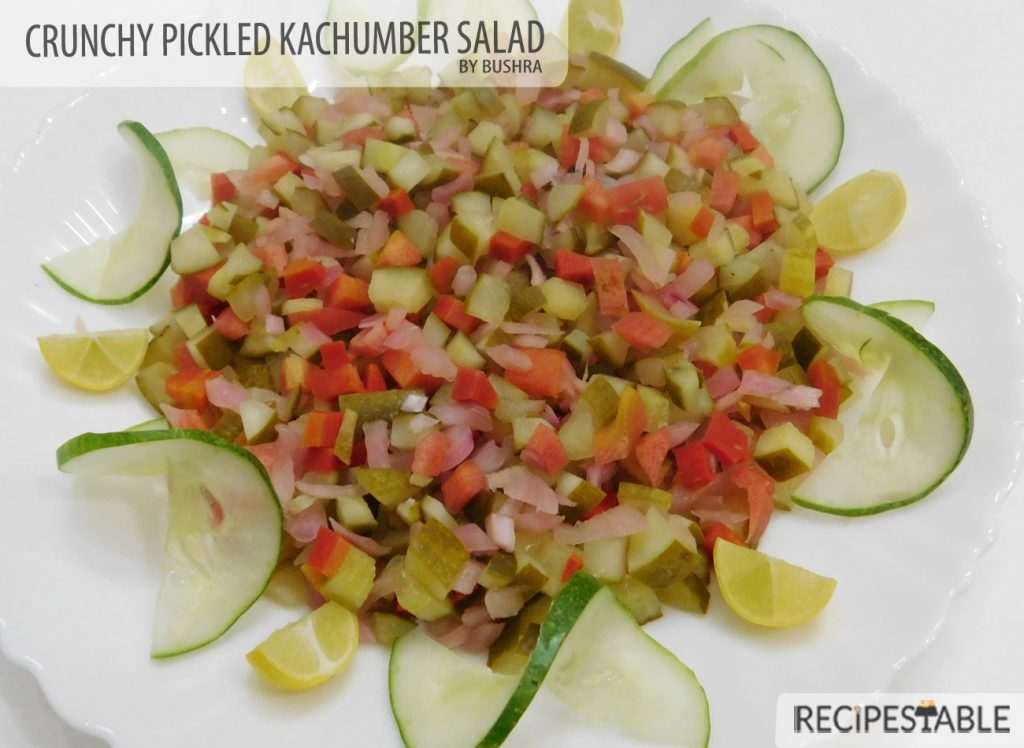
    Crunchy Pickled Kachumber Salad Recipe
    Phot: Crunchy Pickled Kachumber Salad Recipe

    Some Useful Tips

    • If you like pickle vegetables, you’re going to love this salad. You can use store bought pickles or make your own by following my recipe.
    • Usually, we tend to favor pickles that are bright with acid and low on sugar; anything labeled “half-sour” usually fits the bill. If using sweeter pickles, add a bit more vinegar and black salt. And honestly, you can use whatever pickles you want in this recipe.
    • Organic cucumbers are smaller and thinner than non organic cucumbers.  They are smaller and slightly sweeter than the non-organic variety, and they have less seeds. Organic cucumbers are great for snacking. They have a wonderful mineral flavor to them. Unfortunately some grocery stores only carry Organic cucumbers seasonally, and some don’t carry them at all.
    • If you can’t find them, substitute Non-organic cucumbers—those are the long thin ones wrapped tightly in plastic. Avoid using regular fat cucumbers, as they are coated with wax and prone to bitterness.

    This is my favourite salad to serve with my Restaurant Style Lahori Mutton Karahi recipe. It just works so well with Tawa fish and the sweetness of the Apricot Chutney. I highly recommend serving this up with some extra Cucumber on the side. 

    Bismillah let’s get started. 

    Check it out Hot and Sour Noodles Recipe and printable version here!!

    Want more Salad Inspiration? 

    Here are some other salad recipes on my blog:

    Put your own spin on it. And lemme know how it turns out and do take a few seconds to rate it! I would love to see your recreations so tag me on instagram @recipestable or Facebook (Recipestable) or on Twitter so I can see how lovely yours turn out.

  • Easy Spicy Mango Chutney Recipe (Perfect for Summer!)

    Whip up this Easy Spicy Mango Chutney Recipe in no time! This sweet and spicy condiment is the perfect summer companion for grilling, adding a burst of flavor to any dish.

    Spicy Mango Chutney Recipe

    Author Bushra Waheed

    Ingredients

    • 3 large sweet mangoes slightly ripened
    • 1 tsp lemon rind finely chopped
    • 1 tsp lemon juice
    • 4 green chillies
    • 1- inch piece of ginger finely chopped
    • 1 tsp cumin seeds
    • 1/2 tsp fennel seeds
    • 1 tsp coriander seeds
    • 1 tsp mustard seeds
    • A pinch of hing
    • 3 tbsp cooking oil

    Instructions

    • Peel the mango and cut it into small chunks.
    • Heat about 2 tsp oil in a pan and fry the chunks till they turn mushy.
    • Drain, mash well and set aside.
    • Roast the methi, saunf, cumin and coriander seeds and crush coarsely using a mortar and pestle.
    • Set aside and heat the remaining oil and add the hing and mustard.
    • When the mustard crackles, add the ginger and green chillies and fry for about 1-2 minutes.
    • Add the mango, powdered masala, salt to taste, lime rinds and lime juice.
    • Bring to a boil on a low flame.
    • Remove from heat and let it cool to room temperature.
    • Store in an airtight container.
    • If boiled and cooled well, since no water is used in making this dish, it should keep well for more than a week.
    • Store it in airtight containers in the fridge.
    • Enjoy!
  • Beetroot Raita Recipe

    Beetroot Raita

    It’s an awesome Yogurt dip(Raita) especially for Veggie lovers. Beatroot is also a great source of iron so give it to all who are suggested to take iron.Must try this Beetroot Raita Recipe, you’ll like it.

     Beetroot Raita Recipe
    Photo: Beetroot Raita Recipe

    Check it out the  Beetroot Raita Recipe here!!

    [divider]

    [one_fourth]Prep Time:10 minutes[/one_fourth] [one_fourth]Cook Time:15 minutes[/one_fourth] [one_fourth]Servings: 2[/one_fourth] [one_fourth_last]Difficulty Level: Easy[/one_fourth_last]

    [divider]

    [tabs type=”horizontal”] [tabs_head] [tab_title]Ingredients[/tab_title] [tab_title]Nutrition[/tab_title] [/tabs_head] [tab]

    • 1 medium beetroot
    • 1 cup yogurt
    • Salt to taste
    • 1 green chili, chopped finely
    • 1 teaspoon oil
    • 1/4 teaspoon black mustard seeds
    • A few cilantro leaves for garnishing
    • 1/2 teaspoon cumin powder
    • 1 teaspoon sugar

    [/tab] [tab]Yield: 2 servings

    Nutritional information is not yet available. [/tab] [/tabs]

    Directions:
    [tabs type=”horizontal”] [tabs_head] [tab_title]Step by Step Method[/tab_title] [tab_title]Serving Suggestions[/tab_title][/tabs_head] [tab]

    Step 1

    Cook the beetroot either in the microwave or in a pot with water.

    Step 2

    For the microwave, place it in a microwavable-pan of water 1 inch high, prick with fork and cook on high for 6 to 8 minutes until done.

    Step 3

    Peel off the skin.

    Step 4

    Grate the beetroot and put in a serving bowl.

    Step 5

    Add yogurt to it and mix well.

    Step 6

    Add sugar, salt and cumin powder to it and mix.

    Step 7

    Heat the oil in a pan, season it with black mustard seeds and the chopped green chilies.

    Step 8

    When the seeds start to sputter, remove from the stove and add the seasoned oil to the beetroot and yogurt mixture.

    Step 9

    Garnish the beetroot salad with coarsely chopped cilantro leaves. Beetroot Raita is ready to serve.

    [/tab] [tab]

    • Serve with paratha or any curry.

    [/tab] [/tabs]
    If you like Beetroot Raita Recipe and make it then let me know your feedback by commenting below.And if you know more innovative ways in which we can utilize this mouth watering Beetroot Raita, do share with us and we would be glad to give it a try.

  • Cool & Refreshing Tomato Raita Recipe (The Perfect Dip!)

    Tomato Raita

    Tomato Raita is one of the easiest condiment recipes which does not require any cooking and can be made at home by combining chopped tomatoes and yogurt. This tomato raita recipe is a great accompaniment for spicy dishes.Goes great with spicy pilafs or any spicy dishes.

    Tomato Raita recipe
    Photo: Tomato Raita

    Tomato Raita recipe
    Photo: Tomato Raita

    Check it out the Tomato Raita Recipe  here!!

    Prep Time:5 minutes

    Cook Time:not required

    Servings:2

    Difficulty Level: Easy

    Ingredients: 

    • 2 tomatoes
    • 1 cup plain yogurt
    • 1 green chili, chopped
    • Salt to taste
    • few coriander leaves
    • 1/2 teaspoon cumin seeds
    • 1/4 teaspoon chaat masala powder

    Directions:

    Step 1

    Beat yogurt in a mixing bowl.

    Step 2

    Add chopped tomatoes, green chili, salt, cumin seeds, and a pinch of chaat masala.

    Step 3

    Mix well.

    Step 4

    Garnish with fresh coriander leaves.

    Step 5

    Sprinkle remaining chaat masala over it. Tomato raita is ready to serve.

    Recipe Note’s

    • You can add black pepper powder along with or instead of green chili according to your taste.

    Serving Suggestions:

    • Serve with rice or bread immediately or after cooling in the fridge for sometime.

    If you like Tomato Raita Recipe and make it then let me know your feedback by commenting below.And if you know more innovative ways in which we can utilize this mouth watering Tomato Raita, do share with us and we would be glad to give it a try.

  • Healthy & Flavorful Dip: Easy Mint Tamarind Chutney Recipe (Pair it with Everything!)

    Mint Tamarind Chutney

    A sweet and sour Mint Tamarind Chutney recipe . It’s so flavorful on its own, you don’t need very much – Try this Mint Tamarind Chutney Recipe with pakoras, tikka or kebab’s

    Mint Tamarind Chutney Recipe
    Photo: Mint Tamarind Chutney Recipe

    Check it out the Mint Tamarind Chutney Recipe here!!

    [divider]

    [one_fourth]Prep Time:10 minutes[/one_fourth] [one_fourth]Cook Time:not required[/one_fourth] [one_fourth]Servings: as desired[/one_fourth] [one_fourth_last]Difficulty Level: Easy[/one_fourth_last]

    [divider]

    [tabs type=”horizontal”] [tabs_head] [tab_title]Ingredients[/tab_title] [tab_title]Nutrition[/tab_title] [/tabs_head] [tab]

    • 2 cups mint leaves
    • 2 green chilies
    • 1/2 cup tamarind
    • 2 tablespoon sugar
    • Salt to taste

    [/tab] [tab]Yield: 1 cup chutney

    Nutritional information is not yet available. [/tab] [/tabs]

    Directions:
    [tabs type=”horizontal”] [tabs_head] [tab_title]Step by Step Method[/tab_title] [tab_title]Serving Suggestions[/tab_title][/tabs_head] [tab]

    Step 1

    Grind the green chillies and mint leaves into a fine paste.

    Step 2

    Soak tamarind for 15 minutes in 1/2 cup of hot water and then pass through a sieve.

    Step 3

    Mix the tamarind pulp, sugar and salt with the ground paste.

    Step 4

    Transfer into a bowl. Mint Tamarind Chutney is ready to serve. Enjoy!

    [/tab] [tab]

    [/tab] [/tabs]
    If you like Mint Tamarind Chutney Recipe and make it then let me know your feedback by commenting below.And if you know more innovative ways in which we can utilize this mouth watering Mint Tamarind Chutney, do share with us and we would be glad to give it a try.

  • Unlock a Flavor Bomb: Mint Chutney Recipe for Pakoras & More!

    Mint Chutney

    A very flavourful chutney recipe made with mint leaves and green chilies. This chutney has the aromatic freshness of mint combined with the earthiness of the coriander. Give it a try!!

    Mint Chutney Recipe
    Photo: Mint Chutney Recipe

    Check it out the Mint Chutney Recipe here!!

    [divider]

    [one_fourth]Prep Time:10 minutes[/one_fourth] [one_fourth]Cook Time:not required[/one_fourth] [one_fourth]Servings:as desired [/one_fourth] [one_fourth_last]Difficulty Level: Easy[/one_fourth_last]

    [divider]

    [tabs type=”horizontal”] [tabs_head] [tab_title]Ingredients[/tab_title] [tab_title]Nutrition[/tab_title] [/tabs_head] [tab]

    • 2 cups fresh mint leaves
    • 1 cup coriander leaves
    • 4 green chilies,finely chopped
    • 1 inch piece of ginger, optional
    • 3 tbsp lemon juice
    • water,if needed
    • salt to taste

    [/tab] [tab]Yield: as desired

    Nutritional information is not yet available. [/tab] [/tabs]

    Directions:
    [tabs type=”horizontal”] [tabs_head] [tab_title]Step by Step Method[/tab_title][tab_title]Recipe Note’s[/tab_title] [tab_title]Serving Suggestions[/tab_title][/tabs_head] [tab]

    Step 1

    In a blender or food processor, blend all of the ingredients until smooth.

    Step 2

    You may need to add a little water to help the blending process.

    Step 3

    The consistency may be adjusted according to personal preference. You may add a little water for a slightly thinner consistency.

    Step 4

    Refrigerate or use immediately. Mint Chutney is ready to serve.

    [/tab]

    [tab]

    • This chutney will last for up to 1 week in the refrigerator.

    [/tab]

    [tab]

    • Serve with Tikka, curry, paratha or biryani.

    [/tab] [/tabs]
    If you like Mint Chutney Recipe and make it then let me know your feedback by commenting below.And if you know more innovative ways in which we can utilize this mouth watering Mint Chutney , do share with us and we would be glad to give it a try.

  • The Perfect Dipping Sauce for Tempura: Easy Tempura Sauce (Tentsuyu) Recipe!


    tempura-sauce-recipe-image

    Ingredients:

    • 2 chicken bouillon cubes
    • 1 cup hot water
    • 3 tbsp soy sauce
    • 2 tbsp sugar
    • 2 tsp grated fresh ginger
    • 3 tbsp grated radish

    How to make Tempura Sauce:

    • Drop bouillon cubes in water in a small saucepan and boil.
    • Add soy sauce, sugar, and ginger; stir in grated radish.
    • Tempura sauce is ready to serve.
    • Serve with Tempura’s!
  • The Flavor Booster: Mirch Chutney Recipe for All Your Curries!

    Mirch Chutney

    A complete culinary delight, Mirch Chutney are as unique as they sound.This spicy chutney makes a nice change from your usual chutney. A tangy blend of green coriander, lemon juice and green chilies. It’s perfect served straightaway with your main dish.

    Mirch Chutney Recipe
    Photo: Mirch Chutney Recipe

    Check it out the Mirch Chutney Recipe here!!

    [divider]

    [one_fourth]Prep Time:[/one_fourth] [one_fourth]Cook Time:not required[/one_fourth] [one_fourth]Servings: 6[/one_fourth]
    [one_fourth_last]Difficulty Level:Very Easy [/one_fourth_last]

    [divider]

    [tabs type=”horizontal”] [tabs_head] [tab_title]Ingredients[/tab_title] [tab_title]Nutrition[/tab_title] [/tabs_head]
    [tab]

    • 1 bunch fresh coriander leaves
    • 4 green chilies
    • 1 inch piece of ginger
    • 2 tablespoon lemon juice
    • 1 teaspoon cumin seeds, roasteds
    • salt to taste
    • 1 pinch of asafoetida(hing)

    [/tab] [tab]Yield:6 servings

    Nutritional information is not yet available. [/tab] [/tabs]

    Directions:
    [tabs type=”horizontal”] [tabs_head] [tab_title]Step by Step Method[/tab_title] [tab_title]Serving Suggestions
    [/tab_title][/tabs_head] [tab]

    Step 1

    Wash coriander leaves thoroughly in water.

    Step 2

    Cut the Stem part of Dhaniya and put rest leafy part to the grinder bowl.

    Step 3

    Take out stem of Green Chilies and add rest to the grinder bowl.

    Step 4

    Add ginger, Cumin seeds,hing,Salt and lemon juice.

    Step 5

    Process until smooth.Take it out in a small bowl. Mirch Chutney is ready to serve.

    [/tab] [tab]

    • Serve with Dal,Rice, Curry or Stuffed Paratha, or any snacks item.

    [/tab] [/tabs]

    If you like Mirch Chutney Recipe and make it then let me know your feedback by commenting below.And if you know more innovative ways in which we can utilize this spicy and mouth watering Mirch Chutney, do share with us and we would be glad to give it a try.

  • Tangy and Tart: This Lemon Chutney Recipe will Steal Your Heart!

    Lemon Chutney

    This lively sweet-sour lemon chutney takes two days to make, but it’s worth every minute. Goes great with paratha, curry or dals!

     Lemon Chutney Recipe
    Photo: Lemon Chutney Recipe

    Check it out the Lemon Chutney Recipe here!!

    [divider]

    [one_fourth]Prep Time:1 day[/one_fourth] [one_fourth]Cook Time:20 minutes[/one_fourth] [one_fourth]Servings:4 [/one_fourth] [one_fourth_last]Difficulty Level:Medium [/one_fourth_last]

    [divider]

    [tabs type=”horizontal”] [tabs_head] [tab_title]Ingredients[/tab_title] [tab_title]Nutrition[/tab_title] [/tabs_head] [tab]

    • 8 large lemons, chopped
    • 2 onions,chopped
    • 1 cup vinegar
    • 500g sugar
    • 125g raisins
    • salt to taste
    • 30g mustard seed
    • 1 tsp ground ginger
    • 1/2 tsp cayenne pepper

    [/tab] [tab]Yield: 4 servings

    Nutritional information is not yet available. [/tab] [/tabs]

    Directions:
    [tabs type=”horizontal”] [tabs_head] [tab_title]Step by Step Method[/tab_title] [tab_title]Serving Suggestions[/tab_title][/tabs_head] [tab]

    Step 1

    Mix the onions and lemons with the salt, then leave to stand 24 hours.

    Step 2

    Next day, add the rest of the ingredients and cook till the skins are soft and the mixture is a chutney-like consistency.

    Step 3

    Now Lemon Chutney is ready.

    Step 4

    Pour into hot sterilized jars and seal.

    [/tab] [tab]

    • Enjoy with your favorite snacks.

    [/tab] [/tabs]

    If you like Lemon Chutney recipe and make it then let me know your feedback by commenting below.

  • Sweet & Tangy Delight: The Easy Mango Chutney Recipe!

    Ingredients:

    • 2 cups sugar
    • 1 cup distilled white vinegar
    • 6  cups mangoes,peeled and cut in 3/4-inch pieces
    • 1 onion,finely chopped
    • 1/2 cup golden raisins
    • 1/4 cup ginger, finely chopped
    • 1 garlic clove, minced
    • 1 tsp whole mustard seeds
    • 1/4 tsp red chili pepper flakes

    How to make Mango Chutney:

    • Combine sugar and vinegar in a 6 quart pot; bring to a boil, stirring until sugar dissolves.
    • Add remaining ingredients and simmer, uncovered, until syrupy and slightly thickened, 45 minutes to 1 hour.
    • Stir occasionally during cooking.
    • Pour into clean, hot jars leaving 1/2-inch head space; close jars.
    • Process in a water bath 15 minutes.
    • Mango Chutney is ready to serve.
    • Enjoy!
  • Coconut Sambal Recipe

    Coconut Sambal

    Remove from the flame and allow it to cool.Blend to make a smooth paste.Try this Coconut Sambal Recipe from a member of the Recipestable Community.

    Coconut Sambal recipe
    Photo: Coconut Sambal Recipe

    Check it out the Coconut Sambal Recipe here!!

    [divider]

    [one_fourth]Prep Time:10 minutes[/one_fourth] [one_fourth]Cook Time:5 minutes[/one_fourth] [one_fourth]Servings:4 [/one_fourth] [one_fourth_last]Difficulty Level: Easy[/one_fourth_last]

    [divider]

    [tabs type=”horizontal”] [tabs_head] [tab_title]Ingredients[/tab_title] [tab_title]Nutrition[/tab_title] [/tabs_head] [tab]

    • 1 cup coconut, grated
    • 1 onion, finely chopped
    • 2 cloves garlic, minced
    • 1 tbsp Oil
    • 1/2 tbsp Lemon Juice
    • 2 green chillies
    • 6 black peppercorns
    • 1 tsp red chili flakes, crushed
    • salt to taste

    [/tab] [tab]Yield: 4 servings

    Nutritional information is not yet available. [/tab] [/tabs]

    Directions:
    [tabs type=”horizontal”] [tabs_head] [tab_title]Step by Step Method[/tab_title] [tab_title]Serving Suggestions[/tab_title][/tabs_head] [tab]

    Step 1

    Heat oil in a wok or deep pan.

    Step 2

    Saute onion, garlic and green chillies in it.

    Step 3

    Remove from the flame and allow it to cool.
    Step 4

    In a blender, place sauteed onion and all ingredients with 2tbsp water.

    Step 5

    Blend to make a smooth paste.
    Coconut Sambal is ready to serve.

    Enjoy!
    [/tab] [tab]

    Serve with [/tab] [/tabs]
    If you like Coconut Sambal Recipe and make it then let me know your feedback by commenting below.

  • Recipe: Onion Raita

    Onion Raita

    Cool your day by adding the Onion raita along with any meal as accompaniment. Onion Raita is one of the easiest raita, as the major ingredient of it is only onion and yogurt. 

    Indian Onion Raita Recipe
    Photo:Onion Raita Recipe

    Check it out the Onion Raita Recipe here!!

    Prep Time: 10 minutes

    Cook Time:0 minutes

    Servings: 4

    Difficulty Level: Easy

    Ingredients

    • 2 cups plain Yogurt
    • 1 big yellow sweet onions
    • 1 Green Chili chopped finely
    • 1/4 th cup chopped Cilantro leaves
    • Salt to taste


    Directions:

    Step 1

    Slice the onions lengthwise, Wash under cold water and swish.

    Step 2

    Drain all water.

    Step 3

    Wash and dry the cilantro and chop finely.

    Step 4

    In a serving bowl beat the yogurt with the salt. Add the onions and chilies with salt.

    Step 5

    Garnish with cilantro. Indian Onion Raita is ready to serve.

    • Serve with any rice dish.

    If you like Onion Raita recipe and make it then let me know your feedback by commenting below.

  • Red Radish Raita Recipe

    Red Radish Raita

    This raita is good for health and a great summer treat that’s packed with a lot of nutrients that come from radish and lots of calcium that comes from the yogurt. Super Easy and Healthy raita with red radishes. Its really a easiest one with thick yogurt and grated red radish. Check it out the Red Radish Raita Recipe here!!

    Red Radish Raita recipe
    Photo: Red Radish Raita Recipe

    [divider]

    [one_fourth]Prep Time: 10 minutes[/one_fourth] [one_fourth]Cook Time:2 minutes[/one_fourth] [one_fourth]Servings: 4[/one_fourth] [one_fourth_last]Difficulty Level: Easy[/one_fourth_last]

    [divider]

    [tabs type=”horizontal”] [tabs_head] [tab_title]Ingredients[/tab_title] [tab_title]Nutrition[/tab_title] [/tabs_head] [tab]

    • 1 bunch red radish
    • 1 green chilli
    • 1 cup of yogurt
    • 1/2 tsp sugar
    • Salt to taste
    • Few fresh coriander leaves

    For tarka/tempering:

    • 1 tbsp olive oil
    • 1/4 tsp mustard seeds

    [/tab] [tab]Yield: 3 servings Nutritional information is not yet available. [/tab] [/tabs]

    Directions:
    [tabs type=”horizontal”] [tabs_head] [tab_title]Step by Step Method[/tab_title] [tab_title]Serving Suggestions[/tab_title][/tabs_head] [tab]

    Step 1

    Wash and grate radish.

    Step 2

    Chop chilli and coriander leaves. Mix all the ingredients in a bowl.

    Step 3

    Heat oil in a small pan, add mustard seeds.

    Step 4

    When they crackle, add the tarka to the bowl and mix.

    Step 5

    If desired you can add crushed peanuts to this raita. Red Radish Raita is ready to serve.

    [/tab] [tab]

    • Serve with Pulao, Biryani or any kind of curry.

    [/tab] [/tabs]

    If you like Red Radish Raita recipe and make it then let me know your feedback by commenting below.

  • Gajar Ka Raita Recipe

    Gajar Ka Raita

    Easy raita with carrots (gajar) as main ingredient. Rainbow Carrots (gajar) are used to make this easy Raita, giving it a visual appeal. This hot and cold salad with an interesting and simple dressing is ideal for summer. Check it out the Gajar Ka Raita recipe here!!

    Gajar Ka raita recipe
    Photo: Gajar Ka raita Recipe

    [divider]

    [one_fourth]Prep Time: 5 minutes[/one_fourth] [one_fourth]Cook Time: 5 minutes[/one_fourth] [one_fourth]Servings: 12[/one_fourth] [one_fourth_last]Difficulty Level: Easy[/one_fourth_last]

    [divider]

    [tabs type=”horizontal”] [tabs_head] [tab_title]Ingredients[/tab_title] [tab_title]Nutrition[/tab_title] [/tabs_head] [tab]

    • 5 carrots, cut into 1-inch matchsticks
    • 1 small carrot, cut into thin strips for garnish
    • 1 quart plain whole-milk yogurt
    • 3 tablespoons freshly squeezed lemon juice
    • 3 tablespoons vegetable oil
    • 2 teaspoons black or brown whole cumin seeds
    • 1 tablespoon whole fennel seeds
    • Salt to taste
    • 1/2 cup fresh mint leaves, torn into medium pieces

    [/tab] [tab]Yield: 12 servings

    Nutritional information is not yet available. [/tab] [/tabs]

    Directions:
    [tabs type=”horizontal”] [tabs_head] [tab_title]Step by Step Method[/tab_title] [tab_title]Serving Suggestions[/tab_title][/tabs_head] [tab]

    Step 1

    Combine 5 cups carrots, yogurt, and lemon juice in a medium bowl.

    Step 2

    Heat the oil in a very small skillet over medium-high heat until very hot.

    Step 3

    Add the cumin and fennel seeds, and let fry until they pop, about 5 seconds.

    Step 4

    Immediately pour the oil and the seeds over the carrot mixture.
    Stir to combine.

    Step 5

    Salt to taste; add mint and toss.

    Step 6

    Garnish with mint leaves and carrot strips. Gajar Ka Raita is ready to serve. Enjoy!

    [/tab] [tab]

    • Serve with biryani, paratha or any curry.

    [/tab] [/tabs]
    If you like Gajar Ka Raita recipe and make it then let me know your feedback by commenting below.

  • Mint Raita Recipe (Refreshing Mint Dip)

    Mint Raita

    A deliciously quick and easy  yogurt sauce.  This is a cool, fresh raita that takes seconds to make. It’s made by combining yogurt with mint, lemon juice and pomegranate seeds. Enjoy as a dipping sauce or serve alongside anything spicy to cool the palate.

    Pudina raita has a very cooling effect when served in summers. It’s a very refreshing and flavorful raita. This is one of my favorite raita recipe. Pudina raita goes great with parathas, biryani and pulaos. Check it out the recipe here!!

    Check it out the Mint Raita recipe here!!

    mint raita recipe
    Photo: mint raita recipe

    [divider]

    [one_fourth]Prep Time: 5 minutes[/one_fourth] [one_fourth]Cook Time: 0 minutes[/one_fourth] [one_fourth]Servings: 4 [/one_fourth] [one_fourth_last]Difficulty Level: Easy[/one_fourth_last]

    [divider]

    [tabs type=”horizontal”] [tabs_head] [tab_title]Ingredients[/tab_title] [tab_title]Nutrition[/tab_title] [/tabs_head] [tab]

    • 6 tbsp mint leaves
    • 5 tbsp yogurt
    • 1 1/2 tbsp pomegranate seeds
    • 1 tsp lemon juice
    • 1 tsp sugar
    • Salt and Pepper

    [/tab] [tab]Yield: 4 servings

    Nutritional information is not yet available. [/tab] [/tabs]

    Directions:
    [tabs type=”horizontal”] [tabs_head] [tab_title]Step by Step Method[/tab_title] [tab_title]Serving Suggestions[/tab_title][/tabs_head] [tab]

    Step 1

    Pound pomegranate seeds in yogurt.

    Step 2

    Blend all the ingredients together.

    Step 3

    Garnish with mint leaves. Mint Raita is ready to serve. Enjoy!

    [/tab] [tab]

    • Serve with BBQ, Biryani, Pulao or any other meal.

    [/tab] [/tabs]

    If you like Mint Raita recipe and make it then let me know your feedback by commenting below.