Tag: Carrot

  • Crunchy Pickled Kachumber Salad Recipe

    Crunchy Pickled Kachumber Salad Recipe

    Looking for something more adventurous than your usual Kachumber salad? Try this tasty Crunchy Pickled Kachumber Salad, a crunchy, squeaky pickle salad that would be amazing alongside a super fatty main dish, like this Chicken Biryani. But don’t worry, it’s not one briny mouthful, there are a lot of different textures going on between the crisp onions, crunchy pickles, red cabbage and juicy carrots.

    Crunchy Pickled Kachumber Salad Recipe
    Photo: Crunchy Pickled Kachumber Salad Recipe

    I like to experiment with creating no-cook dishes that can be easily thrown together at the last minute. I especially enjoy playing with the salads I’ve learned and putting a new spin on them, using whatever ingredients I have on hand to create something entirely new.

    This salad happened during one of my kitchen experiments. Things I really love in spring: 

    1. Super crisp, crunchy salads
    2. Juicy Colorful Veggies

    So clearly it make sense to combine these two faves into one, right?

    Crunchy Pickled Kachumber Salad

    I started with a simple family recipe for a Kachumbar salad. But for a change, I used the homemade pickled Cucumber, onion and baby carrots, vinegar, salt for this recipe. then tweaked the dressing and added some stuff I found in the fridge—red radishes and half a red cabbage. The result is a delightfully flavorful salad—cold, crunchy, pickled and easy to throw together at a moment’s notice. I call it my Crunchy Pickled Kachumber Salad.
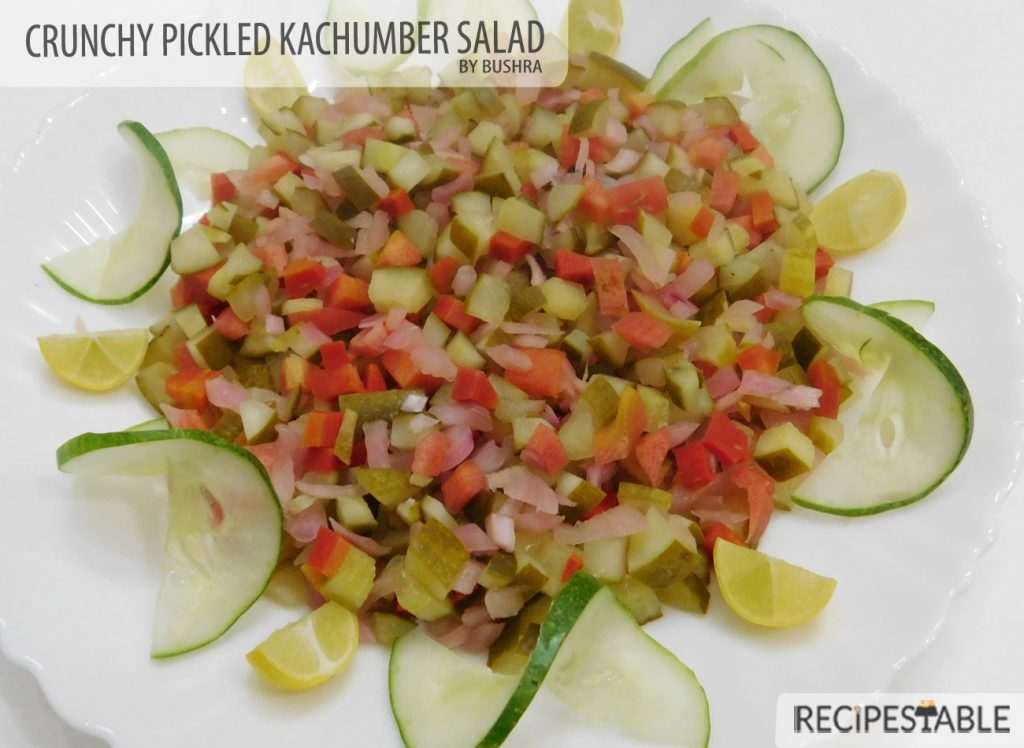
    Crunchy Pickled Kachumber Salad Recipe
    Phot: Crunchy Pickled Kachumber Salad Recipe

    Some Useful Tips

    • If you like pickle vegetables, you’re going to love this salad. You can use store bought pickles or make your own by following my recipe.
    • Usually, we tend to favor pickles that are bright with acid and low on sugar; anything labeled “half-sour” usually fits the bill. If using sweeter pickles, add a bit more vinegar and black salt. And honestly, you can use whatever pickles you want in this recipe.
    • Organic cucumbers are smaller and thinner than non organic cucumbers.  They are smaller and slightly sweeter than the non-organic variety, and they have less seeds. Organic cucumbers are great for snacking. They have a wonderful mineral flavor to them. Unfortunately some grocery stores only carry Organic cucumbers seasonally, and some don’t carry them at all.
    • If you can’t find them, substitute Non-organic cucumbers—those are the long thin ones wrapped tightly in plastic. Avoid using regular fat cucumbers, as they are coated with wax and prone to bitterness.

    This is my favourite salad to serve with my Restaurant Style Lahori Mutton Karahi recipe. It just works so well with Tawa fish and the sweetness of the Apricot Chutney. I highly recommend serving this up with some extra Cucumber on the side. 

    Bismillah let’s get started. 

    Check it out Hot and Sour Noodles Recipe and printable version here!!

    Want more Salad Inspiration? 

    Here are some other salad recipes on my blog:

    Put your own spin on it. And lemme know how it turns out and do take a few seconds to rate it! I would love to see your recreations so tag me on instagram @recipestable or Facebook (Recipestable) or on Twitter so I can see how lovely yours turn out.

  • Chicken Stir Fried Noodles Recipe

    Chicken Stir Fried Noodles Recipe

    Welcome back to my corner of the blogosphere!

    Where have I been you may ask?

     I was chilling with my grandparents, stuffing my tummy with yummy food, filling up my body with awesomeness. Nice relaxing day. I spent a quality time with my grandparents, did lots of cooking for them and made a full use of everything in the fridge, make them laugh, smile and collected their countless dua’s. My grandparents were happy to see me with them. I Love both of them. They puts a smile on my face and giggle in my heart.

    As much as I adore my grandparents, they do treat me like I’m still 6 years old.🤔🤔 I love staying with my grandparents they treat me like I’m royalty, but in reality they are my King & Queen😍

    The King and Queen of my Heart (My Grandparents)
    The King and Queen of my Heart (My Grandparents)

    Grandma’s Favorite Chicken Stir Fried Noodles

    Grandma's Favorite Chicken Stir Fried Noodles
    My Grandma’s Favorite Chicken Stir Fried Noodles

    Stop and wait a minute. This post is special.

    Because today I’ m sharing a family favorite recipe.{Especially, my grandma’s(nano)}. I’ve made these noodles countless times; in exchange of favors, to impress certain people. My GrandMa Loves to eat Chinese Food.  Just this weekend, I cooked it on my nano’s request. Nana abu loved it so much and he rewarded me with cash. $_$  💰 💰

    chicken-stir-fried-noodles3

    Cooking is an art ! I believe it- My favorite moments are the looks of appreciation my family and loved ones give me when they tastes my food. 

    My Grandma's Favorite Chicken Stir Fried Noodles
    Chicken Stir Fried Noodles

    A simple to make Chicken Stir Fried Noodles recipe, but big on flavors. The perfect balance of spiciness, tanginess and saltiness. The vibrant mix of fresh vegetables paired with the saltiness of the stir fry noodles, the tanginess of soy sauce, and the heat from the sesame oil and the acclaimed chili sauce; all worked out so well. These Grandma’s favorite Chicken Stir Fried Noodles will be a hit with the whole family.

    My Grandma's Favorite Chicken Stir Fried Noodles
    Vibrant mix of fresh vegetables paired with the saltiness of stir fry noodles

    Bismillah, let’s begin!

    Check it out the Chicken Stir Fried Noodles recipe and printable version below.

    Chicken Stir Fried Noodles Recipe

    A simple to make Chicken Stir Fried Noodles recipe, but big on flavors. The perfect balance of spiciness, tanginess and saltiness. The vibrant mix of fresh vegetables paired with the saltiness of the stir fry noodles, the tanginess of soy sauce, and the heat from the sesame oil and the acclaimed chili sauce; all worked out so well.
    Prep Time 10 minutes
    Cook Time 20 minutes
    Total Time 30 minutes
    Servings 6
    Author Bushra Waheed

    Ingredients

    • 2 boneless chicken breast cut into cubes
    • 2 tablespoon sesame Oil
    • 2 tablespoon vegetable oil
    • 2 clove garlic minced
    • 2 green onions cut into strips
    • 2 carrots peeled and cut into strips
    • 1/2 red bell pepper cut into strips
    • 1/2 green bell pepper cut into strips
    • 1/4 cup dark soy sauce
    • 1/4 cup chili garlic sauce
    • 1 packet spaghetti noodles or egg noodles
    • salt and pepper to taste

    Instructions

    Method

    • Cook the noodles in a large pan of boiling water for 2-3 minutes until Soft.
    • Once the noodles are cooked.
    • Drain and return to the saucepan.
    • Toss well in vegetable oil and set aside. Cover with a tea towel.
    • Heat a wok until very hot, then add remianing vegetable and sesame oil. Add 1 chopped garlic clove after 30 seconds.
    • Add the chicken and stir-fry for 3 minutes or until it loses its colour.
    • When the chicken is ready add the vegetables and stir-fry for another 30 seconds.
    • Add a splash of Soy sauce and stir fry for 1-2 minute.
    • Stir in the Soy sauce and chili garlic sauce.
    • Add noodles and cook for 30 seconds, stirring constantly and serve immediately.
    • Enjoy!

    Recipe Note’s:

    You can also add lamb, beef to this stir fry noodles, or just filled up with colorful veggies like I loved to eat. Either way, it’s finger lickin’ good. You’ll be coming back for more :’)


    I had made many yummy dishes there and in upcoming posts I’d love to share those recipes with you. So Stay tuned.


    I have also posted Keema Noodles Recipe which is another easiest & tastiest version of making noodles. Do check it out as well.


    Put your own spin on it. And lemme know how it turns out. Post a photo on Facebook (Recipestable) or  on Twitter so I can see how lovely yours turn out.


    Happy Cooking!!

    If you like this post, Please Subscribe to my blog and let me know your feedback by commenting below.. I have lots more recipes to share with you.

  • Vegetable Karahi Recipe

    Vegetable Karahi

    A popular side dish that you get in Indian restaurants. An all in one side dish for rotis. Today, I’m posting a Vegetable Karahi recipe for all the vegetarian curry fans. This Vegetable Karahi recipe is a homemade version of the Vegetable karahi.

    Vegetable Karahi Recipe
    Photo: Vegetable Karahi Recipe

    Check it out the Vegetable Karahi Recipe here!!

    [divider]

    [one_fourth]Prep Time:10  minutes[/one_fourth] [one_fourth]Cook Time:35 minutes[/one_fourth] [one_fourth]Servings: 4[/one_fourth] [one_fourth_last]Difficulty Level: Easy[/one_fourth_last]

    [divider]

    [tabs type=”horizontal”] [tabs_head] [tab_title]Ingredients[/tab_title] [tab_title]Nutrition[/tab_title] [/tabs_head] [tab]

    • 1/2 cauliflower, cut in slices
    • 1/2 cup green peas
    • 2 Potatoes
    • 1 green pepper
    • 1 red pepper
    • 1 Carrot
    • 1 onion
    • 4 Green chillies, thinly sliced
    • 2 tablespoon ginger garlic paste
    • 3 tomatoes, chopped
    • 1/4 cup plain yogurt
    • 1 tablespoon turmeric powder
    • 1 tablespoon Garam masala powder
    • 1 tablespoon red chili powder
    • 1 tablespoon cumin powder
    • Salt as taste

    For Garnishing:

    • 1 inch piece of ginger, thinly sliced
    • few coriander leaves

    [/tab] [tab]Yield: 4 servings

    Nutritional information is not yet available. [/tab] [/tabs]

    Directions:
    [tabs type=”horizontal”] [tabs_head] [tab_title]Step by Step Method[/tab_title] [tab_title]Serving Suggestions[/tab_title][/tabs_head] [tab]

    Step 1

    Take a wok put oil and heat it up and fry onion until light pink.

    Step 2

    Then put ginger garlic paste and fry, then put chopped tomatoes and mix well.

    Step 3

    Then put salt, red crushed chillies, turmeric powder, cumin powder, garam masala, and mix it well, then add vegetables and mix it well,

    Step 4

    Then put yogurt and fry bit, after 3 min put green chillies, fresh coriander and ginger flakes with little bit of water and cook on steam until vegetables done.

    Step 5

    Garnish with fresh coriander, ginger and green chilies. Vegetable Karahi is ready to serve.

    [/tab] [tab]

    • Serve hot with chapati or naan!

    [/tab] [/tabs]
    If you like Vegetable Karahi  Recipe and make it then let me know your feedback by commenting below.And if you know more innovative ways in which we can utilize this mouth watering Vegetable Karahi , do share with us and we would be glad to give it a try.

  • A Taste of Afghanistan: Aromatic Afghani Pulao Recipe

    Afghani Pulao

    Afghani Pulao is the national dish of Afghanistan. Made with Aromatic Fine Rice With Carrots, Raisins, Spices and meat. Give it a try!!

    Afghani Pulao Recipe
    Photo: Afghani Pulao Recipe

    Check it out the Afghani Pulao Recipe here!!


    [divider]

    [one_fourth]Prep Time:15 minutes[/one_fourth] [one_fourth]Cook Time:45 minutes[/one_fourth] [one_fourth]Servings: 5[/one_fourth] [one_fourth_last]Difficulty Level: Medium[/one_fourth_last]

    [divider]

    [tabs type=”horizontal”] [tabs_head] [tab_title]Ingredients[/tab_title] [tab_title]Nutrition[/tab_title] [/tabs_head] [tab]

    • 3 cup of fine quality rice
    • 1 kg chicken
    • 2 large onions,finely chopped
    • 1 tsp black pepper
    • 2 medium carrots,grated
    • Half cup of raisins (kishmish)
    • 1 tsp cumin seeds
    • Salt to taste

    [/tab] [tab]Yield: 5 servings

    Nutritional information is not yet available. [/tab] [/tabs]

    Directions:
    [tabs type=”horizontal”] [tabs_head] [tab_title]Step by Step Method[/tab_title] [tab_title]Serving Suggestions[/tab_title][/tabs_head] [tab]

    Step 1

    Put some oil in frying pan, Fry one chopped onion in oil until it is light brown.

    Step 2

    Take out onion and mash it to make a pulp.

    Step 3

    Put chicken pieces Use the same oil to brown the.

    Step 4

    Add a cup or so of water, salt and pepper, simmer it till become tender.

    Step 5

    Remove the meat, and add the ground onion to the stock.

    Step 6

    Cook until 1 cup of stock remains.

    Step 7

    Add the 2 grated carrots and cook them in oil on low heat until light brown.

    Step 8

    Add raisins and fry till plump.

    Step 9

    Drain and set aside.

    Step 10

    Boil the rice (become little soft) and drain the rice water.

    Step 11

    Put the rice into a large size pan.

    Step 12

    Sprinkle cumin seeds.

    Step 13

    Pour the meat stock over it and stir.

    Step 14

    Put the chicken meat in to the Layer half of the blend of raisin and carrots over rice.

    Step 15

    Cover the pan tightly and give the low heat for 20 minutes.

    Step 16

    Sprinkle raisin and carrot mixture on surface.Delicious Afghani Pulao is ready to serve.

    [/tab] [tab]

    • Serve warm with salad.

    [/tab] [/tabs]
    If you like Afghani Pulao Recipe and make it then let me know your feedback by commenting below.And if you know more innovative ways in which we can utilize this mouth watering Afghani Pulao, do share with us and we would be glad to give it a try.

  • Moist & Delicious: The BEST Carrot Cake Recipe Ever (Easy & Perfect!)

    Carrot Cake

    A simple, moist, yummy carrot cake with delicious cream cheese frosting. This moist carrot cake is welcome at birthdays, weddings, reunions and all special occasions. A Perfect delight!!

    Carrot Cake Recipe
    Photo: Carrot Cake Recipe

    Check it out the Carrot Cake Recipe here!!

    [divider]

    [one_fourth]Prep Time:30 minutes + cooling[/one_fourth] [one_fourth]Cook Time:50 minutes[/one_fourth] [one_fourth]Servings: 8[/one_fourth] [one_fourth_last]Difficulty Level: Medium[/one_fourth_last]

    [divider]

    [tabs type=”horizontal”] [tabs_head] [tab_title]Ingredients[/tab_title] [tab_title]Nutrition[/tab_title] [/tabs_head] [tab]

    • 3 cups grated carrots
    • 1 cup chopped walnuts
    • 4 eggs
    • 2 cups all-purpose flour
    • 2 cups white sugar
    • 1-1/4 cups vegetable oil
    • 2 tsp vanilla extract
    • 2 tsp baking soda
    • 2 tsp baking powder
    • 2 tsp cinnamon powder
    • 1/2 tsp salt

    For Glaze:

    • 4 cups confectioners’ sugar
    • 1 cup cream cheese, softened
    • 1/2 cup butter, softened
    • 1 teaspoon vanilla extract
    • 1 cup chopped walnuts

    [/tab] [tab] Yield: 1 – 9×13 inch cake

    Amount Per Serving

    • Calories: 575 kcal
    • Carbohydrates: 63.7 g
    • Cholesterol: 74 mg
    • Fat: 34.8 g
    • Fiber: 2.2 g
    • Protein: 5.1 g
    • Sodium: 347 mg

    Percent Daily Values are based on a 2,000 calorie diet.

    [/tab] [/tabs]

    Directions:
    [tabs type=”horizontal”] [tabs_head] [tab_title]Step by Step Method[/tab_title] [tab_title]Serving Suggestions[/tab_title][/tabs_head] [tab]

    Step 1

    Preheat oven to 175 degrees C.

    Step 2

    Grease and flour a 9×13 inch baking pan. Set aside.

    Step 3

    Beat eggs with oil, white sugar and vanilla essence in a large bowl.

    Step 4

    In another bowl, combine together the flour, baking soda, baking powder, salt and cinnamon.

    Step 5

    Stir in the carrots.

    Step 6

    Fold in Walnuts.

    Step 7

    Pour into the prepared pan.

    Step 8

    Bake, in the preheated oven, for 40 minutes or until a toothpick inserted into the center of the cake comes out clean.

    Step 9

    Allow to cool for 10 minutes then turn out onto a wire rack.

    Step 10

    Let it cool completely.

    Step 11

    To Make Frosting:

    In a medium bowl, mix together the butter, cream cheese, confectioners’ sugar and vanilla essence.

    Step 12

    Beat until the mixture is smooth and creamy.

    Step 13

    Stir in chopped Walnuts.

    Step 14

    Frost over the cooled cake. Delicious Carrot Cake is ready to serve. ENJOY!!

    [/tab] [tab]

    • Serve with Tea or coffee.

    [/tab] [/tabs]

    If you like Carrot Cake Recipe and make it then let me know your feedback by commenting below.And if you know more innovative ways in which we can utilize this sweet and mouth watering Carrot Cake, do share with us and we would be glad to give it a try.

  • Sensational Chicken Noodle Soup Recipe

    Sensational Chicken Noodle Soup

    This sensational home-style soup packed with carrots, celery,chicken and egg noodles. Give this Sensational Chicken Noodle Soup recipe, all you need is 6 ingredients and 35 minutes to it. Hope, you’ll really enjoy.

    Sensational Chicken Noodle Soup Recipe
    Photo: Sensational Chicken Noodle Soup Recipe

    Check it out the Sensational Chicken Noodle Soup Recipe here!!

    [divider]

    [one_fourth]Prep Time:5 minutes[/one_fourth] [one_fourth]Cook Time:20 minutes[/one_fourth] [one_fourth]Servings:4 [/one_fourth] [one_fourth_last]Difficulty Level: Very Easy[/one_fourth_last]

    [divider]

    [tabs type=”horizontal”] [tabs_head] [tab_title]Ingredients[/tab_title] [tab_title]Nutrition[/tab_title] [/tabs_head] [tab]

    • 4 cups chicken stock
    • 1 cup cooked chicken, cubed
    • 1/2 cup egg noodles, uncooked
    • 1 carrot, thinly sliced
    • 1 stalk celery, thinly sliced
    • 1/4 teaspoon black pepper

    [/tab] [tab]Yield: 4 servings

    Nutritional information is not yet available. [/tab] [/tabs]

    Directions:
    [tabs type=”horizontal”] [tabs_head] [tab_title]Step by Step Method[/tab_title] [tab_title]Serving Suggestions[/tab_title][/tabs_head] [tab]

    Step 1

    Pour chicken stock in a large saucepan.

    Step 2

    Add carrot and celery.

    Step 3

    Bring to a boil. Simmer for 5 minutes or until crisp-tender.

    Step 4

    Stir in the egg noodles and chicken. Cook over medium heat for 10 minutes or until noodles are done

    Step 5

    Ladle into soup bowls.Sensational Chicken Noodle Soup is ready to serve. ENJOY!!

    [/tab] [tab]

    • Serve with Parmesan breadsticks.

    [/tab] [/tabs]
    If you like Sensational Chicken Noodle Soup recipe and make it then let me know your feedback by commenting below.And if you know more innovative ways in which we can utilize this Sensational Chicken Noodle Soup, do share with us and we would be glad to give it a try.

  • Light & Refreshing: The Perfect Summer Rice Rolls Recipe!

    Rice Rolls

    These Rice rolls are a refreshing change from the usual fried variety, and have become a family favorite. They are great as a cool summertime appetizer, and are delicious dipped in one or both of the sauces.

     Rice Rolls Recipe
    Photo: Rice Rolls Recipe

    Bismillah, let’s begin!

    Check it out the Rice Rolls Recipe and printable version below.

    Rice Rolls Recipe

    Prep Time 10 minutes
    Cook Time 5 minutes
    Total Time 15 minutes
    Servings 2
    Author Bushrah | Recipestable

    Ingredients

    • 2 small rice paper
    • 2 tbsp basil leaves
    • 2 tbsp mint leaves
    • 1/4 cup slices carrots
    • 1/4 cup slices cucumber
    • 1/2 tbsp sesame seeds
    • 1/4 cup vermicelli

    Instructions

    Method

    • Cut cucumber into 2” long skinny sticks.
    • Remove stems from mint and basil sprigs.
    • Take small handful of vermicelli noodles and place in bowl of boiling water until soft. Drain.
    • In a large shallow bowl, fill with two inches of boiling water.
    • Dip rice paper in bowl, allowing it to sit (no folds or wrinkles) until flimsy and soft.
    • Move wet rice paper to large place and dab off excess water with tea towel.
    • In the center of the circle, place pinches of matchstick carrots, cooked vermicelli, mint, basil, cucumber and sprinkle everything with sesame seeds.
    • Wrap everything up like a burrito, and voila! Rice Rolls are ready to serve.

    Notes

    Serving Suggestions:
    Serve with Spicy Peanut Dipping Sauce.
     

    I have also posted Cabbage Rolls Recipe which is another easiest & tastiest version of making rolls. Do check it out as well.


    Put your own spin on it. And lemme know how it turns out. Post a photo on Facebook (Recipestable) or  on Twitter so I can see how lovely yours turn out.


    Happy Cooking!!

    If you like this post, Please Subscribe to my blog and let me know your feedback by commenting below.. I have lots more recipes to share with you.

  • Carrot Chapati Recipe

    Carrot Chapati

    This carrot multi-grain chapati is high in nutrition. The carrot is extremely rich in vitamin A, which provides antioxidant effects to the body.

    This Carrot Chapati recipe is a simple and delicious. Kids love to eat and Its a good way to give our kid a healthy dish.

    Carrot Chapati Recipe
    Photo: Carrot Chapati Recipe

    Check it out the Carrot Chapati Recipe here!!

    [divider]

    [one_fourth]Prep Time:30 minutes[/one_fourth] [one_fourth]Cook Time:15 minutes[/one_fourth] [one_fourth]Servings:2 [/one_fourth] [one_fourth_last]Difficulty Level: Easy[/one_fourth_last]

    [divider]

    [tabs type=”horizontal”] [tabs_head] [tab_title]Ingredients[/tab_title] [tab_title]Nutrition[/tab_title] [/tabs_head] [tab]

    • 1 cup wheat flour
    • 1 carrot, grated
    • Salt to taste
    • water as required
    • butter (optional)

    [/tab] [tab]Yield: 2 servings

    Nutritional information is not yet available. [/tab] [/tabs]

    Directions:
    [tabs type=”horizontal”] [tabs_head] [tab_title]Step by Step Method[/tab_title] [tab_title]Serving Suggestions[/tab_title][/tabs_head] [tab]

    Step 1

    Place wheat flour, carrot, salt in a large bowl.

    Step 2

    Mix well.and Knead a soft dough with water.

    Step 3

    Cover the dough with wet cloth and set aside for 20 minutes.

    Step 4

    Now make small balls and roll into shape of chapati.

    Step 5

    Heat griddle (tawa) over medium heat.

    Step 6

    Cook carrot chapati on griddle. Spread butter on both sides of chapati. Carrot Chapati is ready to serve.

    [/tab] [tab]

    • Serve with pickle and raita.

    [/tab] [/tabs]
    If you like Carrot Chapati recipe and make it then let me know your feedback by commenting below.And if you know more innovative ways in which we can utilize this mouthwatering Carrot Chapati, do share with us and we would be glad to give it a try.

  • Chicken with Vegetables Recipe

    Chicken with Vegetables

    Add one cup water and cook for 20 minutes or until chicken is almost tender.Try this Chicken with Vegetables Recipe from a member of the Recipestable Community.

    Chicken with Vegetables recipe
    Photo: Chicken with Vegetables Recipe

    Check it out the Chicken with Vegetables Recipe here !!

    [divider]

    [one_fourth]Prep Time:10 minutes[/one_fourth] [one_fourth]Cook Time:45 minutes[/one_fourth] [one_fourth]Servings: 6[/one_fourth] [one_fourth_last]Difficulty Level: Easy[/one_fourth_last]

    [divider]

    [tabs type=”horizontal”] [tabs_head] [tab_title]Ingredients[/tab_title] [tab_title]Nutrition[/tab_title] [/tabs_head] [tab]

    • 1-1/2 kg chicken cut into eight pieces
    • 1 cup oil
    • 1 cup green peas
    • 1 cup yogurt
    • 1/2 cup brown onion, crushed
    • 1/2 cup chopped tomatoes
    • 1/2 cup carrots, thinly sliced
    • 1/2 cup green pepper, thinly sliced
    • 1/2 cup chopped cabbage
    • 2 teaspoon ginger/garlic paste
    • 1 teaspoon salt
    • 2 teaspoon red chilli powder
    • 2 teaspoon coriander powder
    • 1/2 teaspoon turmeric powder
    • 1/2 teaspoon all spices

    For Garnishing:

    • few coriander leaves, chopped
    • 3 green chillies, chopped

    [/tab] [tab]Yield:6 servings

    Nutritional information is not yet available. [/tab] [/tabs]

    Directions:
    [tabs type=”horizontal”] [tabs_head] [tab_title]Step by Step Method[/tab_title] [tab_title]Serving Suggestions[/tab_title][/tabs_head] [tab]

    Step 1

    Heat oil in a pan over medium heat.

    Step 2

    Add chicken pieces along with salt, browned onion, turmeric, coriander powder, red chilli powder and ginger and garlic paste.Stir and cook for 10 minutes.

    Step 3

    Then add one cup water and cook for 20 minutes or until chicken is almost tender.

    Step 4

    Add tomatoes and yoghurt and cook for another 10 minutes.

    Step 5

    Add all vegetables and cook for 20 minutes.

    Step 6

    Lastly, add all spices, coriander leaves and green chillies. Chicken with Vegetables are ready to serve.

    [/tab] [tab]

    • Serve with white rice, chapati or garlic naan.

    [/tab] [/tabs]

    If you like  Chicken with Vegetables Recipe and make it then let me know your feedback by commenting below.

  • Recipe: Gajar Ki Barfi (Carrot Barfi)

    Recipe: Gajar Ki Barfi (Carrot Barfi)

    Gajar Ki Barfi

    Gajar Barfi is a delicious Pakistani traditional sweet or dessert that people like to eat. It is made with carrot (gajar), cream and khoya. It is not only eaten at the end of meal but also people like to eat in other times as well. Do try this Gajar Ki Barfi recipe, you’ll love it.

     Gajar Ki Barfi Recipe
    Photo: Gajar Ki Barfi Recipe

    Gajar Ki Barfi is one of my all time favourite deserts, I make it more often than any other sweets. I make it lots of different way and each time it turn out to be good. Carrots are a great veg for desserts, anything made out of it taste yum, like american carrot cake and my carrot raisan cake.

    Gajar Ki Barfi Recipe
    Photo: Gajar Ki Barfi Recipe

    So Today I came up with Gajar Ki Barfi recipe and believe me it turned out to be good.Method for making carrot barfi, prepared by cooking grated carrots in milk, is same to that of making carrot halwa. Just cook for more time and set. Hope you will love it and let me know how it turned out for you.

    Check it out the Gajar Ki Barfi Recipe here!!

    Gajar Ki Barfi

    Gajar Barfi is a delicious Pakistani traditional sweet or dessert that people like to eat. It is made with carrot (gajar), cream and khoya. It is not only eaten at the end of meal but also people like to eat in other times as well.
    Prep Time 30 minutes
    Cook Time 40 minutes
    Total Time 1 hour 10 minutes
    Servings 8
    Author Bushrah

    Ingredients

    • 1/2 kg carrots
    • 250 gm ricotta cheese khoya
    • 1-1/2 cup white sugar
    • 1/2 cup full cream dry milk powder
    • 6 green cardamom
    • 2 tbsp ghee or clarified butter

    For Garnishing

    • 1/4 cup sliced almonds
    • 1/4 cup pistachios
    • 1/4 cup cashew nuts

    Instructions

    Directions

    • Peel carrots then grate properly.
    • Now put grated carrots in a pan.
    • Cook on low heat for 10-15 minutes or until its own water dries.
    • Now put cooked carrots in a chopper.
    • Process until well chopped.
    • In a mixing bowl, combine chopped carrots, ricotta cheese (khoya), dry milk powder, and green cardamoms.
    • Mix well.
    • Place this mixture in the pan.
    • Add ghee or clarified butter in it and fry for 2-3 minutes.
    • Turn the heat off. Add sugar and mix well.
    • Pour this batter in the greased dish.
    • Garnished with almonds and pistachios.
    • Cut into small cubes and leave it for 30 minutes or until set. Gajar ki Barfi is ready to serve.Enjoy!

    Notes

    1. After adding khoya in carrots, keep stirring the mixture at regular intervals. Make sure it doesn’t stick to the bottom of pan.
    2. This burfi will be on the softer side. But taste really yummy.
    3. Instead of setting it as burfi, you can spoon it into bowls and serve as halwa.
    Adapted from Recipestable

    If you like Gajar Ki Barfi Recipe and make it then let me know your feedback by commenting below.

  • Light & Refreshing: The Perfect Summer Raw Vegetable Salad Recipe!

    Raw Vegetable Salad

    Place all sliced vegetables in a large mixing bowl.Squeeze lemon juice over it. Do try this Raw Vegetable Salad recipe!!

    Check it out the Raw Vegetable Salad Recipe  here!!

    Prep Time:10 minutes

    Cook Time: Not required

    Servings: 6

    Ingredients:

    • 2 onions, thinly sliced
    • 2 cucumber, thinly sliced
    • 2 carrots, thinly sliced
    • 3 tomatoes, thinly sliced
    • 4 green chilies, finely chopped
    • 1 bunch fresh coriander, finely chopped
    • lettuce leaves as required
    • 2 tbsp lemon juice
    • salt to taste

    Directions:

    1. Place all sliced vegetables in a large mixing bowl.
    2. Add chopped coriander, lettuce leaves and green chilies.
    3. Toss well.
    4. Squeeze lemon juice over it.
    5. Season with salt.
    6. Mix well.
    7. Raw Vegetable Salad is ready to serve.
    8. Enjoy!

    If you like Raw Vegetable Salad Recipe and make it then let me know your feedback by commenting below.

  • Gajar Ka Raita Recipe

    Gajar Ka Raita

    Easy raita with carrots (gajar) as main ingredient. Rainbow Carrots (gajar) are used to make this easy Raita, giving it a visual appeal. This hot and cold salad with an interesting and simple dressing is ideal for summer. Check it out the Gajar Ka Raita recipe here!!

    Gajar Ka raita recipe
    Photo: Gajar Ka raita Recipe

    [divider]

    [one_fourth]Prep Time: 5 minutes[/one_fourth] [one_fourth]Cook Time: 5 minutes[/one_fourth] [one_fourth]Servings: 12[/one_fourth] [one_fourth_last]Difficulty Level: Easy[/one_fourth_last]

    [divider]

    [tabs type=”horizontal”] [tabs_head] [tab_title]Ingredients[/tab_title] [tab_title]Nutrition[/tab_title] [/tabs_head] [tab]

    • 5 carrots, cut into 1-inch matchsticks
    • 1 small carrot, cut into thin strips for garnish
    • 1 quart plain whole-milk yogurt
    • 3 tablespoons freshly squeezed lemon juice
    • 3 tablespoons vegetable oil
    • 2 teaspoons black or brown whole cumin seeds
    • 1 tablespoon whole fennel seeds
    • Salt to taste
    • 1/2 cup fresh mint leaves, torn into medium pieces

    [/tab] [tab]Yield: 12 servings

    Nutritional information is not yet available. [/tab] [/tabs]

    Directions:
    [tabs type=”horizontal”] [tabs_head] [tab_title]Step by Step Method[/tab_title] [tab_title]Serving Suggestions[/tab_title][/tabs_head] [tab]

    Step 1

    Combine 5 cups carrots, yogurt, and lemon juice in a medium bowl.

    Step 2

    Heat the oil in a very small skillet over medium-high heat until very hot.

    Step 3

    Add the cumin and fennel seeds, and let fry until they pop, about 5 seconds.

    Step 4

    Immediately pour the oil and the seeds over the carrot mixture.
    Stir to combine.

    Step 5

    Salt to taste; add mint and toss.

    Step 6

    Garnish with mint leaves and carrot strips. Gajar Ka Raita is ready to serve. Enjoy!

    [/tab] [tab]

    • Serve with biryani, paratha or any curry.

    [/tab] [/tabs]
    If you like Gajar Ka Raita recipe and make it then let me know your feedback by commenting below.

  • Carrot Pudding with a Twist: Make Delicious Gajar ki Kheer!

    Gajar ki kheer

    Treat your sweet tooth with a new dessert and delight everyday by just following this delightful Gajar Ki Kheer recipe. 

    Gajar ki kheer Recipe
    Photo: Gajar ki kheer Recipe

     Gajar ki kheer Recipe
    Photo: Gajar ki kheer Recipe

    gajar ki kheer Recipe
    Photo: Gajar ki kheer Recipe

    Check it out the Gajar ki kheer Recipe here !!

    Gajar ki Kheer

    Prep Time 10 minutes
    Cook Time 50 minutes
    Total Time 1 hour
    Servings 4
    Author Bushrah | Recipestable

    Ingredients

    • 4 cups milk
    • 2 cups grated carrots
    • 1/2 cup sugar
    • 4 tbsp grain Rice
    • 2 tbsp almonds
    • 1 tbsp rose water
    • 1/2 tsp cardamom
    • 1/4 cup chopped pistachios
    • 1/4 cup fresh cream

    Instructions

    • Pour milk and rice in a big saucepan. Bring it to boil and keep the heat moderate.
    • Stir well and keep it on heat for 20 minutes.
    • Heat it for another 15 minutes uncovered with carrots added.
    • Add sugar and almonds and cook it for further 10 minutes.
    • Stir it till the mixture starts sticking to the bottom of the pan.
    • Remove from heat and keep it to cool down at room temperature.
    • Add cream, cardamom, and rose water. Keep it in freeze.
    • If the Kheer is thick once you remove it from freeze add a little milk to it and stir it. Add pistachios and serve it cool. Gajar ki kheer is ready to eat. Enjoy!

    Notes

    Serving Suggestions:
    Serve chilled as a dessert after any meal.
     

    If you like Gajar ki kheer Recipe and make it then let me know your feedback by commenting below

  • Mixed Vegetable Bread Rolls Recipe

    Mixed Vegetable Bread Rolls

    Try this Mixed Vegetable Bread Rolls Recipe and enjoy it as an evening snack. It can be prepared on birthday parties, Ramadan.

    Mixed Vegetable Bread Rolls Recipe
    Photo: Mixed Vegetable Bread Rolls Recipe

    Check it out the Mixed Vegetable Bread Rolls Recipe here!!

    [divider]

    [one_fourth]Prep Time:30 minutes[/one_fourth] [one_fourth]Cook Time:10 minutes[/one_fourth] [one_fourth]Servings: 6[/one_fourth] [one_fourth_last]Difficulty Level: Easy[/one_fourth_last]

    [divider]

    [tabs type=”horizontal”] [tabs_head] [tab_title]Ingredients[/tab_title] [tab_title]Nutrition[/tab_title] [/tabs_head] [tab]

    • 6 Bread Slices
    • 1 Potato
    • 1 Carrot
    • 4 tbsp Fresh Peas
    • 2 Green Chillies
    • 1/4 tsp Ginger-Garlic Paste
    • 1/2 tsp Garam Masala
    • Cilantro few Sprigs
    • Salt to taste
    • 2 tbsp Bread Crumbs
    • Oil for Deep Frying

    [/tab] [tab]Yield: 6 servings

    Nutritional information is not yet available. [/tab] [/tabs]

    Directions:
    [tabs type=”horizontal”] [tabs_head] [tab_title]Step by Step Method[/tab_title] [tab_title]Serving Suggestions[/tab_title][/tabs_head] [tab]

    Step 1

    Peel and finely chop the carrot.

    Step 2

    Remove stems, wash and finely chop the green chiles.

    Step 3

    Wash, separate cilantro leaves and finely chop them.

    Step 4

    Boil the potato in enough water till it turns soft.

    Step 5

    Cool the potato to room temperature and peel the potato.

    Step 6

    Roughly chop the boiled potato.

    Step 7

    In a sauce pot, add half a cup of water and chopped carrot.

    Step 8

    Boil till the carrot turns soft, add the frozen or fresh green peas and remove from heat.

    Step 9

    Strain the carrots and peas if necessary and cool them to room temperature.

    Step 10

    Heat quarter tsp of oil in a pan, add ginger garlic paste and green chilies.

    Step 11

    When raw smell of the ginger garlic paste is gone after a few seconds, remove from heat, cool the mixture a bit and add garam masala to the pot.

    Step 12

    In a mixing bowl, add boiled potato, carrot, peas, above spice mixture, cilantro and salt.

    Step 13

    Mash the mixture with help of a masher into paste.

    Step 14

    Leave some of the peas and carrots pieces intact.

    Step 15

    Divide the mixture into around 5 equal portions.

    Step 16

    Take a wide bowl full of water.

    Step 17

    Chop the edges off of the bread slices.

    Step 18

    Damp a muslin cloth and cover one bread slice at a time with the cloth.

    Step 19

    Dip the covered bread slice in the water for a second and remove.

    Step 20

    Squeeze the bread slice wrapped in muslin clothe between the palms to remove excess water.

    Step 21

    Take each portion of the mixed vegetable stuffing and place it on the damp bread slice.

    Step 22

    Roll one side of the damp bread slice over the stuffing till it touches the opposite side and pinch with wet fingers to seal the edges.

    Step 23

    Repeat the same with remaining bread slices and the stuffing.

    Step 24

    Roll each stuffed bread roll in bread crumbs and keep aside.

    Step 25

    Heat oil in a small pan on medium heat, slowly place the stuffed bread rolls into hot oil.

    Step 26

    Fry the bread rolls on both sides till they turn dark golden brown in color.

    Step 27

    Remove the bread rolls onto absorbent paper. Mixed Vegetable Bread rolls are ready to serve.

    [/tab] [tab]

    • Serve with chili sauce or ketchup.

    [/tab] [/tabs]
    If you like Mixed Vegetable Bread Rolls Recipe and make it then let me know your feedback by commenting below.And if you know more innovative ways in which we can utilize this mouth watering Mixed Vegetable Bread Rolls, do share with us and we would be glad to give it a try.

  • Recipe: Gajrela (Pakistani Rice & Carrot Pudding)

    Gajrela (Pakistani Rice & Carrot Pudding)

    Also known as carrot pudding or gajar ki kheer. Gajrela is tasty blend of carrots, milk and heavy cream. This sweet dish hails from the Punjab region of Pakistan and India. It is healthy and delicious delight. Gajrela is one of the most eaten dessert in winters even throughout the year. Its so tasty with solid milk and almond and pistachio.

    Gajrela Recipe
    Photo: Gajrela Recipe

    Try this gajrela recipe and don’t forget to add lots of khoya as it is one of main ingredients of dessert. Carrot gives wonderful reddish color and tempting aroma will fill up your mouth with water. Tastes best when you make it with fresh carrots.

    Gajrela Recipe
    Photo: Gajrela Recipe

    Yummy good for tummy, carrot pudding (gajerla). it is bursting of cardamom and kewra aromas and khoya it is melting in your mouth, warming up your hearts 🙂. Give it a try you will really love it.  

    Gajrela Recipe
    Photo: Gajrela Recipe

    Don’t get scared to read my long description as I love to write in details so the reader understands the steps clearly.

    Check it out the Gajrela Recipe and printable version below and don’t forget to leave your comment below.

    Print Pin
    5 from 1 vote

    Gajrela (Carrot Pudding)

    Gajrela is one of the most eaten dessert in winters even throughout the year. Try this gajrela recipe and don’t forget to add lots of khoya as it is one of main ingredients of dessert.
    Prep Time 20 minutes
    Cook Time 1 hour
    Total Time 1 hour 20 minutes
    Servings 8
    Author Bushrah | Recipestable

    Ingredients

    • 3 liters milk
    • 1 kg carrots peeled and grated
    • 200 gm khoya optional
    • 1-1/2 cup boiled rice
    • 1 cup sugar or to taste
    • 1/2 cup puree ghee or butter
    • 1/2 cup almonds sliced
    • 1/2 cup walnuts chopped
    • 1/4 cup pistachios chopped
    • 1 tin condensed milk
    • few drops kewra essence
    • 4 green cardamom
    • silver leaves

    Instructions

    Directions

    • Take 2-1/2 milk in a large pot. Boil with the green cardamom.
    • Melt ghee in a separate pan, add grated carrots in it. Cook and stir for 15 minutes or until well cooked.
    • Put boiled rice and remaining milk in the blender. Process until smooth.
    • Pour in the boiled milk. Add carrots. Simmer on low flame for 15 minutes or until the carrots have become soft and rice has almost dissolved.
    • Now add the sugar and the condense milk. Note: since the condense milk is sweet so be careful while adding sugar.
    • Stir in the sliced almond.
    • Keep stirring so that it dosent stick to the bottom.
    • When the gajrela has thicken and the texture has become creamy remove from the flame and add khoya if desired.
    • Take it out in a dish. Garnish with pistachios, walnuts and silver paper.
    • Allow to cool completely.
    • Place in the refrigerator for 4-6 hours or until chilled. Delcious Gajrela is ready to serve. ENJOY!!

    Notes

    Serving Suggestions:
    Serve as a dessert after meal.

    Recipe Note’s:

    You may store it in the fridge after cooking it completely. Must be consumed within 2-3 days.

    If you like Gajrela Recipe ,Please Subscribe to my blog. I have lots more recipes to share with you. And If you make it then let me know your feedback by commenting below.

  • The No-Fail French Salad Recipe

    The No-Fail French Salad Recipe

    Today’s post is about a recipe that is as old as my habit of  recording/saving recipes in hardcover notebooks. It’s a foolproof recipe for a SUPER YUM salad that has always been a savior whenever I’m pulling off family dawats/get together s or random hangouts at home with friends.

    Tbh, I can’t believe I didn’t put this french salad recipe up on the blog earlier.

    Let’s dig straight in.

    Make this colorful french salad in minutes. What could be easier? Check it out French Salad Recipe here! 

    Prep Time: 10 minutes

     Servings:4

    Ingredients

    For Salad:

    • 1 boiled potato, chopped
    • 1/2 bunch iceberg, chopped
    • 1 carrot, chopped
    • 1 cucumber, chopped
    • 1 tomato, chopped
    • 1/2 radish, chopped

    For Salad Dressing:

    • 2 tbsp lemon juice
    • 3 tbsp tomato ketchup
    • 1/2 cup mayonnaise
    • 1/2 cup  mozzarella cheese, grated
    • 1 tsp black pepper, crushed
    • salt to taste

    Directions:

    1. French Salad is ready to serve. Enjoy!
    2. Cover and refrigerate for 2 hours or until chill.
    3. Toss to coat evenly.
    4. Sprinkle  grated cheese over it.
    5. Pour this salad dressing on the chopped vegetables.
    6. Mix well.
    7. In a small bowl, add mayonnaise, tomato ketchup, lemon juice, black pepper and salt.
    8. set aside.
    9. Place all chopped vegetables in a large bowl.
    10. Serve with BBQ meal.