Mint is a magic ingredient, which adds zing to any preparation, however simple. Here is a simple process of dry roasting and crushing the leaves boosts the aroma of mint extraordinarily, adding a flavourful punch to the whole wheat flour rotis.
Pudina roti is such a healthy dish with a wonderful aroma. Its a healthy treat for your taste buds. This is my most favourite style of eating roti. Its a lighter version of roti and I just love it. Check it out the Pudina Roti Recipe here!!
Check it out the Mint Roti recipe here!!
Ingredients:
2-1/2 cups flour
1 cup mint,finely chopped
2 tbsp oil or butter
Oil for shallow frying
Salt to taste
How to make Mint Roti:
Sift the flour and salt in a bowl.
Add 2 tbsp of oil and mint and knead a stiff but non-sticky dough..
Cover with a damp cloth and leave aside for 30 minutes.
Divide the dough into 15 parts.
Shape like balls and press flat with the palm of your hand.
Roll out the roti into a round disc about 5″ diameter.
Put roti on a preheated griddle, dry roast both sides first then spread oil on both sides and shallow fry until well browned.
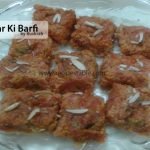
Gajar Barfi is a delicious Pakistani traditional sweet or dessert that people like to eat. It is made with carrot (gajar), cream and khoya. It is not only eaten at the end of meal but also people like to eat in other times as well. Do try this Gajar Ki Barfi recipe, you’ll love it.
Photo: Gajar Ki Barfi Recipe
Gajar Ki Barfi is one of my all time favourite deserts, I make it more often than any other sweets. I make it lots of different way and each time it turn out to be good. Carrots are a great veg for desserts, anything made out of it taste yum, like american carrot cake and my carrot raisan cake.
Photo: Gajar Ki Barfi Recipe
So Today I came up with Gajar Ki Barfi recipe and believe me it turned out to be good.Method for making carrot barfi, prepared by cooking grated carrots in milk, is same to that of making carrot halwa. Just cook for more time and set. Hope you will love it and let me know how it turned out for you.
Gajar Barfi is a delicious Pakistani traditional sweet or dessert that people like to eat. It is made with carrot (gajar), cream and khoya. It is not only eaten at the end of meal but also people like to eat in other times as well.
Prep Time 30 minutesminutes
Cook Time 40 minutesminutes
Total Time 1 hourhour10 minutesminutes
Servings 8
Author Bushrah
Ingredients
1/2kgcarrots
250gm ricotta cheesekhoya
1-1/2cupwhite sugar
1/2cupfull cream dry milk powder
6green cardamom
2tbspghee or clarified butter
For Garnishing
1/4cupsliced almonds
1/4cuppistachios
1/4cupcashew nuts
Instructions
Directions
Peel carrots then grate properly.
Now put grated carrots in a pan.
Cook on low heat for 10-15 minutes or until its own water dries.
Now put cooked carrots in a chopper.
Process until well chopped.
In a mixing bowl, combine chopped carrots, ricotta cheese (khoya), dry milk powder, and green cardamoms.
Mix well.
Place this mixture in the pan.
Add ghee or clarified butter in it and fry for 2-3 minutes.
Turn the heat off. Add sugar and mix well.
Pour this batter in the greased dish.
Garnished with almonds and pistachios.
Cut into small cubes and leave it for 30 minutes or until set. Gajar ki Barfi is ready to serve.Enjoy!
Notes
1. After adding khoya in carrots, keep stirring the mixture at regular intervals. Make sure it doesn’t stick to the bottom of pan. 2. This burfi will be on the softer side. But taste really yummy. 3. Instead of setting it as burfi, you can spoon it into bowls and serve as halwa.Adapted from Recipestable
If you like Gajar Ki Barfi Recipe and make it then let me know your feedback by commenting below.
If you’re a cupcake making newbie, then this is the perfect starter recipe. Simple and oh-so-delicious, these Extra Easy cupcakes make a lovely.You can change the ingredients of these easy cupcakes to match the occasion.
Extra Easy Cupcakes
I mentioned a couple weeks ago that I’d be bringing you some new basic favorites and I started with a Banana Chocolate Loaf cake. Today, we are talking about these Extra Easy cupcakes and I’m pumped! One of the things that I’m always messing with is vanilla cake or simple cupcakes. It’s the never ending quest for all the best versions.There are so many ways to vary a Simple cupcake and I want the best of all of them! I’m greedy like that. Plus, I know not every has the same idea of the perfect cupcake, so I like to have options.
Extra Easy Cupcakes
So let’s talk a bit about these Extra Easy cupcakes. These cupcakes use butter and are lighter and super moist. We’ve got the usual suspects in this cupcake, starting with the dry ingredients: all-purpose flour, baking powder and salt. Easy, common ingredients that you should totally have in your pantry already. Mix ’em all together and set ’em aside.
Next are the wet ingredients:butter, sugar, milk, vanilla extract and eggs. The butter is the fat component instead of vegetable oil and in my opinion, tends to make a more moist cake that stays moist for longer. Totally true for these cupcakes. The milk adds to the structure of the cake, in addition to adding moisture. Milk adds fluff and I love some fluff.
I used a teaspoon of vanilla extract to make sure there’s plenty of delicious vanilla flavor. Then the eggs add more moisture, structure and flavor. I switched it up in these and went with whole eggs instead of egg whites. No more egg yolks getting wasted here!
Once the wet and dry ingredients are combined, the milk is added.
Extra Easy Cupcakes
There’s so much moisture in these cupcakes! I love them! I’m a big, big fan of their ease of making, their flavor and moisture. They use such simple ingredients that you likely already have in your pantry too – score!
Extra Easy Cupcakes
When topped with my favorite buttercream frosting, these vanilla cupcakes really are a dream! They were a big hit in our house and I hope you love them as much as we did!
Perfect for offering as a snack, at tea time or as party food or any occasion. Exercise your creative muscle by decorating these cupcakes to suit your mood.Pipe the frosting onto the cupcakes for an extra special look.
Bismillah, let’s begin!
Check it out the Extra Easy Cupcakes Recipe and printable version below.
If you’re a cupcake making newbie, then this is the perfect starter recipe. Simple and oh-so-delicious, these Extra Easy cupcakes make a lovely.You can change the ingredients of these easy cupcakes to match the occasion.
Course Dessert, Snack
Prep Time 20 minutesminutes
Cook Time 25 minutesminutes
Total Time 45 minutesminutes
Servings 12
Author Bushra Waheed
Ingredients
200gm plain flour
3eggs
200gm butter
200gm sugar
1tspbaking powder
1/2tspvanilla essence
1/2cup milk
12cupcases
Instructions
Preheat oven to 325°F (180°C) and prepare a cupcake pan with liners.
Add the flour, sugar, baking powder and salt to a large mixer bowl and combine. Set aside.
In a medium bowl, cream butter with sugar. Then add eggs and beat well.
Add the wet ingredients to the dry ingredients and beat until well combined. Stir vanilla in it.
Slowly add the milkr to the batter and mix on low speed until well combined.
Scrape down the sides of the bowl as needed to make sure everything is well combined. Please note that the batter will be very thin.
Fill the cupcake liners about half way and bake for 15-17 minutes, or until a toothpick comes out with a few moist crumbs.
Remove the cupcakes from oven and allow to cool for 2 minutes, then remove to a cooling rack to finish cooling.Extra Easy Cupcakes are ready to serve.
Notes
Serve with tea or coffee.
I have also posted Picnic Cupcakes Recipewhich is another easiest & tastiest version of making Cupcakes. Do check it out as well.
Put your own spin on it. And lemme know how it turns out. Post a photo on Facebook (Recipestable) or on Twitter so I can see how lovely yours turn out.
Happy baking!!
If you like this post, Please Subscribe to my blog and let me know your feedback by commenting below.. I have lots more recipes to share with you.
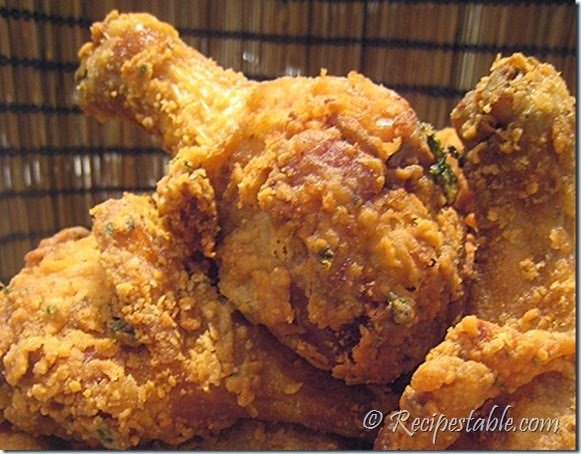
Fed up from meaty dishes? Want some change in week days? Try out this easy and tasty Aloo Daal Kabab recipe. These kababs are very easy to prepare and gives you unique taste. You can also enjoy these kababs as a tea time snack.. Must try it out this Aloo Daal Kabab Recipe and share your experience with us!!
[tabs style=”h1″ ]
[tab title=”Step By Step Method” ]
Step 1
Mash dal with a hand mixer.
Step 2
In a large bowl, combine together the potatoes and chana dal.
Step 3
Add onion, green chilies, cumin seeds, mint leaves and coriander leaves.
Step 4
Season with salt, red pepper, red chili, cumin seeds and garam masala.
Step 5
Mix until well combined. Shape into round cutlets or kababs.
Step 6
Dip first in egg and then roll in bread crumbs.
Step 7
Heat oil in a frying pan over medium heat. Fry kababs until golden brown.
Step 8
Remove from the oil and drain on paper towel. Delicious Aloo daal kabab is ready to serve. ENJOY!!
[/tab]
[tab title=”Recipe Note’s” ]We have determined the nutritional value of oil for frying based on a retention value of 10% after cooking. The exact amount may vary depending on cook time and temperature, ingredient density, and the specific type of oil used.[/tab]
[tab title=”Serving Suggestions”]Serve with your favorite chutney .[/tab]
[/tabs]
If you like Aloo Daal Kabab Recipe and make it then let me know your feedback by commenting below.
Goodbye to restaurant style pizzas, I really mean it…I can’t tell you how often I get asked to make pizza at home.
Quick and Easy Mince Pizza
Quick and Easy Mince Pizza
I made this pizza last night for a quick dinner. I had been roaming around with the recipe for making the perfect pizza for so long and the thought of topping the pizza crust with minced triggered me last night all of a sudden. I had no other choice but to execute my idea.
When it came to top the pizza crust, I went a little overboard and made ground chicken sauce.Topped the crust with the ground chicken and then with veggies, olives generously sprinkled mozzarella cheese and herbs and baked it in the oven for 30 minutes. For the entire 30 minutes, I literally peeped into the oven window and enjoyed the amazing show of crust puffing up, ground chicken getting browned and the cheese getting melted, what a divine pleasure it was!!!
Each step I did with so much passion and waited so eagerly to have a bite of this pizza. As the pizza came out perfectly baked with a soft crust and the mince topping on it along with the melted golden cheese on it, the mere sight of it made me go wild. I screamed out of joy and I burned my tongue out of greed!
Quick and Easy Mince PizzaQuick and Easy Mince PizzaQuick and Easy Mince PizzaQuick and Easy Mince PizzaQuick and Easy Mince Pizza
For this recipe I used pre-made pizza base, sauce and toppings.The fresh and juicy taste of fried mince, Italian pizza sauce, and vegetables are really an awesome treat for your tongue. Make a try and enjoy the original taste:-)
fried mince
Do try it. It’s a quick meal with most ingredients from the cupboard. My family really like it. It’s homemade pizza, so women are going to like it. It’s topped with ground chicken sauce, so men are going to love it. It has cheese on it, so kids are going to enjoy it of course in a messy way. After finishing up the pizza, everyone is going to go wild!!!
Good with minced lamb, too.
Bismillah, let’s begin!
Check it out the Easy Mince Pizza Recipe and printable version below!
This Easy Mince Pizza Recipe is for all those who want to prepare pizza at home but have not tried yet because making dough is not a quick process.It will reward you with infallible pizzas every time.
Prep Time 15 minutesminutes
Cook Time 30 minutesminutes
Total Time 45 minutesminutes
Servings 6
Author Bushrah | Recipestable
Ingredients
For Mince
500gm chicken mince
6mushroomsthinly sliced
1medium onionchopped
1teaspoonginger garlic paste
2green chiliesminced
1tablespooncooking oil
1teaspooncrushed red chili
1/2teaspoonoregano
1/2teaspoondried basil
1/4teaspoonrosemaryoptional
salt to taste
For Pizza Filling & Topping
1large ball of premade pizza dough
1-1/2cupcooked chiken mince
1cuppizza sauce
1/2cupcheddar cheese
1/2cupMozzarella cheese
1small onionthinly sliced
1small capsicumthinly sliced
1small tomatodeseeded & thinly sliced
4olivesthinly sliced
1teaspoonherb seasoning
2pinchoregano
Instructions
Start making the mince by heating some oil in a pan over medium heat.
Then saute onion and cook for 3-4 minutes until translucent.
Now add ginger-garlic paste and cook for a minute without browning, then add the minced meat and green chilies.
Cook and stir well for few minutes or until lightly browned.
Season with salt, pepper, basil and rosemary.
Add mushrooms and cook for 5 minutes or until all water dries up and mince is cooked thoroughly.
Roll out the dough in the circle or a desired shape (I use my deep dish pizza pan, 3×12″ ), Pushing gently until fairly thin and prick the dough all over with a fork.
Spread on the sauce almost to the edges and sprinkle on the oregano.
Top generously with the shredded cheddar cheese, chicken mince, arrange some onion and pepper, tomato slices, olives over it.
Grate on Mozzarella to taste and sprinkle herb seasoning then place in the oven to bake for 30 minutes, or until the crust is puffy, crisp and slightly blistered.
Take out of oven, let sit for a few minutes, then slice, sprinkle with red pepper flakes and serve warm.
Notes
Serving Suggestions: So easy, and delicious with a glass of fresh lemonade.
I have also posted Lunch Box Pizzaswhich is another easiest & tastiest version of making Pizza. Do check it out as well.
[
Put your own spin on it. And lemme know how it turns out. Post a photo on Facebook (Recipestable) or on Twitter so I can see how lovely yours turn out.
[divide icon=”circle”]
Happy Pizza Making!!
If you like this post, Please Subscribe to my blog and let me know your feedback by commenting below.. I have lots more recipes to share with you.
If there’s one dish I could live off for the rest of my life it would have to be Kabab’s. So many different possibilities and such a vast array of flavors, Kebabs are one of the most delicious foods of all time.I love experimenting with different flavors for kabab’s and today I’ve got for you a tasty Tawa Kabab that’s super easy and I’m also going to share my secret to a moist and juicy Kabab!!
Photo: Tawa Kabab Recipe
I’ve made these kabab’s on the Griddle Pan but you could also broil it in the oven if you wish. These kabab is a nice combination of chicken mince, raw papaya, fried onion and spices.This tawa kebab recipe is fast and fabulous—and sure to satisfy any palate!!
They’re easy and always a crowd pleaser. I used papaya and fried onion in this tawa kabab recipe which make the kabab’s very moist, juicy and flavorful. Also I marinated these kabab’s for just a couple of hours and they still came out really flavorful. You can use any meat beef, mutton or lamb of your choice and you can make them spicy or non spicy according to your preference.I love the sizzle when the Kabab touches the hot pan. 😛
Tawa Kabab’s on Griddle
The sizzling sound in the frying pan and the aroma that surrounds while making tawa kabab is sensational. AND the taste…delightful! These kabab’s will definitely become the new favorite appetizer in your family.
Photo: Tawa Kabab Recipe
I will not write any more praises about these tawa kababs and will let you make them and believe for yourself. Try my tawa kabab recipe nd you’ll never ever have a dry flavorless kebab again. 🙂
Check it out the Tawa Kabab Recipe and printable version below!!
The sizzling sound in the frying pan and the aroma that surrounds while making tawa kabab is sensational. AND the taste…delightful! These kabab’s will definitely become the new favorite appetizer in your family.
Prep Time 30 minutesminutes
Cook Time 20 minutesminutes
Total Time 50 minutesminutes
Servings 4
Author Bushrah |Recipestable
Ingredients
500gm chicken mince
4tablespoonfried and ground onion
3tablespooncooking oil
1tablespoonginger garlic paste
1tablespoonraw papaya
1tablespoonred chilicrushed
1tablespoonwhole coriandercrushed
1tablespooncumin seedsroasted and crushed
1/2teaspoongaram masala powder
Salt to taste
Instructions
Directions
In a small pan, dry roast cumin seeds, coriander seeds and red chilli. Let it cool and grind.
Put chicken mince in a mixing bowl. Add fried onion,green chilies, ginger garlic paste, raw papaya, garam masala, salt and grinded masala. Mix until well combined.
Leave it for 20 minutes to blend flavors. Then shape into seekh kababs.
Refrigerate for 1 hour or until set.
Now heat oil on a griddle (tawa) over medium heat.
Put kabab on the griddle (tawa). Fry kabab on each side for 2-3 minutes or until they turn golden.
When done, give them smoke of charcoal. Take it out in a serving platter. Tawa Kabab is ready to serve. ENJOY!!
Notes
Serving Suggestions: 1.You can served these kababs in a tortilla wrap or chapati with some green chutney. 2.Serve with naan and raita.
Recipe Note’s:
While mixing chicken mince, make sure it’s completely drained of water or else it will cause problems later while making the kebab.
For a healthy and lighter version, these kababs can also be baked.
You can prepare the kababs and place them in the fridge to fry when needed.
You can even fry them and wrap them in aluminium foil to warm up later and they taste good.
You can grill or BBQ them as well.
If you like this Tawa Kabab Recipe, Please Subscribe to my blog. I have lots more recipes to share with you. And If you make it then let me know your feedback by commenting below.
Cut a slit from the outer edge till the center. Start rolling from the slit to form cone. Roll out to a thick paratha. Do try this Lacha Pudina Paratha recipe!!
Bismillah, let’s begin!
Check it out the Lacha Pudina Paratha Recipe and printable version below!
In a bowl, combine together wheat flour, carom seeds, salt, chili powder, oil.
Gradually add water and knead a soft dough.
Make small balls out of the dough.
Roll into a quarter plate size.
Spread 1 tbsp of ghee over it.
Cut a slit from the outer edge till the centre.
Start rolling from the slit to form cone.
Roll out to a thick paratha.
Sprinkle mint leaves on it.
Roll again.
Heat a griddle( tawa) over medium heat.
Put paratha on hot griddle.
Fry paratha on each sides for 2 minutes or until light golden.
Lacha Pudina Paratha is ready to serve. ENJOY!!
Notes
Serving Suggestions: Serve with curd or pickle or chutney.
I have also posted Khasta Parathawhich is another easiest & tastiest version of making Paratha. Do check it out as well.
[divide icon=”circle”]
Put your own spin on it. And lemme know how it turns out. Post a photo on Facebook (Recipestable) or on Twitter so I can see how lovely yours turn out.
[divide icon=”circle”]
Happy Cooking!!
If you like this post, Please Subscribe to my blog and let me know your feedback by commenting below.. I have lots more recipes to share with you.
This Chocolate Tea Biscuit Rolls recipe is a kid and adult favorite. Chocolate covered Marie biscuits that are served with tea or coffee and used as a small snack. They are so good. Must try this Chocolate and Tea Biscuit Rolls recipe and give your feedback by commenting below.
Want to learn Arabi Paratha? Yes this is one of best Arabi Paratha recipe you can try and enjoy. A square shapes paratha stuffed with mince filling tastes awesome. You can also fill it with Potatoes.
Bring a completely new scrumptious flavor in lentils and vegetables. And put a hearty smile your family’s face with great tasting vegetables and lentils on week days. Give it a try!!
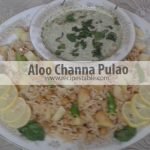
Photo: Aloo Channa Pulao Recipe
Channa Pulao is always my favorite.I have made it many times but this time I wanted to try it with Potatoes ( My fav veggie) and it came so good.
I do remember my khala (anty) who would make fabulous chana pulao along with potatoes. Well, while making this aloo chana pulao recipe and writing this post i do remember the aroma and taste still lingering in my mind of her pulao. Her dishes was always cooked to perfection and the taste of the pulao was just heavenly.
Photo: Aloo Channa Pulao Recipe
Though I make chana biryani often this [highlight]chana pulao[/highlight] is always my quick fix whenever I am pressed for time. Do try this Aloo Channa Pulao recipe. I had it Korma, mint raita and salad.It was a satisfying lunch.
Photo: Aloo Channa Pulao Recipe
Note’s:
For the chana pulao obviously you have to first cook the [highlight]chickpeas(kabuli channa)[/highlight].
if you have leftover boiled chickpeas than these too can be added.
The pulao has to be made with basmati rice and desi ghee or else something will be a little amiss if you do not use basmati rice and ghee. This is pretty easy pulao, great to put in your kids lunch box. If you pre cook the chana the previous day itself, then you don’t have to worry about anything. It can be made in minutes.
If you are diet conscious you can add olive or sesame oil.
This could be also quick fix forlunch box for office going people or students, since less cutting work. You can pack this with cucumber or vegetable raita. Check it out the Aloo Channa Pulao recipe and printable version below!!
Bring a completely new scrumptious flavor in lentils and vegetables. And put a hearty smile your family’s face with great tasting vegetables and lentils on week days. Do try this Aloo Channa Pulao Recipe, your family will love it.
Prep Time 30 minutesminutes
Cook Time 45 minutesminutes
Total Time 1 hourhour15 minutesminutes
Servings 6
Author Bushrah | Recipestable
Ingredients
2cupsbasmati rice
1cupchickpeaswhite channa
2onionthinly sliced
2potatoescubed
2bay leaves
4cloves
5black pepper pods
3cinnamon stick
1black cardamom
3green chiliesthinly sliced
4tablespoonclarified butter or ghee
1teaspoonginger garlic paste
salt to taste
3-1/2cupswater or chicken stock
For Garnishing
Fresh coriander leaveschopped
Instructions
Directions
Wash rice with few changes of water and soak them for 30 minutes. Keep aside.
Heat oil in a heavy bottom skillet over medium heat.
Add the cloves, cinnamon, cardamom, black pepper and bay leaves.
Now add the sliced onions, sliced green chilli and also the ginger garlic paste.
Saute them until the raw flavor fades.
Now add the Potato cubes and the boiled channa.
Stir well.
Cook for 5-6 minutes or until potatoes are tender.
Add rice and lightly stir.
Now add the salt and water.
Mix well and allow the rice to cook for 10 minutes or until done.
Cover with a lid and put on low flame.
After 10 minutes, turn the heat off.
Fluff the rice and dish it out.
Garnish with the coriander leaves. Aloo Channa Pulao is ready to serve.
Notes
Serving Suggestions: Serve with Mint Raita and salad.
If you like this Aloo Channa Pulao Recipe, Please Subscribe to my blog. I have lots more recipes to share with you. And If you make it then let me know your feedback by commenting below.
Remove stems, wash and finely chop the green chiles.
Step 3
Wash, separate cilantro leaves and finely chop them.
Step 4
Boil the potato in enough water till it turns soft.
Step 5
Cool the potato to room temperature and peel the potato.
Step 6
Roughly chop the boiled potato.
Step 7
In a sauce pot, add half a cup of water and chopped carrot.
Step 8
Boil till the carrot turns soft, add the frozen or fresh green peas and remove from heat.
Step 9
Strain the carrots and peas if necessary and cool them to room temperature.
Step 10
Heat quarter tsp of oil in a pan, add ginger garlic paste and green chilies.
Step 11
When raw smell of the ginger garlic paste is gone after a few seconds, remove from heat, cool the mixture a bit and add garam masala to the pot.
Step 12
In a mixing bowl, add boiled potato, carrot, peas, above spice mixture, cilantro and salt.
Step 13
Mash the mixture with help of a masher into paste.
Step 14
Leave some of the peas and carrots pieces intact.
Step 15
Divide the mixture into around 5 equal portions.
Step 16
Take a wide bowl full of water.
Step 17
Chop the edges off of the bread slices.
Step 18
Damp a muslin cloth and cover one bread slice at a time with the cloth.
Step 19
Dip the covered bread slice in the water for a second and remove.
Step 20
Squeeze the bread slice wrapped in muslin clothe between the palms to remove excess water.
Step 21
Take each portion of the mixed vegetable stuffing and place it on the damp bread slice.
Step 22
Roll one side of the damp bread slice over the stuffing till it touches the opposite side and pinch with wet fingers to seal the edges.
Step 23
Repeat the same with remaining bread slices and the stuffing.
Step 24
Roll each stuffed bread roll in bread crumbs and keep aside.
Step 25
Heat oil in a small pan on medium heat, slowly place the stuffed bread rolls into hot oil.
Step 26
Fry the bread rolls on both sides till they turn dark golden brown in color.
Step 27
Remove the bread rolls onto absorbent paper. Mixed Vegetable Bread rolls are ready to serve.
[/tab] [tab]
Serve with chili sauce or ketchup.
[/tab] [/tabs]
If you like Mixed Vegetable Bread Rolls Recipe and make it then let me know your feedback by commenting below.And if you know more innovative ways in which we can utilize this mouth watering Mixed Vegetable Bread Rolls, do share with us and we would be glad to give it a try.
Light and flaky shortbread, flavored with cardamom and vanilla will just melt away in your mouth!
Nankhatai (Eggless Buttery Cookies)
Nankhatai (Eggless Buttery Cookies)
Nan Khatai is a popular sweet snack which is equally liked by kids as well as elders. I am a huge fan of these nan khatais. It’s the NanKhatai recipe you would want when you suddenly crave for cookies.
Does this recipe rings a bell? Khasta nankhatais from your favorite bakery shop – so what does Khasta mean? Khasta means light and flaky and Nankhatai is referred to as a shortbread or biscuits. This is super easy fail proof recipe that has been tested and tried many times in my kitchen.
Nan Khatai are simple to make if you ask me.Nothing complicated and no fancy ingredients. No baking soda and baking powder added in this recipe. Does this make you walk away from the recipe? Please wait and learn the secret to these khasta nankhatai recipe. Secret to these flaky nankhatai is the amount of ghee/butter that goes in them. No water or milk is added to this recipe.
Bake these goodies for 12- 15 minutes. Depending on the oven, cooking time may vary. Unlike other cookies, nankhatais will not brown up and when taken out of the oven they will still be soft and gooey.
No worries, allow them to sit for 5-10 minutes on the counter and they will become firm. When completely cooled, store in an airtight container and enjoy with your evening tea!!
This Nan khatai Cookies Recipe especially for all those who are new in baking. These cookies prepare easily and serve with afternoon tea. Do try it!!
Check it out the Nankhatai (Eggless Buttery Cookies Recipe and printable version here!!
Light and flaky Indian shortbread, flavored with cardamom and vanilla will just melt away in your mouth!
Prep Time 20 minutesminutes
Cook Time 15 minutesminutes
Total Time 35 minutesminutes
Servings 18
Author Bushrah | Recipestable
Ingredients
1-1/4cupplain flour
1/4cupsemolinafine sooji
3/4cupbutter or gheeshould be at room temperature not melted
1/2cup+1 tablespoon superfine Sugar
1teaspoonVanilla
a pinch of Cardamom Powder
few almondspistachios and cashew nuts, for sprinkling
Instructions
Assemble all the ingredients.
Cream the butter and sugar till it turns fluffy.
Stir in the vanilla, flour and sooji. Make smooth dough of this mixture.
Stir in the vanilla and cardamom powder.
Knead a soft dough. Butter or ghee is the secret to light/flaky (khasta) nankhatai’s.
Roll the dough into a big circle.
Roll out medium sized balls and put a almond or cashew nut on the top of each piece.
(One way is to use a cookie cutter and cut out the nan khatais.
Other way and the original way to shape nan khatais is to take a small dough ball in your hand.)
Preheat oven at 150 degree C.
Place nankhatai cookies on a greased baking tray.
Bake in the preheated oven for 12-15 minutes.
Remove from oven and place on the counter and allow them to cool.
They will still be soft when you remove the tray from oven.
NanKhatai is ready to serve. ENJOY!!
Notes
Recipe Note’s: Once cooled store in an air tight container. These cookies stays good for about 2 weeks.Serving Suggestions: Serve with tea.
Put your own spin on it. And lemme know how it turns out by sharing a picture on Instagram, Facebook (Recipestable) or Twitter with this hashtag #Recipestable so I can see how lovely yours turn out.
Happy Baking!!
If you like this post, Please Subscribe to my blog and let me know your feedback by commenting below.. I have lots more recipes to share with you.
This Egg Pulao recipe is just perfect for egg lovers like me. Its a very quick recipe. I enjoy a lot when I make this dish.
Photo: Egg Pulao Recipe
This is not only great casual home cooking recipe but also serves as a great main dish for parties. Serve this for your next party or get together and your guests will be amazed by this simple yet aromatic treat.
In a non-stick heavy bottomed pot, heat oil and fry the sliced onion till soft then add tomatoes. Cook until softened, stirring continuously, while it cooks.
Step 2
Add ginger-garlic paste and saute for 2 minutes.
Step 3
Add a little water (about 1/8 cup).
Step 4
Add all the powdered spices and fry for 2 minutes.
Step 5
Add coconut milk and stir well.
Step 6
Add peas ,coriander and salt, just enough for the mixture and the rice.
Step 7
Add 2 1/2 cups of water and Stir once.
Step 8
Bring to a boil and Strain the rice.
Step 9
Add to the boiling pot and Cook, partially covered, until all the water has been absorbed by the rice. Reduce heat to a simmer.
Step 10
Add potatoes and eggs on top. Cover and cook for 10 minutes. Egg Pulao is ready to serve.
[/tab] [tab]
Serve hot with salad, yogurt.
[/tab] [/tabs]
If you like Egg Pulao Recipe and make it then let me know your feedback by commenting below.