Tag: Kids Friendly

  • Lip Smacking Cheesy Chicken Cups Recipe

    Lip Smacking Cheesy Chicken Cups Recipe

    An EASY comfort food recipe with just few ingredients and ready in 30 minutes!! Lip Smacking Cheesy Chicken Cups with a cheesy filling are sure to be a family favorite. Great for breakfast, dinner, snacks, a party appetizer or anything in between!!

    Cheesy Chicken Cups Recipe
    Cheesy Chicken Cups

    Cheesy Chicken Cups

    I had some extra chicken cooked and was looking to use it in a super fast and easy recipe. Since I also had few slider buns in my fridge, this fit the bill perfectly. I love the idea of the Slider cups (I can’t wait to get creative and try other things with that concept) and the filling was ooey-gooey, warm and cheesy. This is a very quick and simple way to get that comfort food taste/feeling.

    Here is my first try. I was thrilled they turned out just right.  They look so Lip smacking and appetizing (thus the name Lip Smacking Cheesy Chicken Cups). These are just as beautiful as they are delicious. My taste buds are going crazy, and I cannot wait for the next course in this meal.
    For a change of pace from your average dinner, this Cheesy Chicken Cups fits the bill! Unusual as it may be, once you take a bit, you will be reminded of some of your favorite chicken recipes. This is cheesy, flavorful, and will be loved by the whole family. Try making it tonight!

    Cheesy Chicken Cups Recipe
    Cheesy Chicken Cups yes!  Please give me one moment. All righty – I’m good now. I had to take a break to stare at these little beauties

    Extra Cheesiness Alert

    Alright, lets move to the cheesiness of this recipe.  


    Cheesy chicken filling, extra cheese on top and pepper flakes all stuffed up in a crispy slider bun shell.  Slider Buns are great for so many appetizers.  I used regular sized muffin tins, so I used bun half per cup, overlapping the corners so that all the edges are covered.   This whole recipe is sure to leave you stuffed and satisfied!

    Cheesy Chicken Cups Recipe
    Cheesy Chicken Cups Recipe

    What I Love About The Cheesy Chicken Cups?

    What I love about these Cheesy Chicken Cups – they are SO SIMPLE.  Seriously, simple ingredients, and half an hour are all it takes to make these Lip Smacking Cheesy Chicken Cups!   They are very good and easy to make, filled with a delicious cheesy chicken filling that everyone will love. We normally have all these items on hand. Mini Slider Buns make great cups for these cheesy treats. You can also use any leftover chicken for this.

    Cheesy Chicken Cups Recipe
    Cheesy Chicken Cups Recipe

    If you serve these at your Iftar Party or next get together , you may want to make a few a double batch – your guests will love them too!
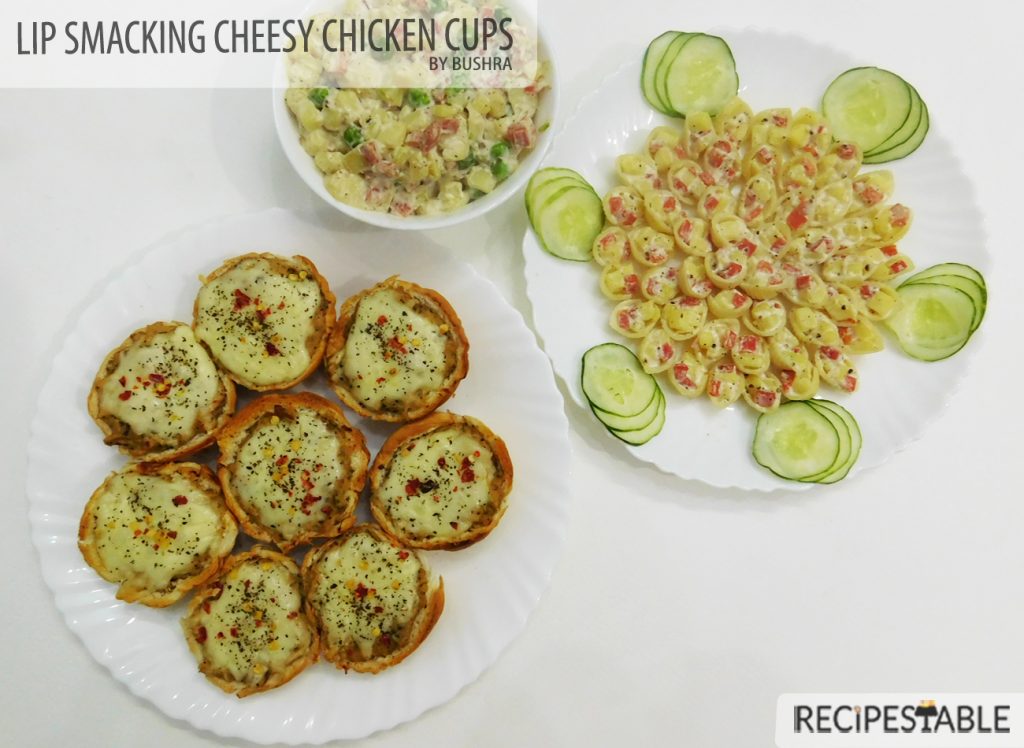
     Cheesy Chicken Cups with Pasta Salad
    Cheesy Chicken Cups with Pasta Salad that are hearty enough to serve for dinner.

    Bismillah let’s get started. 
    Check it out Hot and Sour Noodles Recipe and printable version here!!

    Lip Smacking Cheesy Chicken Cups Recipe

    Lip Smacking Cheesy Chicken Cups – baked to perfection in muffin tins! Great for holidays and lunch boxes – it’s portable and makes for easy serving!
    Prep Time 15 minutes
    Cook Time 15 minutes
    Servings 12
    Author Bushra Waheed

    Ingredients

    • 6 mini slider buns

    For Cheesy Chicken Filling:

    • 1 cup boiled chicken shreded
    • 1 small onion chopped
    • 1 tablespoon plain flour
    • 1 cup milk
    • 1/2 cup cheddar cheese
    • 2 tablespoon butter
    • 1 teaspoon black pepper freshly ground
    • 1 teaspoon dried basil
    • 1/2 teaspoon red chili flakes
    • salt to taste

    For Topping:

    • 1/2 cup grated cheese
    • red pepper flakes
    • dried or fresh basil

    Instructions

    • Preheat oven to 180 degrees C.
    • Lightly greased a muffin pan with non-stick cooking spray or butter.

    To Prepare the Chicken Filling:

    • Melt butter in a frying pan over medium heat.
    • Fry onion till soft and translucent. Now add the plain flour and stir well.
    • Stir in the milk and cook for 2-3 minutes or until sauce is thickened.
    • Season with salt, black pepper, red chili flakes.
    • Stir in the shredded chicken and keep stirring for few minutes or until well combined.
    • Add cheese and dried basil and give it a good stir.
    • Turn the heat off.

    To Assemble the Cheesy Chicken Cups:

    • Cut buns into halves and put each half into the prepared muffin pan.
    • Press the buns into the holes to form cups.
    • Spoon chicken filling evenly into cups.
    • Sprinkle remaining cheese over them.
    • Top with chili flakes and dried basil (optional).
    • Bake for 12 to 15 minutes or until cheese is melted and they turn golden brown.
    • Take it from the oven. Remove from the muffin pan.
    • Lip Smacking Cheesy Chicken Cups are ready to serve. ENJOY!!

    I have also posted Buffalo Chicken Cheese Balls Recipe and Mini Pizza Cups Recipe which are another easiest & tastiest version of Comfort Food. Do check it out as well.

    Put your own spin on it. And lemme know how it turns out. Post a photo on Facebook (Recipestable) or Instagram on Twitter so I can see how lovely yours turn out.

    Happy Cooking

  • Quick Weeknight Dinner: Chicken Tikka Pizza Recipe (Ready in Under 30 Minutes)

    Chicken Tikka Pizza

    Pizza is a popular and delicious dish of Italian origin, that has become extremely popular all over the world.
    Today i am bringing you guys an amazing fusion dish. Fusion cooking is a delight! It creates magic and is fairly easy to do. When we combine a number of cuisines in one meal, we get a delicious combination of new tastes and flavors.
    If you love pizza and you love BBQ aroma – then this is totally your kind of Pizza.It sounded AH-mazing!…and it sure was! It was “love at first bite”!

    Chicken Tikka Pizza Recipe
    Photo: Chicken Tikka Pizza 

    Chicken tikka is Asian style of barbecued chicken and it tastes fabulous as a topping on pizza. It has become widely popular in Pakistan.

    Chicken Tikka Pizza Marination
    Photo: Chicken Tikka Pizza Marination

    I made it yesterday for my family and especially for my brother. He is a true pizza lover. He was sad when it got over and even though he knew there was no more pizza left he was talking about how he felt like having this pizza the next day. He still talks about it. And while writing this post, I wish I had some pizza dough so that I could make this again now.
    If you ask me what makes a good pizza, i would definitely say that it is the sauce. I will overlook a ‘meh’ crust if the sauce is good. Yeah, but of course, i would prefer when both the crust and sauce are amazing, but the highlight of a pizza for me is definitely its sauce. And this sauce is just ‘magical perfection’. Talking about the crust, i prefer thin crust pizza over a thick chewy one. And this recipe gives you the perfect crust. The best part is that it is super easy. Hope you guys give this recipe a try and be fall illustrious among your friends and relatives for making finest an admirable Chicken pizza.

    So let the fun begin

    1st Prepare Chicken Tikka:

    Marinate the chicken with the lemon juice, yogurt, ginger garlic paste, roasted cumin powder, garam masala, red chilli powder, tikka masala powder and salt.Marinate for atleast 4 hours ( perferably marinate overnight).

    Chicken Tikka Pizza MarinationPhoto: Chicken Tikka Pizza Marination

    Now broil on high for 8-10 minutes, turning over once. Or grill till cooked.
    Transfer into a bowl and keep side.

    Note:Sorry I din’t get grilling process pictures as I was on in a hurry to assemble the pizza. 😛

    Now Make Pizza Dough :

    In a large mixing bowl, mix 2 cups flour, yeast, sugar, milk powder and salt.
    Combine warm water, egg and butter in a small bowl.

    Pizza Dough Ingredients
    Photo: Pizza Dough Ingredients

    Add this in the flour mixture and beat with an electric mixer on High for 3 minutes.
    Using a wooden spoon, stir in as much of the remaining flour as you can. or knead with hand.
    Turn dough out onto a lightly floured surface. Knead in enough of the remaining flour to make a moderately stiff dough that is smooth and elastic ( 3 to 5 minutes ).
    Shape dough into a ball. Place in a lightly greased bowl, turning once to grease dough surface.

    Chicken Tikka Pizza Dough
    Photo: Pizza Dough

    Cover bowl and let the dough rise in a warm place until double in size ( 50 to 60 minutes ).
    Punch dough down. Turn dough out onto a lightly floured surface.
    Cover and let rest for 10 minutes.

    To Make Pizza Sauce :
    Blend tomato paste, tomato sauce, oregano in a blender.
    Heat 1 teaspoon butter in a pan, add garlic paste & fry for 1 minute.
    Add blended tomato mixture & paprika.
    Cook on medium heat until sauce is thick. Keep aside and let it cool competely.

    To Assemble The Pizza

    Preheat oven to the highest setting on your oven. Mine goes to 250 C degree.
    If you have a pizza stone, place it in the oven. I do not have one, and I use the back of my sheet pan.
    You do not have to preheat your sheet pan. Dust your sheet pan.
    Roll out your pizza dough.
    Drizzle some melted butter on top of your rolled out pizza.
    Prick with fork and let it rest for 10 minutes.
    Spread pizza sauce over it.
    Top generously with the chicken tikka and capsicum.
    Sprinkle cheddar cheese and mozzarella cheese.
    Sprinkle parsley and oregano on top the pizza.
    Bake for 20 minutes or until cheese has melted and crust has cooked.
    Sprinkle some extra parsley. Let cool a little. Cut into slices and serve.

    Lets go to weekend Programming class with this fabulous pizza. I’m sure my class-fellow’s will enjoy this pizza. 🙂

    Recipe Notes:

    1. .FOR PIZZA DOUGH:  If you want to store the extra pizza dough for future use, just oil the dough ball all around and put each ball into separate zippered freezer bag. You can freeze this way for about 2-3 days.The day before you plan on using them, just transfer the dough to the refrigerator. And on the day of usage, remove from fridge, place on a floured counter and gently press the ball into 1/2 inch thickness and let rise for 2 hours.

     Chicken Tikka Pizza Dough
    Photo: Pizza Dough

    FOR PIZZA CRUST: The crust cooks really fast. Mine actually took just 12 minutes. Do not over cook or your crust will become hard. By the time the cheese melts, the crust will get cooked. Even then just check before taking out.

    Chicken Tikka Pizza Crust
    Photo: Chicken Tikka Pizza Crust

    FOR PIZZA SAUCE: This recipe makes about 1-1/2 cups of pizza sauce, I often have a bit leftover for during the week if I want to make bread pizza pinwheels or homemade pizza rolls. Sometimes, I place the extra sauce in sterilized jars and freeze it until i need it next. I just let it thaw in the refrigerator when I know I am going to need it.

    FOR TIME SAVING: You wont require much time in the kitchen if you prepare the dough and marinate the chicken the night before. The next day, you will just have to grill the chicken, and thaw the dough for 2 hours and assemble the pizza.

    Chicken Tikka Pizza

    Prep Time 1 hour 30 minutes
    Cook Time 30 minutes
    Total Time 2 hours
    Servings 6
    Author Bushrah

    Ingredients

    For Pizza Dough

    • 2 cups flour
    • 1 egg beaten
    • 1/4 cup Luke warm water
    • 1 tablespoon butter
    • 2 tablespoon dry milk powder
    • 2 teaspoon yeast
    • 1 teaspoon sugar
    • 1 teaspoon salt

    For Chicken Tikka

    • 500 gm boneless chicken cubed
    • 2 tablespoon plain yogurt
    • 1 tablespoon oil or butter
    • 1 teaspoon ginger garlic paste
    • 1 tablespoon tikka masala powder
    • 1 teaspoon crushed red chili
    • 1 teaspoon salt
    • 1 teaspoon garam masala powder
    • 1/2 teaspoon cumin powder

    For Pizza Topping

    • 1 cup cheddar cheese grated
    • 1/2 cup Mozzarella cheese grated
    • 4 tablespoon pizza sauce
    • 1/2 teaspoon oregano
    • 1/2 teaspoon dried parsley
    • 1 capsicum sliced

    Instructions

    Directions

      To Make Dough

      • Knead all the dough ingredients with lukewarm water.
      • Keep covered in an oiled bowl in a warm place for 1 hour or until doubled and well risen.

      To Make Chicken Tikka

      • Marinate all chicken tikka ingredients for 30 minutes then cook on high heat for 20 minutes or until chicken is tender and all juices run clear.

      To Assemble The Pizza

      • Roll out the dough onto a floured surface and line a pizza plate with it.
      • Spread pizza sauce.
      • Top with chicken tikka, cheeses, oregano and let rise again in a warm place for 20 more minutes.
      • Sprinkle some dried parsley over it.
      • Bake at 200 degrees C for 20 minutes or till cheese has melted and dough is cooked.
      • Remove from the oven and cut into wedges. Chicken Tikka Pizza is ready to serve. ENJOY!!

      Notes

      Serving Suggestions:
      Serve with Chili Sauce.

    • Crunchy Fish Cutlets Recipe

      Crunchy Fish Cutlets

      This Crunchy Fish cutlets recipe is lightly different from usual ones. It will brighter out mood of all fish lovers. Use these fish cutlets as a starter or simply prepare a fish burger for evening tea.

      Crunchy Fish Cutlets Recipe
      Photo: Crunchy Fish Cutlets Recipe

      Check it out the Crunchy Fish Cutlets Recipe here!!

      [divider]

      [one_fourth]Prep Time:15 minutes+ Cooling [/one_fourth] [one_fourth]Cook Time:20 minutes[/one_fourth] [one_fourth]Servings: 5[/one_fourth] [one_fourth_last]Difficulty Level: Easy[/one_fourth_last]

      [divider]

      [tabs type=”horizontal”] [tabs_head] [tab_title]Ingredients[/tab_title] [tab_title]Nutrition[/tab_title] [/tabs_head] [tab]

      • 500 gm fish fillets
      • 2 green onions, chopped
      • 2 boiled potatoes, mashed
      • 4 green chilies, chopped
      • 1/2 cup breadcrumbs
      • 2 eggs, lightly beaten
      • 1 tablespoon butter
      • 1 tablespoon fresh coriander leaves, chopped
      • 1 tablespoon mint leaves, chopped
      • 1 teaspoon ginger garlic paste
      • 1 teaspoon pepper powder
      • salt to taste
      • Oil for deep frying

      [/tab] [tab]Yield: 5 servings

      Nutritional information is not yet available. [/tab] [/tabs]

      Directions:
      [tabs type=”horizontal”] [tabs_head] [tab_title]Step by Step Method[/tab_title] [tab_title]Serving Suggestions[/tab_title][/tabs_head] [tab]

      Step 1

      Boil fish flesh with little salt till they are cooked.

      Step 2

      Pour oil in a pan, as the oil becomes hot put onion, ginger, garlic & green chillies and half fry. You have to stir it continuously.

      Step 3

      Now add fish to it and mix well.

      Step 4

      Don’t add water to it.

      Step 5

      Make this mixture dry and Cook till it dry.

      Step 6

      Now add pepper powder. Fry well.

      Step 7

      Add smashed potatoes and mix well .

      Step 8

      Turn off the stove and sprinkle coriander and mint leaves.

      Step 9

      If you need salt, you can add as per the taste.

      Step 10

      Let it be cool for some time then make small round balls .

      Step 11

      Make patties with that.

      Step 12

      Take a bowl beat the eggs and in another plate take bread crumbs.

      Step 13

      Dip this balls in the egg mixture & then put bread crumbs on both sides of the cutlet.

      Step 14

      Now deep fry the cutlets in oil for 8-10 minutes or until golden brown.

      Step 15

      Then Remove from the heat and drain on paper towel. Crunchy Fish Cutlets are ready to serve.

      [/tab] [tab]

      • Serve with tomato ketchup.

      [/tab] [/tabs]
      If you like Crunchy Fish Cutlets Recipe and make it then let me know your feedback by commenting below.And if you know more innovative ways in which we can utilize this mouth watering Crunchy Fish Cutlets, do share with us and we would be glad to give it a try.

    • Street Food Favorite: The Flavorful Chicken Rolls Recipe!

      Chicken Rolls

      Chicken Rolls pack your favorite ingredients into a quick and easy recipe that makes chicken desirable again. You can prepare it in advance for guests. Give it a try!!

      Stuffed Chicken Rolls Recipe
      Photo: Chicken Rolls Recipe

      Check it out the Chicken Rolls Recipe here!!

      [divider]

      [one_fourth]Prep Time:10 minutes + cooling time[/one_fourth] [one_fourth]Cook Time:1 hour[/one_fourth] [one_fourth]Servings: 6[/one_fourth] [one_fourth_last]Difficulty Level: Easy[/one_fourth_last]

      [divider]

      [tabs type=”horizontal”] [tabs_head] [tab_title]Ingredients[/tab_title] [tab_title]Nutrition[/tab_title] [/tabs_head] [tab]

      • 1/2 kg chicken mince
      • 1 can chicken sausage, chopped
      • 1 small onion, chopped
      • 1 stalk celery, chopped
      • 1/2 cup Italian style spaghetti sauce
      • 1 egg
      • 1 small carrot, coarsely grated
      • 2 slices pan American cheese, cut into cubes
      • 1/4 cup raisins

      [/tab] [tab]Yield: 6 servings

      Nutritional information is not yet available. [/tab] [/tabs]

      Directions:
      [tabs type=”horizontal”] [tabs_head] [tab_title]Step by Step Method[/tab_title] [tab_title]Serving Suggestions[/tab_title][/tabs_head] [tab]

      Step 1

      Combine all ingredients with 3/4 tsp iodized fine salt and 1/4 tsp pepper.

      Step 2

      Mix thoroughly.

      Step 3

      Wrap every 3/4 cup of mixture in aluminum foil. Roll.

      Step 4

      Steam for 1 hour.

      Step 5

      Cool and chill overnight.

      Step 6

      Unwrap and slice. Chicken Rolls is ready to serve. Enjoy!

      [/tab] [tab]

      • Serve with your favorite dipping sauce.

      [/tab] [/tabs]
      If you like Chicken Rolls Recipe and make it then let me know your feedback by commenting below.And if you know more innovative ways in which we can utilize this mouth watering Chicken Rolls, do share with us and we would be glad to give it a try.

    • Skip the Takeout Line: Make Restaurant-Style Chicken Club Sandwich at Home


      Chicken Club Sandwich

      This Club Sandwich is stacked high with chicken, cheese slices, mustard Mayo and fresh tomatoes goodness. This flavorful Chicken Club Sandwich will add brightness to even the coldest winter day–but are perfect for any time of year.

      This quick and easy to prepare club sandwich, makes a tasty meal for two. Also It’s a great picnic food or can be served at a small lunch gathering. Goes great with french fries.

      Chicken Club Sandwich Recipe
      Photo: Chicken Club Sandwich Recipe

      Check it out the Chicken Club Sandwich Recipe here!!

      [divider]

      [one_fourth]Prep Time:15 minutes[/one_fourth] [one_fourth]Cook Time:5 minutes[/one_fourth] [one_fourth]Servings: 4[/one_fourth] [one_fourth_last]Difficulty Level:Easy [/one_fourth_last]

      [divider]

      [tabs type=”horizontal”] [tabs_head] [tab_title]Ingredients[/tab_title] [tab_title]Nutrition[/tab_title] [/tabs_head] [tab]

      • 12 white bread slices, edges cut off
      • 1 cup cooked chicken, cut into slices
      • 2 teaspoon butter
      • 4 tablespoon mayonnaise
      • 1 teaspoon mustard paste
      • 1 tomato, thinly sliced
      • 4 cheese slices
      • 4 fried eggs
      • 4 lettuce leaves

      For Serving:

      • Tomato Sauce
      • French Fries

      [/tab] [tab]Yield: 4 servings

      Nutritional information is not yet available. [/tab] [/tabs]

      Directions:
      [tabs type=”horizontal”] [tabs_head] [tab_title]Step by Step Method[/tab_title] [tab_title]Serving Suggestions[/tab_title][/tabs_head] [tab]

      Step 1

      Spread butter on one side of bread slices.

      Step 2

      Toast on the hot griddle or pan.

      Step 3

      In a small bowl, mix together the mustard and mayonnaise.

      Step 4

      Spread mustard mayonnaise on one side of each bread slice.

      Step 5

      Place lettuce over a toast and cover with a slice of cheese and some cooked chicken.

      Step 6

      Cover with another toast and top with tomato slices.

      Step 7

      Put a fried egg over the tomato.

      Step 8

      Cover with remaining toast, buttered side down.

      Step 9

      Secure together with wooden-picks.

      Step 10

      Cut diagonally into half. Make the other sandwiches with the same method.

      Step 11

      Transfer into a serving platter. Chicken Club Sandwich is ready to serve. ENJOY!

      [/tab] [tab]

      • Serve with tomato sauce and mustard sauce on the side.

      [/tab] [/tabs]
      If you like Chicken Club Sandwich Recipe and make it then let me know your feedback by commenting below.And if you know more innovative ways in which we can utilize this mouth watering Chicken Club Sandwich , do share with us and we would be glad to give it a try.

    • Energy Bites Made Easy: Honey Date Balls Recipe (Fuel Your Day!)

      Honey Date Balls

      Honey, almonds and dates make these delish treats. Quick & easy. A great healthy snack or perfect for a lunch box or a hike!

      honey date balls
      Photo: Honey Date Balls Recipe

      Check it out the Honey Date Balls Recipe here!!

      [divider]

      [one_fourth]Prep Time:20 minutes[/one_fourth] [one_fourth]Cook Time:5 minutes[/one_fourth] [one_fourth]Servings: 25[/one_fourth] [one_fourth_last]Difficulty Level: Very Easy[/one_fourth_last]

      [divider]

      [tabs type=”horizontal”] [tabs_head] [tab_title]Ingredients[/tab_title] [tab_title]Nutrition[/tab_title] [/tabs_head] [tab]

      • 2 cups almonds, crushed
      • 2 cups pitted dates, preferably Medjool
      • ¼ cup raw Honey
      • 1/4 cup shredded coconut
      • melted butter, for forming balls

      [/tab] [tab]Yield: 25 balls.

      Nutritional information is not yet available. [/tab] [/tabs]

      Directions:
      [tabs type=”horizontal”] [tabs_head] [tab_title]Step by Step Method[/tab_title] [tab_title]Recipe Note’s[/tab_title][tab_title]Serving Suggestions[/tab_title][/tabs_head] [tab]

      Step 1

      Preheat oven to 170 degree C.

      Step 2

      Put almonds in a food processor. Process until finely chopped.

      Step 3

      Spread grinded almonds on a baking sheet and toast in oven for 3-4 minutes, or until fragrant and a shade darker.

      Step 4

      Now put dates into the food processor.

      Step 5

      Process for 2-3 minutes or until finely chopped.

      Step 6

      Take it out in a bowl. Add almonds.

      Step 7

      Stir in the honey. Mix together until well combined.

      Step 8

      Use melted butter to dampen your hands periodically, and shape mixture into 1-inch balls.

      Step 9

      Then roll in the coconut.

      Step 10

      Store in an air-tight container at room temperature for a few days.Delicious Honey Date Balls are ready to serve. ENJOY!!

      [/tab] [tab]

      • You can also freeze them for a couple of weeks.

      [/tab][tab]

      • Serve with a glass of milk.

      [/tab] [/tabs]
      If you like Honey Date Balls Recipe and make it then let me know your feedback by commenting below.And if you know more innovative ways in which we can utilize this sweet and mouth watering Honey Date Balls, do share with us and we would be glad to give it a try.

    • Juicy Perfection: The Easy Grilled Chicken Burger Recipe!

      Grilled Chicken Burger

      This Grilled chicken burger is packed with delicious flavor and are perfect for any night of the week. The process to preparing this amazing burger is simple- ground chicken is combined with a garlic, onion, hot and Worcestershire sauce and then formed into patties. Then simply grill. After the burgers are cooked they are placed onto buns and topped with a cheese slice.

      If you are looking for a great tasting recipe for chicken burger, give this one a try.

      Grilled Chicken Burger Recipe
      Photo: Grilled Chicken Burger Recipe

      Check it out the Grilled Chicken Burger Recipe here!!

      [divider]

      [one_fourth]Prep Time:15 minutes[/one_fourth] [one_fourth]Cook Time:15 minutes[/one_fourth] [one_fourth]Servings: 4[/one_fourth] [one_fourth_last]Difficulty Level: Easy[/one_fourth_last]

      [divider]

      [tabs type=”horizontal”] [tabs_head] [tab_title]Ingredients[/tab_title] [tab_title]Nutrition[/tab_title][tab_title]Diabetic Exchanges[/tab_title] [/tabs_head] [tab]

      For Burger Patties

      • 1 pound ground chicken
      • 1 onion, finely chopped
      • 1 tablespoon ginger garlic paste
      • 1 tablespoon Worcestershire sauce
      • 1 tablespoon hot sauce
      • 1 tablespoon lemon juice
      • 1 teaspoon dried parsley
      • 1/2  teaspoon crushed red chili
      • 1/2 teaspoon black pepper, freshly ground
      • salt to taste

      For Topping

      • tomato & cucumber slice
      • Low Fat mayonnaise
      • 1/2 cup torn leuttece leaves
      • 1/2 cup chili garlic or tomato suace

      Other Ingredients:

      • 1 Cup Cabbage Coleslaw, for serving
      • 4 cheese slices
      • 4 burger buns
      • French fries

      [/tab] [tab]

      Yield: 4 burgers

      Amount Per Serving: ( 1 serving = 1 burger without coleslaw)

      • Calories: 322
      • Fat: 12 g (4 g saturated fat)
      • Cholesterol: 79 mg
      • Sodium: 801 mg
      • Carbohydrate: 29 g
      • Fiber: 2 g
      • Protein: 25 g

      [/tab][tab]

      • 3 lean meat
      • 2 starch
      • 1 fat.

      [/tab] [/tabs]

      Directions:
      [tabs type=”horizontal”] [tabs_head] [tab_title]Step by Step Method[/tab_title][tab_title]Recipe Note’s[/tab_title] [tab_title]Serving Suggestions[/tab_title][/tabs_head] [tab]

      Step 1

      In a large bowl, combine the onion, lemon juice, parsley, ginger garlic paste, hot sauce, Worcestershire sauce, red chili, salt and pepper.

      Step 2

      Crumble chicken over the mixture and mix well.

      Step 3

      Shape into four round patties.

      Step 4

      Grill burgers, covered, over medium heat for 5 minutes on each side or until all juices run clear.

      Step 5

      Meanwhile, Toast burger buns.

      Step 6

      Spread mayonnaise on the surface of burger buns.

      Step 7

      Now put chicken patties on burger buns.

      Step 8

      Top with cheese slices, leuttec leaves, tomato or cucumber.

      Step 9

      Transfer into a platter. Delicious Grilled Chicken Burger is ready to serve.

      [/tab] [tab]

      • You can either fry the chicken burgers in the pan or cook them on the grill. If you decide to cook them on the grill, I would recommend brushing them with olive oil on both sides.
      • To make it even lighter, omit the rolls and use the burgers to top a salad!

      [/tab][tab]

      • Serve with coleslaw salad, tomato ketchup and French fries.

      [/tab] [/tabs]
      If you like Grilled Chicken Burger Recipe and make it then let me know your feedback by commenting below.And if you know more innovative ways in which we can utilize this mouth watering Grilled Chicken Burger, do share with us and we would be glad to give it a try.

    • Rice Pakora Recipe

      Rice Pakora

      Rice Pakora is a tea time snack made with cooked Rice, Besan (Ground Flour) , onion and mild spices.Very easy to make tasty too. Try this Rice Pakora recipe, I’m sure you will definitely like them. You can use left over rice of lunch time to make Rice Pakora also.

      Rice Pakora Recipe
      Photo: Rice Pakora Recipe

      Check it out the Rice Pakora Recipe here!!

      [divider]

      [one_fourth]Prep Time:15 minutes[/one_fourth] [one_fourth]Cook Time:10 minutes[/one_fourth] [one_fourth]Servings: 6[/one_fourth] [one_fourth_last]Difficulty Level: Easy[/one_fourth_last]

      [divider]

      [tabs type=”horizontal”] [tabs_head] [tab_title]Ingredients[/tab_title] [tab_title]Nutrition[/tab_title] [/tabs_head] [tab]

      • 2 cups boiled rice
      • 1/2 cup gram flour
      • 1/2 cup chopped onion
      • 4 green chilies, thinly sliced
      • 2 tbsp fresh coriander leaves, chopped
      • 1 tsp red chili flakes
      • 1/2 tsp chat masala
      • salt to taste
      • oil for frying

      [/tab] [tab]Yield: 6 servings

      Nutritional information is not yet available. [/tab] [/tabs]

      Directions:
      [tabs type=”horizontal”] [tabs_head] [tab_title]Step by Step Method[/tab_title] [tab_title]Serving Suggestions[/tab_title][/tabs_head] [tab]

      Step 1

      In a bowl, combine together boiled rice, gram flour, onion, green chilies and coriander.

      Step 2

      Make a thick paste by using some water.

      Step 3

      Season with salt, chat masala and red chili flakes.

      Step 4

      Mix well and leave it for 10 minutes.

      Step 5

      Heat oil in a deep pan or wok.

      Step 6

      Put the 1 tbsp prepared batter in the form of Pakoras.

      Step 7

      Deep fry for 6-8 minutes or until Pakoras turn golden and crispy.

      Step 8

      Remove from the oil and drain on paper towel. Rice Pakora is ready to serve.

      [/tab] [tab]

      • Serve hot with Pakora Dipping Sauce.

      [/tab] [/tabs]
      If you like Rice Pakora Recipe and make it then let me know your feedback by commenting below.And if you know more innovative ways in which we can utilize this mouth watering Rice Pakora, do share with us and we would be glad to give it a try.

    • Samosa Recipe

      Samosa

      Samosa is a traditional treat in Pakistan and India at tea time and Ramadan.Give it a try!!

      Samosa Recipe
      Photo: Samosa Recipe

      Check it out the Samosa Recipe here!!

      [divider]

      [one_fourth]Prep Time:30 minutes[/one_fourth] [one_fourth]Cook Time:15 minutes [/one_fourth] [one_fourth]Servings: 8[/one_fourth] [one_fourth_last]Difficulty Level:Easy [/one_fourth_last]

      [divider]

      [tabs type=”horizontal”] [tabs_head] [tab_title]Ingredients[/tab_title] [tab_title]Nutrition[/tab_title] [/tabs_head] [tab]

      For Samosa Filling:

      • 1 cup mutton mince ( keema)
      • 1/2 cup green peas
      • 1 potato, grated
      • 1 tablespoon oil or ghee
      • 1 clove garlic, crushed
      • 1/4 teaspoon turmeric powder
      • 1/4 teaspoon freshly ground pepper
      • 1/4 teaspoon cumin powder
      • salt to taste

      For Samosa Pastry:

      • 1-1/2 cup plain flour
      • 1/2 cup butter
      • 1/2 cup warm milk
      • 1/2 teaspoon. salt

      Other ingredients

      • Oil for deep frying

      [/tab] [tab]Yield: 8 servings

      Nutritional information is not yet available. [/tab] [/tabs]

      Directions:
      [tabs type=”horizontal”] [tabs_head] [tab_title]Step by Step Method[/tab_title] [tab_title]Serving Suggestions[/tab_title][/tabs_head] [tab]

      Step 1
      To Make Samosa Filling:

      Heat oil in a frying pan. Saute garlic and lamb until browned.

      Step 2

      Stir in potato, peas, turmeric, and cook, stirring to prevent the mixture from sticking for about 5 minutes.

      Step 3

      Season and leave to cool.

      Step 4
      To Make Samosa Pastry

      Sift flour and salt into a bowl, rub in butter until mixture resembles bread crumbs.

      Step 5

      Mix in milk to make tacky dough.

      Step 6

      Flour hands, break off pieces of dough, size of a walnut.

      Step 7

      Roll out on well-floured board to make thin circle.

      Step 8

      In center of each circle, place a good teaspoon of filling.

      Step 9

      Dampen edges, fold over to make triangular patty.

      Step 10

      Deep fry a few at a time until golden brown. Samosa is ready to serve.

      [/tab] [tab]

      • Serve with Imli Chutney.

      [/tab] [/tabs]
      If you like Samosa Recipe and make it then let me know your feedback by commenting below.And if you know more innovative ways in which we can utilize this mouth watering Samosa, do share with us and we would be glad to give it a try.

    • The BEST Chicken Keema Recipe in 30 Minutes!

      Chicken Keema

      A delicious and simple recipe to follow in week days. Chicken Keema is a distinct taste then normal mince cooking. Goes great with boiled rice. Try this Chicken Keema Recipe and smack your lips for this mouthwatering dish made with chicken mince and spices.

      Chicken Keema Recipe
      Photo: Chicken Keema Recipe

      Check it out the Chicken Keema Recipe here!!

      [divider]

      [one_fourth]Prep Time:5 minutes[/one_fourth] [one_fourth]Cook Time:40 minutes[/one_fourth] [one_fourth]Servings:2 [/one_fourth] [one_fourth_last]Difficulty Level: Easy[/one_fourth_last]

      [divider]

      [tabs type=”horizontal”] [tabs_head] [tab_title]Ingredients[/tab_title] [tab_title]Nutrition[/tab_title] [/tabs_head] [tab]

      • 500 gm chicken mince
      • 1 onion, finely chopped
      • 2 tomatoes , finely chopped
      • 4 tbsp oil or butter
      • 2 tbsp ginger garlic paste
      • 1 tsp lemon juice
      • 1 tsp red chili powder
      • 1 tsp coriander powder
      • 1/2 tsp white pepper powder
      • 1/2 tsp garam masala powder
      • 1/4 tsp turmeric powder

      For Garnishing:

      • 2 tbsp corriander and mint leaves, chopped
      • 4 green chillies, slit

      [/tab] [tab]Yield: 2 servings

      Nutritional information is not yet available. [/tab] [/tabs]

      Directions:
      [tabs type=”horizontal”] [tabs_head] [tab_title]Step by Step Method[/tab_title] [tab_title]Serving Suggestions[/tab_title][/tabs_head] [tab]

      Step 1

      Heat 1 tbsp oil in a non-stick kadai or pan and saute the onions on a low flame till golden.

      Step 2

      Add ginger garlic paste and tomatoes. Mix well.

      Step 3

      Add all the dry masalas and saute on a low flame till oil separates.

      Step 4

      Add the minced chicken and cook on a low flame for about 30 mintues.

      Step 5

      Add mint and coriander leaves, green chillies and lime juice. Mix well and simmer for 10 mins or until done.

      Step 6

      Dish it out. Chicken Keema is ready to serve. ENJOY!!

      [/tab] [tab]

      • Serve hot with Boiled Rice.

      [/tab] [/tabs]
      If you like Chicken Keema Recipe and make it then let me know your feedback by commenting below.And if you know more innovative ways in which we can utilize this mouth watering Chicken Keema, do share with us and we would be glad to give it a try.

    • Italian Chicken Bow Tie Pasta Recipe

      Italian Chicken Bow Tie Pasta

      This is really a good dish for only a few ingredients. Very good and modifiable to suit your own tastes. Must try this Italian Chicken Bow Tie Pasta Recipe, you’ ll love it.

      Italian Chicken Bow Tie Pasta recipe
      Photo:Italian Chicken Bow Tie Pasta

      Italian Chicken Bow Tie Pasta
      Photo:Italian Chicken Bow Tie Pasta

      Italian Chicken Bow Tie Pasta2 Italian Chicken Bow Tie Pasta3 Italian Chicken Bow Tie Pasta4 Italian Chicken Bow Tie Pasta5

      Check it out the Italian Chicken Bow Tie Pasta Recipe here!!

      [divider]

      [one_fourth]Prep Time:10 minutes[/one_fourth] [one_fourth]Cook Time:10 minutes[/one_fourth] [one_fourth]Servings:4 [/one_fourth] [one_fourth_last]Difficulty Level: Easy[/one_fourth_last]

      [divider]

      [tabs type=”horizontal”] [tabs_head] [tab_title]Ingredients[/tab_title] [tab_title]Nutrition[/tab_title] [/tabs_head] [tab]

      • 4 skinless, boneless chicken breast halves – cooked
      • 1 (16 oz) package bow tie pasta
      • 1 (8 oz) bottle Italian-style salad dressing
      • 1 tomato, finely chopped

      [/tab] [tab]

      Yield: 4 servings.

      Amount Per Serving:

      • Calories: 712 kcal
      • Carbohydrates: 88.7 g
      • Cholesterol: 73 mg
      • Fat: 21.2 g
      • Fiber: 4.2 g
      • Protein: 43 g
      • Sodium: 982 mg

      [/tab] [/tabs]

      Directions:
      [tabs type=”horizontal”] [tabs_head] [tab_title]Step by Step Method[/tab_title] [tab_title]Serving Suggestions[/tab_title][/tabs_head] [tab]

      Step 1

      Bring a large pot of lightly salted water to a boil.

      Step 2

      Add bow tie pasta; cook for 8-10 minutes or until al dente.

      Step 3

      Drain and rinse in cold water.

      Step 4

      In a medium bowl, stir together chicken and salad dressing.

      Step 5

      Add pasta; toss to coat evenly.

      Step 6

      Stir in the chopped tomato. Italian Chicken Bow Tie Pasta is ready to serve. Enjoy!!

      [/tab] [tab]

      • Serve warm.

      [/tab] [/tabs]
      If you like Italian Chicken Bow Tie Pasta Recipe and make it then let me know your feedback by commenting below.And if you know more innovative ways in which we can utilize this mouth watering Italian Chicken Bow Tie Pasta , do share with us and we would be glad to give it a try.

    • Easy Cheesy Lasagna Recipe

      Easy Cheesy Lasagna

      This is a fast and easy way to make lasagna. It is yummy too. You get the same great flavor of a more complicated dish but exert none of the effort. Yum Yum !!

      Easy Cheesy Lasagna Recipe
      Photo: Easy Cheesy Lasagna Recipe

      Check it out the Easy Cheesy Lasagna Recipe here!!

      [divider]

      [one_fourth]Prep Time:10 minutes[/one_fourth] [one_fourth]Cook Time:30 minutes[/one_fourth] [one_fourth]Servings: 6[/one_fourth] [one_fourth_last]Difficulty Level: Easy[/one_fourth_last]

      [divider]

      [tabs type=”horizontal”] [tabs_head] [tab_title]Ingredients[/tab_title] [tab_title]Nutrition[/tab_title] [/tabs_head] [tab]

      • 1 pound ground beef
      • 1 (8 ounce) package wide egg noodles, cooked
      • 1 (8 ounce) package shredded mozzarella cheese
      • 1 (26 ounce) jar spaghetti sauce
      • 1 cup grated Parmesan cheese
      • 1 cup cottage cheese

      [/tab] [tab]Yield:6 servings

      Nutritional information is not yet available. [/tab] [/tabs]

      Directions:
      [tabs type=”horizontal”] [tabs_head] [tab_title]Step by Step Method[/tab_title] [tab_title]Serving Suggestions[/tab_title][/tabs_head] [tab]

      Step 1

      Heat a non-stick skillet over medium high heat.

      Step 2

      Place beef into the skillet. Cook for 15-20 minutes or until lightly browned.

      Step 3

      Drain.

      Step 4

      Stir in spaghetti sauce.

      Step 5

      Cover and simmer for 5 minutes.

      Step 6

      Stir in noodles.

      Step 7

      Sprinkle with mozzarella cheese and cottage cheese. Stir until well combined.

      Step 8

      Tranfer to a greased 2-quart casserole dish.

      Step 9

      Top with Parmesan cheese.

      Step 10

      Bake, uncovered, at 350 degree F, for 30 minutes or until bubbly and lightly browned. Easy Cheesy Lasagna is ready to serve. ENJOY!!

      [/tab] [tab]

      • Serve with Broccoli Bites.

      [/tab] [/tabs]
      If you like Easy Cheesy Lasagna Recipe and make it then let me know your feedback by commenting below.And if you know more innovative ways in which we can utilize this mouth watering Easy Cheesy Lasagna, do share with us and we would be glad to give it a try.

    • Say Goodbye to Dry Fish: The Secret to Making Juicy Fish Steak!

       Fish Steak

      Fish Steak is a healthy alternative to beef or chicken, and even non-fish eaters may enjoy this meaty, mild-flavored fish steak. So, must try out this delicious Fish Steak Recipe that is made with few simple ingredients and simple method. You can bake it as well if you don’t want to pan-fry.

      Fish Steak Recipe
      Photo: Fish Steak Recipe

       Check it out the Fish Steak Recipe here!!

      [divider]

      [one_fourth]Prep Time:15 minutes + marination[/one_fourth] [one_fourth]Cook Time:15 minutes[/one_fourth] [one_fourth]Servings:4 [/one_fourth] [one_fourth_last]Difficulty Level:Easy [/one_fourth_last]

      [divider]

      [tabs type=”horizontal”] [tabs_head] [tab_title]Ingredients[/tab_title] [tab_title]Nutrition[/tab_title] [/tabs_head] [tab]

      • 4 fish fillets (halibut)
      • 4 tablespoon butter
      • 2 tablespoon lemon juice
      • 1 teaspoon ginger garlic paste
      • 1 teaspoon mustard paste
      • 1 teaspoon white pepper
      • 1 teaspoon sesame oil
      • 1 teaspoon dried basil
      • 1 teaspoon fresh parsley, chopped

      [/tab] [tab]Yield: 4 servings

      Nutritional information is not yet available. [/tab] [/tabs]

      Directions:
      [tabs type=”horizontal”] [tabs_head] [tab_title]Step by Step Method[/tab_title] [tab_title]Serving Suggestions[/tab_title][/tabs_head] [tab]

      Step 1

      In a small mixing bowl, mix together the ginger-garlic paste, mustard paste, sesame oil, basil, salt, pepper, lemon juice, and parsley.

      Step 2

      Place the fish fillets in a resealable plastic bag.

      Step 3

      Pour the marinade over the fish fillets.

      Step 4

      Seal the bag Shake to coat evenly.

      Step 5

      Place in the refrigerator for 1 hour to blend flavors.

      Step 6

      Melt butter in a shallow frying pan.

      Step 7

      Remove fish fillets from the marinade.

      Step 8

      Pan-fry fish fillets for 5 minutes on each side or until fish is done when easily flaked with a fork.

      Step 9

      Transfer into a serving dish. Garnish with lemon wedges. Delicious Fish Steak is ready to serve. ENJOY
      [/tab] [tab]

      • Serve along with Tartar sauce and French Fries.

      [/tab] [/tabs]
      If you like Fish Steak Recipe and make it then let me know your feedback by commenting below.And if you know more innovative ways in which we can utilize this mouth watering Fish Steak, do share with us and we would be glad to give it a try.

    • The Best Vegetable Spring Rolls Recipe: Easy and Delicious

      Vegetable Spring Rolls

      Here is the my favorite Vegetable Spring Rolls Recipe. You can make them before Ramadan and can also freeze them and fry them when ever you want.

      Vegetable Spring Rolls
      Vegetable Spring Rolls


      These spring rolls are a perfect tea time snack and great party food. With a combination of colorful veggies and exotic taste of soy sauce, these rolls are a great choice for snacking. Give it a try!!

      Vegetable Spring Rolls
      Vegetable Spring Rolls

      A really delicious and colourful way to eat your spring vegetables.These Vegetable Spring Rolls tastes fresh and crisp and adds a lot of beautiful color to tea time.

      colorful vegetables
      Colourful And Delicious Ways To Eat Spring Vegetables

      Vegetable Spring Rolls Recipe With Step By Step Pictures:

      Step 1 : Heat 1 tablespoon vegetable oil in a wok over high heat.

      Vegetable Spring Rolls
      Step 1 

      Step 2:Stir fry onion, garlic, green peas, carrot, green pepper and cabbage for few minutes or until crisp tender.

      Vegetable Spring Rolls recipe
      Step 2 

      Step 3: Stir in the instant noodles (crushed) and soy sauce. Add seasoning and mix well.

      vegetable Spring Rolls
      Step 3

      Step 4: Turn off the stove and let it slightly cool.

      Vegetable Spring Rolls Recipe
      Step 4 

      Step 5: Transfer into a bowl. Keep aside to cool completely.

      Vegetable Spring Rolls recipe
      Step 5

      Step 6:Place a roll wrapper on a clean surface with a corner pointing towards you.Put 1 tablespoon vegetable mixture into the center of the wrap. Brush the edges with egg yolk or cornflour mixture.

      Vegetable Spring Rolls recipe
      Step 6 

      Step 7:Fold corner over the filling then roll up from corner to corner, folding edges in  to enclose filling.

      Vegetable Spring Rolls recipe
      Step 7 

      Step 8:Repeat this method with remaining wrappers and vegetable filling. And make twenty spring rolls.

      Vegetable Spring Rolls recipe
      Step 8 

      Step 9:Heat oil in a wok over medium heat.

      Vegetable Spring Rolls
      Step 9 

      Step 10: Fry spring rolls in batches.

      Vegetable Spring Rolls recipe
      Step 10

      Step 11: Fry on both sides for 1-2 minutes or until they turn crispy and golden in colour.

      Vegetable Spring Rolls recipe
      Step 11

      Step 12: Remove from the oil and transfer into a plate. Ready to enjoy!!

      Vegetable Spring Rolls recipe
      Step 12

      Check it out the printable version recipe below:

      Vegetable Spring Rolls

      A really delicious and colourful way to eat your spring vegetables.This Vegetable Spring Rolls recipe tastes fresh and crisp and adds a lot of beautiful color to tea time.
      Prep Time 20 minutes
      Cook Time 10 minutes
      Total Time 30 minutes
      Servings 10
      Author Bushrah | Recipestable

      Ingredients

      • 1 packet instant noodles
      • 1 tbsp vegetable oil
      • 2 cups shredded cabbage
      • 1/2 cup boiled green peas
      • 3 green onions sliced
      • 2 garlic cloves crushed
      • 1 carrot grated
      • 1 green pepper chopped
      • 1 tbsp soy sauce
      • 1/4 tsp white pepper
      • salt to taste
      • 20 frozen spring roll wrappers thawed
      • oil for frying
      • 2 tablespoon cornflour dissolved in a lil water and make a thick paste or a egg yolk

      Instructions

      Directions

      • Heat vegetable oil in a pan over high heat.
      • Add onion, garlic, green peas, carrot, green pepper and cabbage. Cook and stir for few minutes or until crisp tender.
      • Add instant noodles (crushed) and soy
      • sauce.
      • Season with salt and pepper.
      • Turn the heat off and take it out in a
      • bowl.
      • Set aside to cool.
      • Place 1 wrapper on a board with a corner pointing towards you.
      • Brush edges with cornflour mixture.
      • Spoon 1 tbsp vegetable mixture into the corner of the wrap.
      • Fold corner over the filling then roll up from corner to corner, folding edges in to enclose filling.
      • Repeat with remaining wrappers, cornflour mixture and filling.
      • Heat oil in a deep pan over medium high heat.
      • Deep fry spring rolls, in batches, for 2-3 minutes or until crispy and golden.
      • Remove from the oil and drain on kitchen paper. ENJOY!

      Notes

      Notes:
      Keep remaining wrappers covered with damp tea towel.
      Serving Suggestions:
      Serve hot with sweet chilli sauce.

      If you like this  recipe, Please Subscribe to my blog. I have lots more recipes to share with you. And If you make it then let me know your feedback by commenting below.

    • Rainy Day Snack: Easy Vegetable Pakora Recipe (Warm & Comforting!)

      Vegetable Pakora

      Pakoras are very famous in Pakistan and India.Your favorite vegetables are dipped in a spicy batter and deep fried to make fabulous fritters. Try this Vegetable Pakora Recipe, you’ll love it.

      Vegetable Pakora Recipe
      Photo: Vegetable Pakora Recipe

      Check it out the Vegetable Pakora Recipe here!!

      [divider]

      [one_fourth]Prep Time:10 minutes[/one_fourth] [one_fourth]Cook Time:20 minutes[/one_fourth] [one_fourth]Servings:4 [/one_fourth] [one_fourth_last]Difficulty Level: Easy[/one_fourth_last]

      [divider]

      [tabs type=”horizontal”] [tabs_head] [tab_title]Ingredients[/tab_title] [tab_title]Nutrition[/tab_title] [/tabs_head] [tab]

      • 400gm gram flour
      • 1 onion, chopped
      • 1 green chili,chopped
      • 2 potatoes
      • 1/2 tsp red chili powder
      • salt to taste
      • 1 tsp garlic, chopped
      • 1 tsp ginger,chopped

      [/tab] [tab]Yield: 4 servings

      Nutritional information is not yet available. [/tab] [/tabs]

      Directions:
      [tabs type=”horizontal”] [tabs_head] [tab_title]Step by Step Method[/tab_title] [tab_title]Serving Suggestions[/tab_title][/tabs_head] [tab]

      Step 1

      Add slowly more and more water while kneading the dough.

      Step 2

      In the end it should be a creamy substance, pancake-like.

      Step 3

      Let it stand for 5 till 30 minutes to soak through.

      Step 4

      Heat oil in a deep pan and deep-fat-fry spoonfuls of dough.

      Step 5

      Alternatively slice a raw potatoes into thin slices, turn them in the dough and deep-fry.

      Step 6

      If you like it hot, sprinkle some chat masala on the brown Pakora pieces. Vegetable Pakora is ready to serve. Enjoy!

      [/tab] [tab]

      • Serve with imli ki chutney or green chutney.

      [/tab] [/tabs]
      If you like Vegetable Pakora Recipe and make it then let me know your feedback by commenting below.And if you know more innovative ways in which we can utilize this mouth watering Vegetable Pakora, do share with us and we would be glad to give it a try.

    • Fresh from the Garden: Flavorful Garden Pizza Recipe (A Burst of Summer!)

      Garden Pizza

      A delicious vegetarian pizza made with zucchini, sweet red pepper, carrots and tomatoes. Give it a try!!

      Garden Pizza Recipe
      Photo: Garden Pizza Recipe

      Check it out the Garden Pizza recipe here !!

      [divider]

      [one_fourth]Prep Time:15 minutes[/one_fourth] [one_fourth]Cook Time:10 minutes[/one_fourth] [one_fourth]Servings:2 [/one_fourth] [one_fourth_last]Difficulty Level: Easy[/one_fourth_last]

      [divider]

      [tabs type=”horizontal”] [tabs_head] [tab_title]Ingredients[/tab_title][tab_title]Nutrition[/tab_title] [tab_title]Diabetic Exchange[/tab_title][/tabs_head] [tab]

      • 1 prebaked mini pizza crust
      • 1/3 cup seeded tomato, chopped
      • 1/3 cup shredded Italian cheese blend
      • 1/2 cup zucchini, chopped
      • 1/2 cup sweet red pepper, chopped
      • 1/2 cup green pepper, chopped
      • 2 tbsp finely chopped onion
      • 2 tbsp finely chopped carrot
      • 2 tsp butter
      • 1 tsp garlic powder
      • 1/8 tsp Italian seasoning
      • 1/8 tsp dried oregano
      • a pinch of pepper

      [/tab] [tab]Yield: 2 servings

      Amount Per Serving:( 1 serving = 1/2 pizza)

      • Calories: 324
      • Fat: 13 g (6 g saturated fat)
      • Cholesterol: 23 mg
      • Sodium: 568 mg
      • Carbohydrate: 42 g
      • Fiber: 4 g
      • Protein: 12 g

      [/tab] [tab]

      • 2 starch
      • 2 vegetable
      • 1-1/2 fat
      • 1 lean meat.

      [/tab][/tabs]

      Directions:
      [tabs type=”horizontal”] [tabs_head] [tab_title]Step by Step Method[/tab_title] [tab_title]Serving Suggestions[/tab_title][/tabs_head] [tab]

      Step 1

      Preheat oven to 450 degree F.

      Step 2

      Place pizza crusts on a pizza stone.

      Step 3

      Melt butter in a large skillet over medium heat.

      Step 4

      Saute the zucchini, peppers, onion, carrot and garlic for 8-10 minutes or until crisp-tender.

      Step 5

      Sprinkle with Italian seasoning, oregano and pepper.

      Step 6

      Toss to coat.

      Step 7

      Spoon vegetable mixture onto the prepared crust to within 1/2 inch of edges.

      Step 8

      Top with tomato and Italian cheese.

      Step 9

      Bake, in the preheated oven, for 10 minutes or until cheese is melted.

      Step 10

      Remove from the oven. Cut into wedges. Garden Pizza is ready to serve. Enjoy!!

      [/tab] [tab]

      • Serve with your favorite dipping sauce.

      [/tab] [/tabs]
      If you like Garden Pizza Recipe and make it then let me know your feedback by commenting below.And if you know more innovative ways in which we can utilize this  mouth watering Garden Pizza, do share with us and we would be glad to give it a try.