Tag: Eid Recipes

Celebrate Eid with a variety of Eid Recipes from Recipestable.com After the holy month of Ramadan treat your family with these great mouthwatering recipes.

  • Restaurant Style Tawa Fish Recipe

    Restaurant Style Tawa Fish Recipe

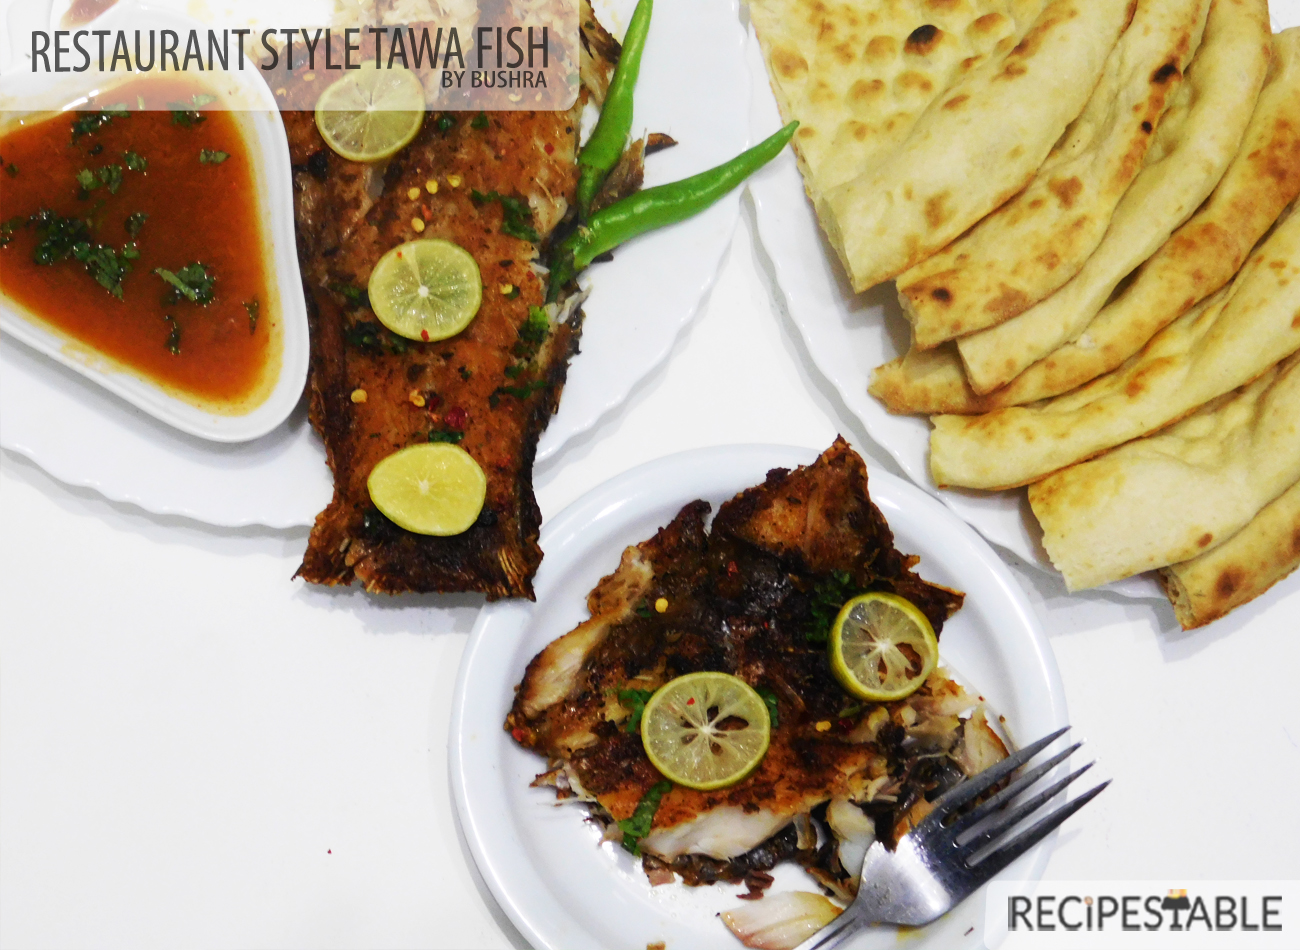
    This Restaurant Style Tawa Fish is a thing of beauty, with its crispy golden crust and spicy, juicy flesh inside. It’s a super quick and can be ready in less than 20 minutes and tastes just like the restaurant’s you would think it’s  take-out. Recreate your favorite Tawa Fish cheaper and better at home!

    Restaurant Style Tawa Fish

    One of the things I find so much fun about food blogging as a living is putting myself up to the challenge of recreating restaurant favorites at home. Although often involving a series of trial and error, it’s very rewarding to come up with a homemade version that’s pretty close to, if not better, than the original.

    Restaurant Style Tawa Fish

    The way I cook this Tawa Fish is a little unorthodox – but it’s a highly effective, no fail method! A blast of heat in a griddle pan and a basting of mustard oil and fish own juices does wonders for plain fish.

    This Restaurant Style Tawa Fish is made with a basic combination of rice flour and desi seasonings. Don’t be fooled by the simplicity of this dish. The fish fries up crispy and delicious. The cooking time is so short that the smell — which, if your fish is fresh and not funky, should not be overpowering — will dissipate quickly. And in the meantime, you have an easy dinner of spicy fish with a toothsome crust, anointed with rice flour and spices, mustard oil , perfumed with fresh Lemon wedges, paired with apricot chutney and naan.

    Restaurant Style Tawa Fish

    Rohu and Catla (Thela) Fish are two excellent choices for Tawa Fish, but baam, cod, or any other mild white fish should work fine. You can use any fish but my preference is rohu, skin on or off, as long as it is not too thick. Be careful not to overcook thin fillets.
    If the fish starts browning too fast, reduce the heat and add a splash of mustard oil to prevent scorching, or squeeze in the juice of half a lemon.

    How to cook Perfect Tawa Fish every time!

    1. Use a heavy duty Griddle (Tawa) – it DOES NOT need to be a non stick griddle or pan! Contrary to popular belief, it’s not just about using a non stick pan. A thin, cheap non stick pan will cause the fish to be in closer and harsher contact with the stove, causing the fish to brown unevenly in the few minutes it’s on the stove. Some crispy patches, some not so crispy ones.
    Use a heavy duty Griddle (Tawa), like a cast iron pan or a good quality, heavy non stick frying pan. I love my Griddle Pan, it heats better, and more evenly, which really helps to get an even, golden, crispy crust.

    2. Heat the pan first before adding the oil – I have NEVER had problems with fish sticking to the pan since I adopted this technique. It’s just an easy way to ensure the oil is hot enough but not too hot (a common mistake people make).
    To do this, just heat a dry pan, and as soon as you see small wisps of smoke, add oil, swirl to coat base, then immediately add the fish.

    3. If it sticks a bit, do not move until it naturally releases – Most fish fillets will initially stick to the pan as they start to cook (unless you’re using so much oil you’re basically shallow frying them). But it naturally releases once the surface is cooked and golden.
    So give it a nudge, and if it doesn’t want to move, then it means that it’s not ready. So just leave it and try again in another 15 seconds or so!

    4. Pat fish dry – Dry fish = crispier surface. Especially important for thawed frozen fish.

    5. Keep Basting with a little oil and its own juices –  it will gives nice juicy flavor.

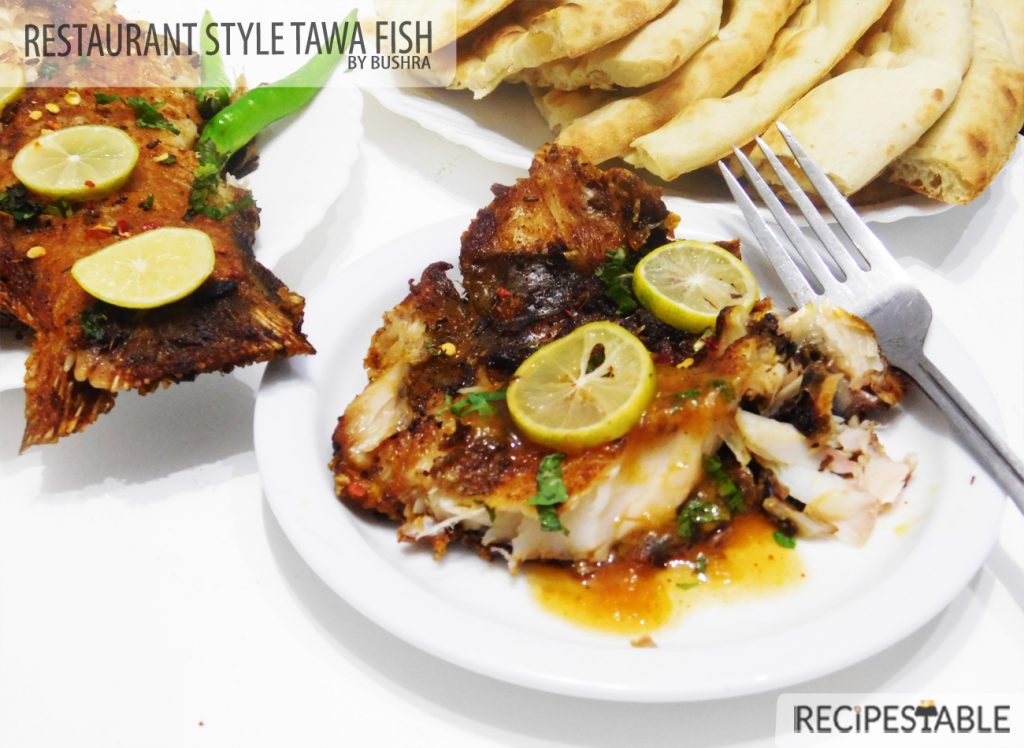
    Packed generously with a crunchy coating but there is so much more to it than what meets the eye! The flavor beneath the crunchy golden layer is delicious because of the magical spice that hits you with the first bite!! This is one fish that everyone is sure to love. Using this Restaurant Style Tawa Fish recipe, you’ll get perfectly flavored tawa fish.

    Restaurant Style Tawa Fish Recipe
    Restaurant Style Tawa Fish

    That’s one last picture before you go. So that you can get a close, hard look at this Restaurant Style Tawa Fish and get tempted. Oh so so tempted.

    Restaurant Style Tawa Fish
    Restaurant Style Tawa Fish Recipe

    Sauces or Chutney For Tawa Fish

    With well seasoned crispy golden texture outside and spicy juicy flesh inside, I don’t need anything more than a squeeze of fresh lemon. But I am a sauce person, so I never turn down a sauce even for fish! Here are my few favorite Sauces for Tawa Fish:

    • Apricot Chutney (Khubani Ki Chutney) for Tawa Fish – this is an absolute ripper. Totally restaurant worthy, few ingredients, the secret is to soak apricots before preparing the chutney.
    • Mint Tamarind Chutney for fish – a shop stopper kind of chutney with its tangy Minty flavor – made with fresh mint leaves and tamarind pulp.
    • Imli ki Chutney – traditionally thought of for fried fish but equally good with the Tawa Fish.
    • Data Chutney / Khajoor ki Chutney – This smooth chutney, which balances the tartness of vinegar with the sweetness of dates, is a delicious accompaniment to the Tawa Fish & Naan.
    • Brown Chutney – for Fish Mellow down the spice of fish by adding a little brown chutney.
    • Lemon Chutney  for Fish. Lip-smacking chutney to add more zesty flavor to Tawa Fish. It’s finger licking good!

    This Restaurant Style Tawa Fish recipe is ‘sea’riously worth trying , it’s cheaper to make at home and tastes so much better!

    If I may, ahem, say so myself, I’ve had quite a few successes with copycatting recipes. Here are a few of my favorites if you’d like to check them out:

    English Style Fish & Chips Recipe
    Fish Tikka Boti Recipe
    Tangy Pan Fried Fish Recipe
    Fish Steak Recipe
    Crumb Fried Fish Recipe
    Sweet and Sour Fish Recipe


    In the mood for more Pakistani food? Forget takeout and make your very own “combo plate” with Restaurant Style Lahori Mutton Karahi, Mutton Nihari Spicy Mutton Pulao , Angara Qeema.

    Put your own spin on it. And lemme know how it turns out and do take a few seconds to rate it! I would love to see your recreations so tag me on instagram @recipestable or Facebook (Recipestable) or on Twitter so I can see how lovely yours turn out.

  • The Flavorful Mint Chicken Curry Recipe

    The Flavorful Mint Chicken Curry Recipe

    Spice up your next dinner party with this Flavorful Mint Chicken Curry. Simple, Mild yet Flavorful Chicken curry with fresh mint and yogurt to shake up your weeknights! This Flavorful Mint Chicken Curry Recipe is ultra-easy to whip up on a weeknight, and completely customizable with your favorite seasonings. A nice change from the usual red curries, perfect with naan or rice.

    Flavorful Mint Chicken curry recipe
    The Flavorful Mint Chicken curry Recipe

    Truth be told – the curry and rice thing is probably my favorite type of food. Coriander, Basil, & Mint Leaves are hands down my favorite herbs of all time. If I could have the herb garden of my dreams, I would plant Mint and Basil everywhere!!

    While most of the Pakistani dishes that I cook require coriander as garnish, for this dish, the mint herb paste forms the backbone of the sauce. The combination of fresh coriander and mint makes the dish light and fragrant and gently simmering the chicken in the creamy yogurt ensures that you end up with juicy morsels of meat. 
    Please make sure that you use the tender , young leaves of Mint in this dish – the harder, older leaves will most probably end up making the dish taste bitter.

    The Flavorful Mint Chicken curry Recipe
    The Flavorful Mint Chicken curry Recipe

    This chicken curry bursts with flavors of mint and creamy yogurt and is bound to make you and your guests happy. The spice level of this dish will vary depending on your taste. I used just 2 green chilies and a pinch of cayenne pepper in this curry to make a mild, family-friendly dish. For more heat,  you can add a drizzle of red pepper, some of the seeds of the jalapeño, or some crushed green chilies.

    This is a quick and simple recipe to prepare using ingredients that I always have on hand. Less is more – focus on the true tastes by using fewer ingredients. Flavorful and very easy to prepare, this recipes will make your weeknight dinners stress-free . Do try it!

    Bismillah let’s get started. 
    First, You will need some boneless chicken. I prefer the breast because you get some super fine chunks out of it. But you can make both curries with bone-in pieces or boneless pieces of chicken. Obviously, boneless chicken will cook faster, and is my choice when I want to cook a quick curry. BUT, a GOOD chicken curry uses bone-in chicken pieces because the bones flavor the gravy/sauce.

    In a blender, pour 1/2 cup of yogurt yogurt, 1 small bunch of mint leaves, coriander leaves, green pepper, garlic ginger paste, cumin powder, a pinch of cayenne pepper, salt and squeezed lemon. Blend until well combined and put in the chicken; Cover and let it marinate for 30 minutes to blend flavors.

    You can marinade the chicken for a few hours or even overnight. If you really are in a rush, you can even cook the chicken straight away.

    The Flavorful Mint Chicken curry Recipe
    The Flavorful Mint Chicken curry Recipe

    Heat the oil over medium-low heat in a large nonstick pan.

    The Flavorful Mint Chicken curry  Recipe
    The Flavorful Mint Chicken curry Recipe

    Then add the marinated chicken along with the marination. Cook and stir for 10 minutes on medium flame. Then cover and let it simmer for 10-15 minutes or until chicken becomes soft .

    The Flavorful Mint Chicken curry Recipe

    Remove the lid and cook on high flame for just few minutes or until sauce is thickened or all water dries up. ( Make sure to not over cook it will ruined the mint taste).

    The Flavorful Mint Chicken Curry  Recipe
    The Flavorful Mint Chicken curry Recipe

    Taste and adjust seasoning with more lemon, green chili or pepper, if necessary. This Flaovrful Mint Chicken Curry is delicious with anything. We ate it with boiled rice but it is just as good with really soft naan bread.

    The Flavorful Mint Chicken curry Recipe
    The Flavorful Mint Chicken curry Recipe

    Check it out The Flavorful Mint Chicken curry Recipe and printable version here!!

    Consider serving this with:

    More Chicken Curry inspiration:

    Put your own spin on it. And lemme know how it turns out. Post a photo on Facebook (Recipestable) or Instagram on Twitter  with hashtag #Recipestable so I can see how lovely yours turn out.

  • Chocolate Lover’s Dream Cake Recipe

    Chocolate Lover’s Dream Cake Recipe

    When I begin to think about cakes, the first ingredient that comes to mind is chocolate! And what if your chocolate cake full of chocolate chips, topped with creamy chocolate ganache and dark chocolate? Then, we are talking about one of the most decadent chocolate cakes – Chocolate Lover’s Dream Cake. 

    Chocolate in three forms, makes this cake extra chocolaty—and extra delicious.  A chocolate lover’s dream come true!!!

    Chocolate Lover's Dream Cake recipe
    Chocolate Lover’s Dream Cake

    Since I began blogging, there are a few fantastic recipes which made me say, “Wooow, I hope I will be able to make something like this some day”. Of course, after a good look and many photos of these desserts, I always gave up not having enough belief in my baking possibilities.

    But, with time, after a lot of experience and time spent in the kitchen, my confidence began to grow. And in time missions in the kitchen that looked impossible were beginning to be solved. So I began to flirt with recipes like Chocolate Mousse CakeBanana Chocolate Loaf Cake  and similar.

    Well, today it was turn for another chocolate masterpiece, Chocolate Lover’s Dream Cake. Only one look at the photos of this divine chocolate cake always made me drool. 

    Chocolate Lover's Dream Cake recipe
    Chocolate Lover’s Dream Cake

    A heavenly delicious chocolate cake you’ve been dreaming of! So good, every bite is worthy of a celebration! After all, there is never too much chocolate, right?! It’s pure decadence in every single bite!!!

    Chocolate Lover's Dream Cake
    Chocolate Lover’s Dream Cake

    I have to admit this cake is not the prettiest cake but with that chocolate ganache and grated dark chocolate on top it dresses it up and makes it look scrumptious.

    You can serve this cake warm without ganache or cold with creamy ganache on top. I can guardsmen that there will be no leftovers of this cake. If you have chocolate lovers around you better stand back because they will run you over just to get a piece of this cake. This chocolate cake is wonderful for birthdays, bake sales, tea parties or any gathering.

    If you are not a true chocoholic then move on. But if you are, then you must try this Chocolate Lover’s Dream Cake!!! 

    Check it out the Chocolate Lover’s Dream Cake recipe and printable version here!!

    Put your own spin on it. And lemme know how it turns out. Post a photo on Facebook (Recipestable) or  on Twitter so I can see how lovely yours turn out

    Happy Baking!!

    Pin it for later

    Chocolate Lover's Dream Cake Pinterest
    Chocolate Lover’s Dream Cake ~ Pin it for later


    ATTENTION: All photos and content are copyright protected. Please do not use our photos without prior written permission. If you wish to republish this recipe, please rewrite the recipe in your own unique words and link back to Chocolate Lovers Dream Cake Recipe on Recipestable. Thank you!

  • Easy Smooth & Rich Egg Pudding Recipe

    Easy Smooth & Rich Egg Pudding Recipe

    This Egg Pudding. Wow.

    Easy Smooth & Rich Egg Pudding
    Easy Smooth & Rich Egg Pudding

    Egg Pudding

     Have you ever wanted something so bad you think you’d die if you don’t have it? And when you think you’ve finally gotten it, its snatched away from you?

    If yes, then this Egg Pudding is especially for you.

    Easy Smooth & Rich Egg Pudding

    Eat it warm, eat it cold; it provides comfort like no other.

    Egg pudding is just one of those things that never fails to bring a smile on your face or warmth to your toes. Its rich, its smooth, and it is so so SO easy to make even my fogged up brain can whip it up. Just needs a little bit of patience and whole lot of whisking!

    Easy Smooth & Rich Egg Pudding
    Easy Smooth & Rich Egg Pudding

    Egg Pudding was my most favorite treat growing up. This easy dessert can be quickly made for festive occasions. Surprise everyone and get loads of compliments by making this easy egg pudding. 

    Easy Smooth & Rich Egg Pudding
    Easy Smooth & Rich Egg Pudding

    Here’s a recipe for making a easy, simple, yet rich, smooth and satisfying egg pudding. I made this for my family and it totally rocked!! They said it was the most creamiest and richest egg pudding they’ve ever tasted. I never had any leftovers, and it would never be enough for them (lol). The only thing I WOULD get however, would be requests to make more!

    Easy Smooth & Rich Egg Pudding
    Easy Smooth & Rich Egg Pudding

    The creamy texture of this soft-smooth pudding is so inviting, you could call it comfort food. This recipe for egg pudding has a pleasant vanilla flavor complemented by cinnamon or nutmeg. This is the best dessert. I like it most for its sponginess. And it is also very easy to make with in 35 minutes.

    Easy Smooth & Rich Egg Pudding
    Easy Smooth & Rich Egg Pudding

    Some Important Tips to Make Best Egg Pudding: 

    Learn how to make best Egg Pudding by following these tips and tricks.

    1. One-dish Pudding: Recipe can be baked in lightly greased 1-1/2 qt. soufflé or baking dish. Pour hot water to within 1 inch of top of dish. Increase baking time to 35 to 40 minutes.
    2. No-mess pouring: Make pudding in a bowl with a pouring lip, or transfer it to a large glass measure, to make filling pudding cups easier and neater.
    3. For perfectly smooth custard: Strain it through a sieve when filling pudding cups or baking dish to remove any tough egg strands.
    4. Don’t skip the hot-water bath. A hot water bath, insulates the pudding from the direct heat of the oven and promotes even cooking so the edges don’t overcook before the center is done. Very hot tap water will do.
    5. When is it done? Baked Pudding  should be removed from the oven (and water bath) before the center is completely set. The center will jiggle slightly when dish or cup is gently shaken. Pudding will continue to “cook” after it’s removed and center will firm up quickly. Over baked Pudding may curdle.
    6. The knife test: Test for doneness with a thin-bladed knife. Insert knife about 1 inch from the center of the dish. If knife is clean when pulled out, the pudding is done. If pudding clings to the blade, bake a few minutes longer and test again.
    7. Serving Options: You can have this yummy dessert by adding dry fruits, jelly or caramel, but today I am making the basic one. 

    If you are craving for something sweet yet easy dessert in this foggy weather, nothing could be better than this Egg Pudding.  Do try it, your kids are going to fall in love with this proteins and calcium rich dessert. You can also serve this dessert for your next party and this will definitely not going to disappoint your guests.

    Check it out the Easy Smooth & Rich Egg Pudding recipe and printable version here!!

     I have also posted Hot Chocolate Pudding Recipe which is another easiest & tastiest version of making Pudding. Do check it out as well.  It’s finger lickin’ good. You’ll be coming back for more. 


    Put your own spin on it. And lemme know how it turns out. Post a photo on Facebook (Recipestable) or  on Twitter so I can see how lovely yours turn out.


    Happy Baking!!

    If you like this post, Please Subscribe to my blog and let me know your feedback by commenting below.. I have lots more recipes to share with you.

  • Karahi Butter Chicken Recipe (Makhni Karahi)

    Karahi Butter Chicken Recipe (Makhni Karahi)

    Assalam-o-Alaikum, how are you? Yep, it’s been almost a month since we met. First things first…I had my mid-term exams, so I was lil busy with studying and the other stuff in my life.
    However this gap between us wasn’t planned. I was hoping to catch up with you in between, but it didn’t work out.

    My celebration “yay, exam is over!”

    Finally exams are over I’m finally free to do whatever I want (blogging, eating yummy food, spending time with my plants)😌
    Anyways, the first thing I wanted to do was to just pop in here & say a quick hi to you. I hope you roll into the weekend in a joyous mood! May your day be as fantastic as you are!

    Karahi Butter Chicken (Makhni Karahi)

    To release some exams stress, I made this butter karahi by twisting my Father’s recipe…delicious goodness. Can’t wait to share it with you. He used to make the best food. He was an expert on how to make a really good Butter Chicken. Saying that, I’m not too sure how He would feel about this Karahi Butter Chicken version that I’m currently loving.

    Karahi Butter Chicken (Makhni Karahi)
    Karahi Butter Chicken (Makhni Karahi)

    Name me one thing that doesn’t taste better with a few dollops of cream, a knob or so of butter, a splash of milk, lashings of ghee.

    I’ll bet you’re having a hard time thinking up something. It’s a truth of the culinary world that these things all enhance the eating experience of many foods, sweet and savory foods alike and curries are no exception to this.

    Karahi Butter Chicken (Makhni Karahi)
    Karahi Butter Chicken (Makhni Karahi)

    Take this Karahi Butter Chicken ( Makhni Karahi), for example. I’ve taken the traditional Chicken Karahi dish and made it the way we all love, with the very flavours we all adore and then finished it up with a hearty amount of butter. What does this do? This fills every bite with the very same flavours we desire, along with a moreish, rich bite to it. Every bite tastes like a buttery dream, I tell you. This creamy and velvety gravy will melt in your mouth. 

    Karahi Butter Chicken (Makhni Karahi)
    Karahi Butter Chicken (Makhni Karahi)


    Bismillah, let’s begin!

    Check it out the Karahi Butter Chicken (Makhni Karahi) recipe and printable version here!!

     Recipe Note’s

    My final words before I give you the recipe – my Father was an expert at Karahi’s and he always told me what with chicken Karahis, you must work fast. Have all the ingredients chopped up beforehand if you can, and cook the entire thing on high heat. Stirring constantly is imperative, otherwise you risk burning the curry or having it stick to the pan. Skimp on half the oil or butter if  you must, but I wouldn’t recommend it as a Karahi dish isn’t truly a Karahi dish without its butter or oil.


    I have also posted Restaurant Style Lahori Mutton Karahi and Kebab Karahi which are another easiest & tastiest version of making Karahi at home. Do check it out as well.  It’s finger lickin’ good. You’ll be coming back for more. 


    Put your own spin on it. And lemme know how it turns out. Post a photo on Facebook (Recipestable) or  on Twitter so I can see how lovely yours turn out.


    Happy Karahi Making!!

    If you like this post, Please Subscribe to my blog and let me know your feedback by commenting below.. I have lots more recipes to share with you.

  • Phirni Recipe (Eid Special Dessert)

    Phirni Recipe (Eid Special Dessert)

    Eid Mubarak to all the readers of my blog. Eid has come and gone, and we are settling down to our routine and trust me it is very difficult after being spoiled by the easy going Ramadan timings. Lots happened during Ramadan even if it is considered to be a slow month. 

    Happy Eid Mubarak
    Happy Eid Mubarak to All my Readers!!

    Eid is a special time in Pakistan: “Festive season, Get together with friends , dinner party, dessert which comes to my mind immediately is ‘Phirni’.” After a heavy main course like Biryani or any spicy curries, phirni is something which cools and soothes you.

    Phirni: Eid Special Dessert
    Phirni: Eid Special Dessert

    Phirni is a wonderful, creamy dessert made with ground rice combined with milk, cream, sugar and some saffron strands for flavoring. Phirni is a kind of Rice Pudding, made with coarsely ground rice. It is similar to what we call “kheer” in Pakistan, but unlike Kheer, it does not use whole grains of rice. The dish is decorated with chopped or ground almonds or pistachio nuts.  The consistency of this pudding varies from thick,- where one has to really scoop out with a spoon, to creamy- where the dessert will gently coat a spoon.

    Phirni, firni: Eid Special Dessert
    Phirni: Eid Special Dessert

    The history of Phirni goes back a very long way; it seems to have originated in ancient Persia or the Middle East; and to have been introduced to Pakistan and India by the Mughul’s. In Indian and Pakistan, phirni is associated with Muslim festivals (like eid, ramadan etc.)

    Traditionally in Pakistan, Phirni is served chilled in earthen pots or small clay plates  called tothie’s. Other than just making it look pretty, the clay pot also absorbs some of the liquid giving it a thicker consistency. It tastes better when the flavors are allowed to mature for 6-7 hours or even  for a day.

    Phirni: Eid Special Dessert
    Phirni: Eid Special Dessert

    The recipe is a keeper and I really urge you to try this. This Phirni recipe is easy and simple steps with the list of all ingredients needed to prepare it.

    Phirni: Rice Pudding with Nuts

    Bismillah, let’s get started!

    Check it out the Phirni recipe and printable version below.

    Pin it:

    Phirni, Firni: Eid Special Dessert Phirni: Eid Special Dessert


    I have also posted Pineapple Phirni which is another easiest & tastiest version of making phirni. Do check it out as well.  It’s finger lickin’ good. You’ll be coming back for more. 


    Put your own spin on it. And lemme know how it turns out. Post a photo on Facebook (Recipestable) or  on Twitter so I can see how lovely yours turn out.


    Happy Eid!!

    If you like this post, Please Subscribe to my blog and let me know your feedback by commenting below.. I have lots more recipes to share with you.

  • Tandoori Spiced Baked Chicken in Yogurt Masala Recipe

    Tandoori Spiced Baked Chicken in Yogurt Masala Recipe

    Well, when I am sad and tired and overall cranky, I likes to eat the food prepared by my mothers hand, the flavorful easy to make food I grew up eating and these Tandoori Spiced Baked Chicken in Yogurt Masala hit the spot. Neither World’s most expensive dish Nor World’s best restaurant can compete Home Cooked Food by Mothers Hand 🙂

    On to today’s recipe!

    Tandoori Spiced Baked Chicken 

    Today’s recipe is a favorite of me and my family. It’s a revamped version of this tandoori Roast Chicken Recipe which is one of my popular recipes on the blog! Why is it revamped? Well, because this recipe is more of tastiest than the old one and this is my favorite version: the chicken is deliciously spiced with yogurt marination, and the mango chutney served alongside adds fruity, tangy flavor.

    Tandoori Spiced Baked Chicken In Yogurt Masala
    Recipe Photo: Tandoori Spiced Baked Chicken In Yogurt Masala

    To pair with the creamy yogurt, and spices, instead of using bone-in chicken or pieces of chicken breast, My mom used chicken thigh and wings. Chicken thigh is fattier, juicer and much more tender than chicken breast – I’m actually not a fan of chicken breast at all due to how tough and rubbery it is. Chicken thigh releases its juices during the cooking process, which leads to a deeply, beautifully flavored tandoori chicken which literally melts in your mouth – something chicken breast can’t do without extended marination times and slow cooking.

    Recipe Photo: Tandoori Spiced Baked Chicken In Yogurt Masala
    Recipe Photo: Tandoori Spiced Baked Chicken In Yogurt Masala

    This Tandoori Spiced Baked Chicken  is very popular in Pakistani restaurants and is usually served with naan bread and chutney. This dish is a great recipes to cook for your house parties and is loved by one and all.

     Tandoori Spiced Baked Chicken In Yogurt Masala
    Recipe Photo: Tandoori Spiced Baked Chicken In Yogurt Masala

    If you have the ingredients on hand and a micro-plane or grater, tandoori chicken wings are so easy to make! Goes great served with Zeera Raita(cumin yogurt dip) or mango chutneylemon wedges and some onion rings.

     Tandoori Spiced Baked Chicken In Yogurt Masala
    Recipe Photo: Tandoori Spiced Baked Chicken In Yogurt Masala

    Bismillah, let’s get started!

    Check it out the Tandoori Spiced Baked Chicken In Yogurt Masala recipe and printable version below.

    Tandoori Spiced Baked Chicken In Yogurt Masala Recipe

    This Tandoori Spiced Baked Chicken is very popular in Pakistani restaurants and is usually served with naan bread and chutney. This dish is a great recipes to cook for your house parties and is loved by one and all.
    Prep Time 10 minutes
    Cook Time 1 hour
    Total Time 1 hour 10 minutes
    Servings 6
    Author Bushra Waheed

    Ingredients

    • 2 pounds chicken pieces

    For marination

    • 1-1/2 cups plain yogurt
    • 2 tablespoon butter
    • 2 tablespoon ginger garlic paste
    • 2 tablespoon lemon juice
    • 2 tablespoons ground cumin
    • 2 tablespoons smoked paprika
    • 1 tablespoon coriander powder
    • 1 teaspoon garam masala powder
    • 1/2 teaspoon turmeric powder
    • 1/2 teaspoon cayenne pepper
    • salt to taste

    For Garnishing

    • 4 limes quartered
    • onion rings

    Instructions

    Method

    • Make two deep slits crossways on the meaty parts of chicken piece.
    • Sprinkle the salt over the chicken and squeeze over some of the lemon juice.
    • In a large bowl, add the yogurt, lemon juice, ginger and garlic, plus all of the spices. Mix well and remove any lumps in the yogurt.
    • Put the chicken into the yogurt mixture and toss to coat evenly.
    • Cover and place in the refrigerator to marinate for about 4 hours to overnight, which is ideal.
    • Preheat an oven to 200 degree C.
    • Put the marinated chicken into a deep heat-proof dish. Cover with a lid or foil with holes poked in the top.
    • Bake for 30 minutes then move the meat around with a spoon.
    • Bake for an additional 30 minutes, uncovering the dish for the last 15 minutes of baking only.
    • Use tongs to remove the meat from the dish and the yogurt sauce and place on a separate tray to broil or use the broil setting on your oven to sear the meat, about 5 minutes each side.Tandoori Spiced Baked Chicken is ready to serve. Enjoy!!

    Notes

    Note:
    If you prefer the chicken to be a bright red colour, and a few drops of red coloring into the marinade.
    Serving Suggestions:
    Serve with fresh naan bread, onion rings, lemon wedges and a yogurt sauce on the side for dipping.

    I have also posted Tandoori Moti Tikka Recipe which is another easiest & tastiest version of making Tandoori Chicken. Do check it out as well.  It’s finger lickin’ good. You’ll be coming back for more. 


    Put your own spin on it. And lemme know how it turns out. Post a photo on Facebook (Recipestable) or  on Twitter so I can see how lovely yours turn out.


    Happy Cooking!!

    If you like this post, Please Subscribe to my blog and let me know your feedback by commenting below.. I have lots more recipes to share with you.

  • Restaurant Style Lahori Mutton Karahi Recipe

    Restaurant Style Lahori Mutton Karahi Recipe

    Isn’t the Title Interesting?Look down at the Picture just scrumptious and believe me the recipe is so simple.

    Restaurant Style Lahori Mutton Karahi Recipe
    Photo: Restaurant Style Lahori Mutton Karahi

    Restaurant Style Lahori Mutton Karahi

    Today, I come up with a new recipe: “Restaurant Style Lahori Mutton Karahi “. It is one of most popular Pakistani dish that you will come across almost every Pakistani restaurant menu anywhere in the world.

    Lahore is famous for its culturally enriched food items.. impossible to be on diet there 😛 lol. People here in Lahore are known as food lover, which is why many new restaurants are constantly opening.

    As all of you know, I always tempted to try popular dishes at home, and perfecting it as possible as I could. One among them was this “Restaurant Style Lahori Mutton Karahi”.

    Restaurant Style Lahori Mutton Karahi Recipe
    Photo: Restaurant Style Lahori Mutton Karahi

    Mutton Karahi is a specialty of Lahori food, this dish is made by stir-frying small cubes of lamb or mutton with tomatoes, green chilies, ginger, and garlic in a karahi, the wok-like pan that gives the dish its name.I made it with a less fat. But taste was so good and excellent. Meat was so tender, juicy, deeply marinated in the masala (gravy) and uniformly cooked.

    Photo: Restaurant Style Lahori Mutton Karahi recipe
    Photo: Restaurant Style Lahori Mutton Karahi

    Very simple and lip smacking dish for anyone who love to have spicy treat occasionally. Its so simple that if you have ingredients in hand then Ready get set go.

    Restaurant Style Lahori Mutton Karahi
    Photo: Restaurant Style Lahori Mutton Karahi

    It pairs the best with butter naan, or simply plain naan and may be served along with rice, tandoor roti and even homemade chapati’s along with zeera or mint raita and onion rings.

    Let the meat eating begin!

    Check it out the Restaurant Style Lahori Mutton Karahi recipe and printable version below!!

    I have also posted Chicken Karahi and Kebab Karahi which are another easiest & tastiest version of making karahi. Do check it out as well.


    Put your own spin on it. And lemme know how it turns out. Post a photo on Facebook (Recipestable) or  on Twitter so I can see how lovely yours turn out.


    Happy Cooking!!

    If you like this Restaurant Style Lahori Mutton Karahi, Please Subscribe to my blog. I have lots more recipes to share with you. And If you make it then let me know your feedback by commenting below.

  • Mutton Nihari Recipe

    Mutton Nihari Recipe

    Aslam-o-Alakaum My Lovelies !!

     In the Name of Allah, Most Gracious, Most Merciful

    Mutton Nihari 

    Nihari is one of most favorite and traditional dishes of every Muslim home. Be it mutton, chicken or beef nihari, it can be relished with any kind of meat. Traditionally nihari made with the bone marrow meat. It’s a deliciously smooth flour based stew with slow cooked mutton and a myriad of spices.  Mutton Nihari takes a long time to cook but is easy to put together.

    mutton-nihari

    There are lot of ready made Nihari spices available in the market. But I would not Never Never recommend. As they are full of artificial colors and preservative agents. Not a healthy approach. 🙁 You can make the Nihari powder at home by following my Nihari Masala Mix and store it in airtight container for many days.

    This is a must try recipe from my Mommy.  We normally make Nihari with small pieces of mutton as we prefer it over the bone-in mutton.

     Mutton Nihari Recipe
    Photo: Mutton Nihari

    Note:

    Preferably it must be cook on low flame, but those of you who would rather prefer a faster process can cook it in a pressure cooker though the Nihari taste wont be the same as cooked on a low flame.

    So about this Mutton Nihari recipe. As you can see, there’s no layer of fat floating on top of the nihari, As many of you know, when we go out to eat it, we want the brain, marrow and floating oil on top, not a very healthy option. My mommy tried to make it just a little healthy by adding as little butter as possible without compromising on the flavor. Less fat and believe me, just as good. Or if you do like a little oil on top, when you are ready it dish it out, leave it covered on very low heat for about 5-7 minutes. Voila, the ‘little’ amount of oil will rise to the top! 

    Mutton Nihari with ginger and fried onion
    Mutton Nihari with ginger and fried onion

    Traditionally Nihari  served with ginger, fried onion, green chilies and the hottest crisp khameeri roti or naan.

    mutton nihari recipe
    Nihari goes great with ginger, green chilies, fried onion, lemon and Khamiri Roti.

    Let’s get started!

    Mutton  Nihari with Step by Step Picture

    Step 1

    Check it out the Mutton Nihari recipe and printable version below!!

    Mutton Nihari Recipe

    Nihari is one of most favorite and traditional dishes of every Muslim home. Be it mutton, chicken or beef nihari, it can be relished with any kind of meat. Traditionally nihari made with the bone marrow meat. It’s a deliciously smooth flour based stew with slow cooked mutton and a myriad of spices. This Mutton Nihari recipe takes a long time to cook but is easy to put together.
    Prep Time 15 minutes
    Cook Time 4 hours 5 minutes
    Total Time 4 hours 20 minutes
    Servings 6
    Author Bushra Waheed

    Ingredients

    • 1-1/2 kg mutton shank portion, cut into 8 pieces
    • 1/4 cup clarified butter or desi ghee
    • 3 medium onions thinly sliced
    • 1 tablspeoon ginger paste
    • 1 tablespoon garlic paste
    • 2 teaspoon coriander powder
    • 1/2 teaspoon turmeric powder
    • salt to taste
    • 4 tablebspoon wheat flour
    • 4 tablespoon nihari masala Mix

    Nihari Masala Mix

    • 1 tablespoon cumin seeds
    • 2 teaspoon fennel seeds
    • 1 teaspoon soonth dry ginger
    • 1/4 teaspoon nutmeg powder
    • 5-6 green cardamoms
    • 2 black cardamoms
    • 5 cloves
    • 1 bay leaf
    • 1 inch cinnamon stick
    • 10 black peppercorns

    For Garnishing

    • 1/2 cup crispy fried onion
    • 1 inch ginger cut into this strips
    • 1 lime cut into wedges
    • 2 green chilies thinly sliced
    • few fresh coriander leaves chopped
    • Juice of 1 lime

    Instructions

    Niahri Masala Mix Method

    • To make your own Nihari masala from scratch, dry roast all the whole spices for the masala and grind them to a fine powder.

    Mutton Nihari Method

    • Melt butter or ghee (you can use oil as well but ghee makes it tastier) in a heavy bottom pot.
    • saute onion slices and fry till they start to turn brown(about4-5 minutes).
    • Now add mutton pieces, ginger paste and garlic paste.
    • Stir and cook for 5-8 minutes or until meat is no longer pink and all juices run clear.
    • Now add coriander powder, turmeric powder and salt.
    • Sauté for 5 minutes.
    • Add the nihari masala and 8 cups of water.
    • Stir well.
    • Cover the pot and cook on very low flame for about 4 hours until the meat is tender.
    • Keep checking in between. The way to know that the meat is cooked is when it breaks easily with a wooden spoon.
    • Remove the lid and increase the flame.
    • Dissolve wheat flour in half cup of water such that there are no lumps.
    • Slowly pour wheat mixture into the gravy.
    • Stir to mix well.
    • Let it simmer for another 15 minutes or until the gravy is thickened.
    • Drizzle some lime juice over it.
    • Garnish with fried onion, ginger slices, green chilies and fresh coriander leaves.
    • Delicious Mutton Nihari is ready to serve. Enjoy!!

    Notes

    Serving Suggestions:
    Serve with Khameeri Roti or Naan. At time of serving, add chop fresh coriander, green chilies, Julienne cut ginger and fry onions.. and also lemon…. these things will improve the taste of nihari.


    Put your own spin on it. And lemme know how it turns out. Post a photo on Facebook (Recipestable) or  on Twitter so I can see how lovely yours turn out.

    Happy Cooking!!

    If you like this Mutton Nihari recipe, Please Subscribe to my blog. I have lots more recipes to share with you. And If you make it then let me know your feedback by commenting below.

  • Walnut Rice Pudding Recipe

    Walnut Rice Pudding Recipe

    Walnut Rice Pudding (Walnut Kheer)

    A creamy, high protein rice pudding made with milk and crunchy walnuts. Walnuts are rich source of energy and contain health benefiting nutrients, minerals, antioxidants and vitamins that are essential for optimum health.

    Walnut Rice Pudding Recipe
    Photo: Walnut Rice Pudding Recipe

    Today I made a Walnut Rice Pudding for the first time. And this concept was new to me. But I tried it anyway only with 1 litre of milk. Alhamdulillah, it was so yummy and exotic. Totally different but delicious flavour. Its a must try for those of you, who never tasted it.

    Walnut Rice Pudding Recipe
    Photo: Walnut Rice Pudding Recipe

    I love the flavorful nutty aroma and exhibits excellent astringent properties of walnuts.I’m always cutting out recipes to try, but always changing them to suit my own taste. I like recipes that use ingredients that you usually have on hand and is fast and easy…and of course taste good!This Walnut rice pudding recipe has been family tested and approved and can be whipped up in no time.
    Check it out the Walnut Rice Pudding recipe and printable version below!!


    If you like this Walnut Rice Pudding Recipe, Please Subscribe to my blog. I have lots more recipes to share with you. And If you make it then let me know your feedback by commenting below.

  • Restaurant Style Kebab Karahi Recipe

    Restaurant Style Kebab Karahi Recipe

    Who said you can’t make restaurant style Kebab Karahi at home ?? and Who said, you need ready made brand karahi Masala to get the authentic flavor ?? They are wrong !! Try this Kebab Karahi recipe and find on your own.

    Restaurant Style Kebab Karahi Recipe
    Restaurant Style Kebab Karahi Recipe

    Kebab Karahi

    Restaurant Style Kebab Karahi Recipe
    Restaurant Style Kebab Karahi Recipe

    This Kebab Karahi recipe is so easy to make but so tasty to eat. I have made quite a few Kebab recipes you can check them all here.This Kebab karahi has a creamy gravy (curry) which makes it more tasty and flavourful. I made this for a family get together, this dish tastes divine and it is always a big hit among my guests.So hope you will try this out and let me know how it turned out for you.

    Restaurant Style Kebab Karahi Recipe
    Restaurant Style Kebab Karahi Recipe
    Restaurant Style Kebab Karahi Recipe
    Restaurant Style Kebab Karahi Recipe
    Restaurant Style Kebab Karahi Recipe
    Restaurant Style Kebab Karahi Recipe

    This is a simplest kebab curry you can imagine. It can be made in a jiffy and taste great with either rice or roti. So good.

    Don’t skip the papaya paste . That’s the one of two ingredients that make the kabab so melt in mouth . The other ingredient is lamb fat . In authentic recipe kebab is used for this kabab , but beef would do too . If you can’t find the mutton or beef fat , don’t worry substitute it with ghee .

    Check it out the Kebab Karahi Recipe and printable version below!!

    I have also posted Namak Mandi Karahi Gosht which is another easiest & tastiest version of making Karahi. Do check it out as well.


    Put your own spin on it. And lemme know how it turns out. Post a photo on Facebook (Recipestable) or  on Twitter so I can see how lovely yours turn out.


    Happy Cooking!!

    If you like this post, Please Subscribe to my blog and let me know your feedback by commenting below.. I have lots more recipes to share with you.

  • Bhuna Keema Recipe (Minced Meat With Whole Spices)

    When you want to throw together a meal in just a few minutes, this can seem like an impossible task but Bhuna Keema is quick meal but taste just as good as anything you’ve spent hours to create.

    So do try my Bhuna Keema recipe and put a hearty smile on your family’s face. Once you have tried it, you will be sure to make it a regular addition to your dining.

    Bhuna Keema recipe
    Bhuna Keema recipe

    Check it out the Bhuna Keema Recipe here!!

    Bhuna Keema (Minced Meat With Whole Spices) Recipe

    Prep Time 10 minutes
    Cook Time 35 minutes
    Total Time 45 minutes
    Servings 4
    Author Bushrah | Recipestable

    Ingredients

    • 500 gm mince keema
    • 1/4 cup oil
    • 2 tsp cumin seeds
    • 4 onions grated
    • 1 tbsp ginger paste
    • 1 tbsp garlic paste
    • 1 cup tomato puree
    • 1 tbsp chili powder
    • 1 tbsp coriander powder
    • 1 tsp garam masala powder
    • 1/4 tsp turmeric powder
    • salt to taste

    For Garnishing

    • 2-3 green chilies thinly sliced
    • 4 tbsp fresh coriander leaves finely chopped

    Instructions

    Method

    • Heat oil in a pan over medium heat.
    • Saute onion in hot oil until translucent.
    • Now add ginger garlic paste and mince. Cook, uncovered, on high heat for 10 minutes, stirring thrice.
    • Now stir in the tomato puree, salt, chilli, coriander powder, turmeric powder.
    • Cook at high heat for 25 minutes or until cooked is thorough.
    • Transfer into a serving dish.
    • Sprinkle Garam Masala over it.
    • Garnish with coriander leaves and green chilies. Bhuna Keema is ready to serve. ENJOY!!

    Notes

    Serving Suggestions:
    Serve with boiled rice or roti.

    I have also posted Aloo Keema which is another easiest & tastiest version of making dinner. Do check it out as well.


    Put your own spin on it. And lemme know how it turns out. Post a photo on Facebook (Recipestable) or  on Twitter so I can see how lovely yours turn out.


    Happy Cooking!!

    Keep remember me in your Dua’s and Stay tuned for new content on the blog 🙂

    If you like this post, Please Subscribe to my blog and let me know your feedback by commenting below.. I have lots more recipes to share with you.

  • Easy Spicy Mutton Pulao Recipe: Perfect for Weeknight Dinners

    Spicy Mutton Pulao

    Ramadan is a delicious time of the year in the Muslim world: Since people fast from sunrise to sunset, meals take on a special meaning. This month is associated with many delicacies with which the day long fast is broken. Spicy Mutton Pulao is one such dish.

    Spicy Mutton Pulao Recipe
    Photo: Spicy Mutton Pulao Recipe

    Spicy Mutton Pulao is a filling rice dish that can provide you with a heavy dinner after an entire day of fasting. That is why it is great Ramadan Recipes.

    Spicy Mutton Pulao Recipe
    Photo: Spicy Mutton Pulao

    Spicy mutton pulao is made out of red meat which is very popular for most Ramadan recipes. You need the proteins and energy from red meat when you are fasting. This Spicy Mutton Pulao recipe is quite similar to the biryani with minor differences in the cooking style. All the spices used in Mughlai mutton pulao make it a rich food item. Do try it!!

    Spicy Mutton Pulao Recipe
    Photo: Spicy Mutton Pulao

    Check it out the Spicy Mutton Pulao Recipe and printable version below!!

    Spicy Mutton Pulao

    This Spicy Mutton Pulao recipe is quite similar to the biryani with minor differences in the cooking style. All the spices used in Mughlai mutton pulao make it a rich food item. Do try it!!
    Prep Time 30 minutes
    Cook Time 1 hour 30 minutes
    Total Time 2 hours
    Servings 5
    Author Bushrah | Recipestable

    Ingredients

    • 500 gm mutton
    • 2 cups basmati rice
    • 3-1/2 cup mutton stock yakhni
    • 2 onions thinly sliced
    • 4 tablespoon desi ghee
    • 1/2 cup plain yogurt
    • 2 tablespoon ginger garlic paste
    • 4 green chilies thinly sliced
    • 1 teaspoon red chilli powder
    • 1 teaspoon cumin seeds roasted
    • 1 inch piece of Cinnamon stick
    • 6 Peppercorns
    • 4 cloves
    • 4 cardamom
    • 1 bay leaf
    • a pinch of saffron soaked in milk
    • salt according to taste

    Instructions

    • Marinate the mutton pieces with salt, red chilli, cumin, and ginger garlic paste for 40 minutes.
    • Heat desi ghee in a heavy bottom skillet over medium heat.
    • Saute the onions in it for 5 minutes on a low flame until lightly browned.
    • Now add green chillies and cook for a minute on a low flame.
    • Add the marinated mutton. Stir for 2 minutes until the spices are mixed uniformly.
    • Add 2 cup water and Cover the skillet. Cook on a low flame for 40 minutes or meat is almost tender.
    • Now add bay leaf, peppercorns, cinnamon, cardamom and cloves. Let the flavours bleed for 1 minute.
    • Add yogurt and cook meat on high flame for few minutes or until oil comes on top.
    • Add rice and yakhni. Lightly stir to mix.
    • Adjust the seasoning.Cover and cook for 18-20 minutes on low flame.
    • When the rice is cooked, pour the saffron on top the pulao.
    • Put on dum for 10 minutes or until full done.
    • Fluff rice with a fork and transfer into a dish. Spicy Mutton Pulao is ready to serve.

    Notes

    Serving Suggestions:
    Serve with raita and onion rings.

    I have also posted Champ Pulao which is another easiest & tastiest version of making pulao at home. Do check it out as well.  It’s finger lickin’ good. You’ll be coming back for more. 


    Put your own spin on it. And lemme know how it turns out. Post a photo on Facebook (Recipestable) or  on Twitter so I can see how lovely yours turn out.


    Happy Lunch Making!!

    If you like this post, Please Subscribe to my blog and let me know your feedback by commenting below.. I have lots more recipes to share with you.


  • Crispy Homemade Jalebi Recipe

    Crispy Homemade Jalebi Recipe

    Jalebi

    It’s fun to prepare traditional methai at home. Jalebi needs little practice for a perfect thin shaped. It must be thin if you like crispy jalebi. Try out this Jalebi Recipe and amaze your family and yourself.

    Jalebi Recipe
    Photo: Jalebi Recipe

    Check it out the Jalebi Recipe here!!

    Crispy Homemade Jalebi Recipe

    Course Dessert, Snack
    Cuisine Indian, Pakistani
    Keyword jalebi, Riwayati Mithaiyan, sweet
    Prep Time 20 minutes
    Cook Time 20 minutes
    Rising Time 8 hours
    Total Time 8 hours 40 minutes
    Servings 12
    Author Bushra Waheed

    Ingredients

    For Jalebi:

    • 1 cup Plain Flour
    • 2 teaspoon cornflour
    • 1 teaspoon instant yeast
    • 1 teaspoon oil
    • 1/8 teaspoon cardamom Powder
    • 1 tablespoon plain yogurt
    • a pinch of orange food color
    • 3/4 cup Warm Water

    For Sugar Syrup:

    • 1-1/4 cups Sugar
    • 1 cup Water
    • 1 teaspoon lemon juice
    • 1/4 teaspoon cardamom powder
    • few strand of saffron

    Instructions

    • In a bowl, mix together the plain flour, cardamom powder, instant yeast and cornflour.
    • Add yogurt, oil, and Water to the dry ingredients.
    • Mix well until there are no lumps.
    • When done, cover the jalebi batter.
    • Place it in a warm place for 24 hours or overnight, till it is fermented (the batter will rise on fermentation).
    • Once the batter is fermented stir the batter in a cut and fold motion to combine it once again.

    To Make Sugar Syrup:

    • Take a saucepan, add Water, sugar and saffron. Cook for 15 minutes on medium heat.
    • Reduce flame to a low simmer and add Cardamom Powder and Lemon Juice.
    • Stir well.
    • When the sugar becomes thick and stringy of one string consistency.Turn off the heat and keep aside.

    To Make The Jalebi:

    • Preheat oil for frying the jalebi’s.
    • Mix the fermented jalebi batter well and put it in a ketchup or mustard bottle with a spout (zipper bag or piping bag can be used).
    • Squeeze out the batter into the hot oil in approximately 8 small circular motions.
    • Jalebi should about 2-3 inches in diameter.
    • Fry until the bottom side looks golden and flip once to cook the other side.
    • With tongs, remove jalebi, shake off excess oil and place directly into sugar syrup.
    • Allow jalebi to remain in the syrup for just a minute (flipping to coat both sides), shake off excess sugar syrup and place onto a plate. Jalebi is ready to serve. ENJOY!!

    Notes

    • The consistency of the batter should be thick and not watery, similar to the butter cream batter. You should be able to make a shape when piped in a piping bag.
    • Don’t over stir you want the air pockets in the batter to remain. This will help in the jalebi being crisp and also in turn help it absorb the sugar syrup.
    • The oil for frying should be medium hot. If it is too hot, the jalebis will end up burnt.
    • Also make sure you keep the heat on low when you pipe the jalebis into the oil, this will ensure you can see the circles you are piping and also the jalebis will rise up slowly.
    • You can store in an air-tight container. They will remain fresh for 4-5 days un refrigerated.
    • Serve as a dessert after any meal or as a tea time snack.


    If you like Jalebi Recipe and make it then let me know your feedback by commenting below.And if you know more innovative ways in which we can utilize this sweet and mouth watering Jalebi, do share with us and we would be glad to give it a try.

  • Suji Halwa with Khoya Recipe

    Suji Halwa with Khoya Recipe

    Suji Halwa with Khoya

    You don’t need to wait for an occasion to savor the sweet and creamy Suji halwa with Khoya as it can be prepared at home in just few minutes and does not require any expert cooking skills. This Suji Halwa with Khoya Recipe takes its taste and texture to next level as use of khoya and generous amount of dry fruits provide nice creamy texture while ghee and cardamom provides irresistible aroma.

    If you don’t have khoya, then don’t worry, read tips and variations given below to make equally tempting Suji halwa with khoya (mawa). Do try it!!

    Suji Halwa with Khoya Recipe
    Photo: Suji Halwa with Khoya Recipe

    Check it out the Suji Halwa with Khoya Recipe here!!

    Suji Halwa with Khoya Recipe

    Course Dessert
    Cuisine Indian, Pakistani
    Keyword dessert, eid desserts, halwa, Iftar Recipes, khoya, Quick and Easy, Ramadan, sweet
    Prep Time 10 minutes
    Cook Time 20 minutes
    Total Time 30 minutes
    Servings 6
    Author Bushra Waheed

    Ingredients

    • 1 cup semolina suji
    • 1 cup sugar
    • 1/2 cup clarified butter or ghee
    • 2 green cardamoms
    • 2 cups water
    • 1 cup khoya

    For Garnishing:

    • 2 tablespoon chopped peanuts
    • 2 tablespoon chopped almonds
    • 2 tablespoon chopped pistachios

    Instructions

    • Heat ghee in a pan over medium heat.
    • Add cardamom and semolina (suji) and roast it well.
    • Add sugar and water. Stir continuously till sugar is dissolved.
    • Leave it on low flame for 10 minutes to cook perfectly.
    • When ghee comes on top add khoya.Stir well.
    • Dish it out. Garnish with nuts. Suji Halwa with Khoya is ready to eat. ENJOY!!

    Notes

    1. Replace khoya with 4 tablespoons of dry milk powder and increase amount of sugar.
    2. It can be served as a dessert or as a sweet accompaniment to main dish.
    3. Serve it along with puri’s to entertain the guests.


    If you like Suji Halwa with Khoya Recipe and make it then let me know your feedback by commenting below.And if you know more innovative ways in which we can utilize this sweet and mouth watering Suji Halwa with Khoya, do share with us and we would be glad to give it a try.

  • Creamy Dreamy Coconut Rice Pudding Recipe

    Coconut Rice Pudding

    Coconut Rice Pudding (Nariyal Kheer) is a nutty twist to the favorite Pakistani dessert Kheer. Coconut and rice are main ingredients for this sweet dish. It’s the best rice pudding (kheer)I’ve ever had, and very easy to make! Must try it!!

    Coconut Rice Pudding Recipe
    Photo: Coconut Rice Pudding Recipe

    Check it out the Coconut Rice Pudding Recipe here!!

    Coconut Rice Pudding Recipe

    Author Bushra Waheed

    Ingredients

    • 8 cups evaporated milk
    • 1/2 cup basmati rice
    • 1/2 cup condensed milk
    • 1/2 cup sugar or to taste
    • 1/2 cup coconut flakes
    • 1/2 teaspoon cardamom powder
    • 2 tablespoons chopped coconut
    • 2 tablespoon raisins
    • 2 tablespoons sliced almonds

    Instructions

    • Wash the rice thoroughly with few changes of water.
    • Soak in water for 20 minutes.
    • Put rice in a deep pot.
    • Pour milk in it.
    • Bring water to a boil then reduce heat to the low and gently boiling for 1 hour or until the rice is thoroughly cooked and the milk has thickened to a pudding consistency.
    • Now stir in the condensed milk, sugar, cardamom and coconut. Cook 5 minutes longer or until thickened.
    • Dish it out or distribute into 12 serving dishes.
    • Garnish with raisins, coconut and almonds.
    • Let it cool completely then put in the refrigerator for 4 hours to chill. Coconut Rice Pudding is ready to serve.ENJOY!!

    Notes

    Serve as a dessert after any meal.

    If you like Coconut Rice Pudding Recipe and make it then let me know your feedback by commenting below.And if you know more innovative ways in which we can utilize this sweet and mouth watering Coconut Rice Pudding, do share with us and we would be glad to give it a try.