Tag: lunch box

  • Simple & Refreshing Apple Orange Salad Recipe (Healthy & Easy!)

    Simple & Refreshing Apple Orange Salad Recipe (Healthy & Easy!)

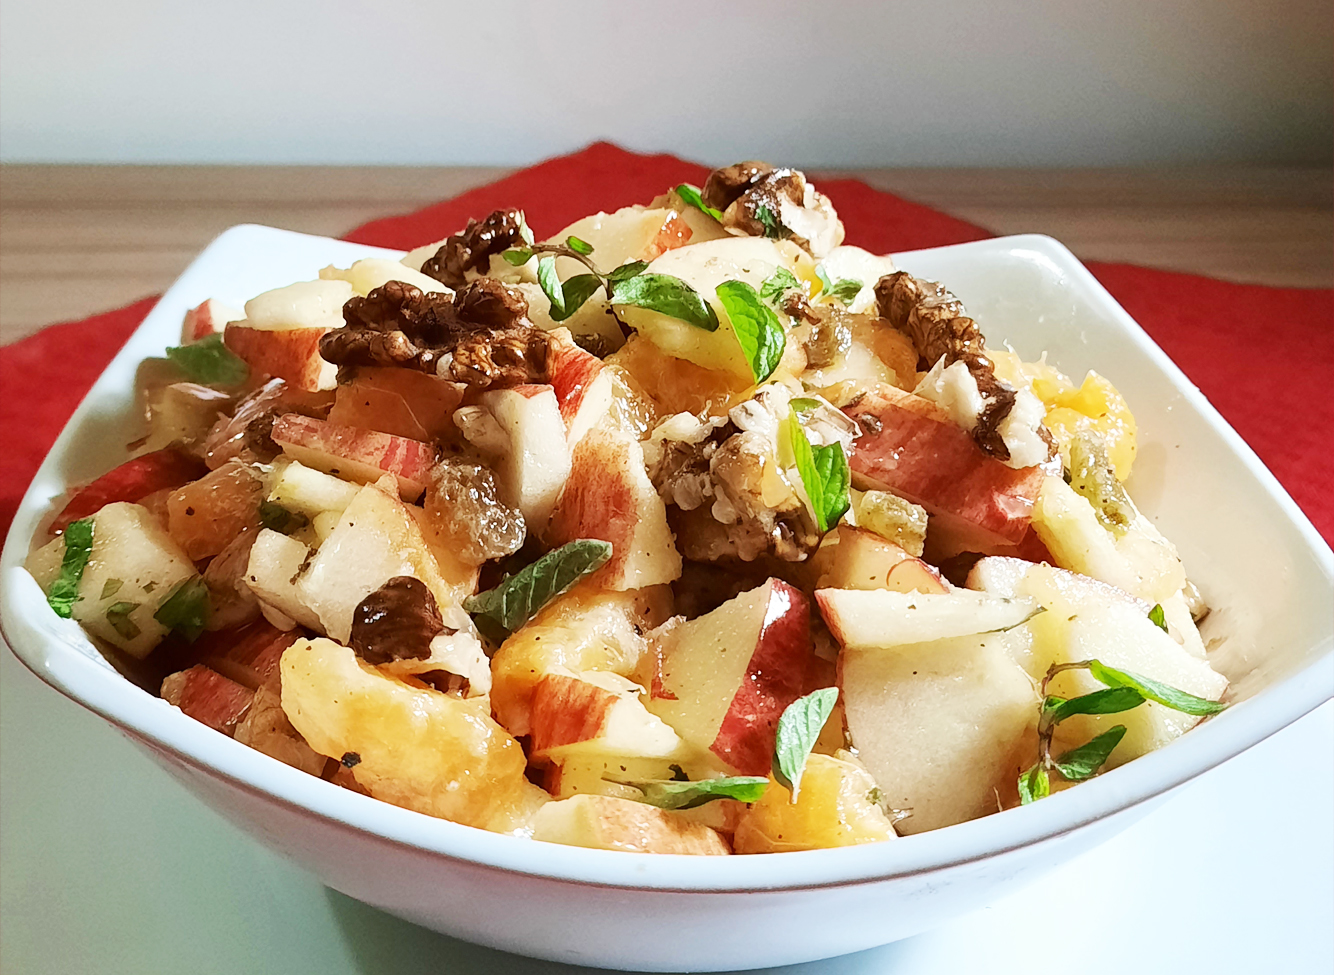
    A light, refreshing Apple and Orange Salad recipe loaded with apples, oranges, raisins and walnuts with a flavorful dressing – perfect as an appetizer or entree!The flavors of the apples, oranges, walnuts and raisins are so clean and fresh. It never fails to please.

    Feel-Good Apple and Orange Salad Recipe
    Feel-Good Apple and Orange Salad Recipe

    This year, I decided to try more salad recipes to stick to healthy diet. This was the first one on the list and it turned out excellent. Although I had it for lunch, I don’t know if I would recommend this for a main course, but definitely a great dinner salad.

    Feel-Good Apple and Orange Salad Recipe

    Ingredients in Apple and Orange Salad Recipe?

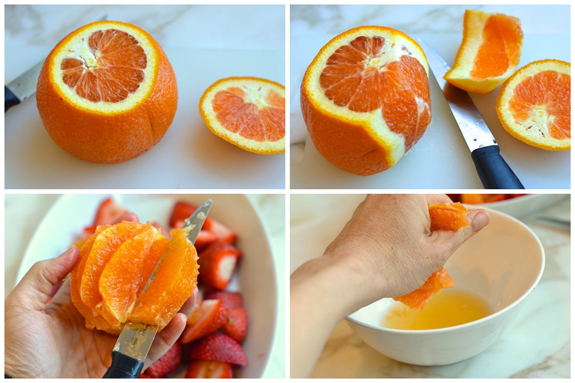
    With only few ingredients, it’s quick and easy to make. The only tricky part is cutting the oranges.

    1. Fruit: Apples & Oranges
    2. Dry Fruit: Raisins & Walnuts
    3. For Garnishing: Mint Leaves
    4. For dressing: Vinegar, Olive Oil, Orange or mosambi juice salt and pepper

    Feel-Good Apple and Orange Salad Recipe
    Feel-Good Apple and Orange Salad Recipe

    How to Make this Apple and Orange Salad:

    This apple and orange salad is super easy to make. To make this salad, simply:

    1. Prepare the salad dressing: To make the salad dressing recipe, just whisk all of the ingredients together in a bowl (or shake them up in a mason jar) until combined.
    2. Fruit Cutting: Next you need to peel an orange and cut it in small pieces. Then Core the apples and cut them in small pieces as well, equal to the orange pieces.
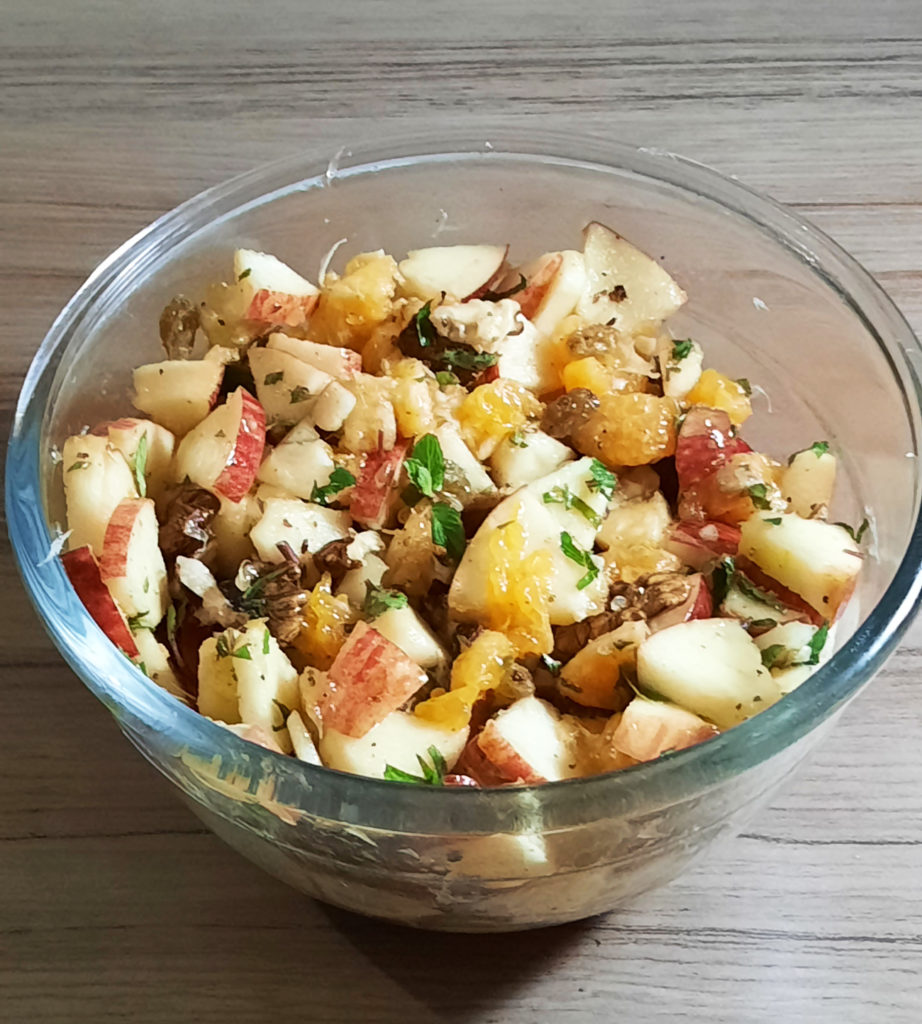
    3. Toss all of your salad ingredients together: Add the oranges and apples to the bowl with raisins and add about 2/3 of a cup of roughly chopped walnuts to the salad. Drizzle evenly with the dressing, then toss lightly until combined and voila!!
    4. And…serve!  Sprinkle fresh mint leaves and enjoy!  🙂
    Feel-Good Apple and Orange Salad Recipe

    Other variations to this Apple and Orange Salad recipe

    1. You can add Pecan or roasted almonds in place of Walnuts.
    2. You can use ground Cinnamon to spice up your Salad.
    3. You can also add some honey to sweeten your Salad as per your taste.
    Feel-Good Apple and Orange Salad Recipe
    Apple and Orange Salad Recipe

    Bismillah let’s get started.
    Check it out The Simple & Refreshing Apple Orange Salad Recipe and printable version here!!

    Apple Orange Salad Recipe (Healthy & Easy!)

    A light, refreshing Apple and Orange Salad loaded with apples, oranges, raisins and walnuts with a flavorful dressing – perfect as an appetizer or entree!
    Keyword 30 minutes meals, apple, clean eating, fruit, fruit salad, healthy, Lunch, orange, Ramadan, salad, walnuts
    Prep Time 15 minutes
    Total Time 15 minutes
    Servings 4
    Author Bushra Waheed

    Ingredients

    For Salad Dressing:

    • 1 tbsp olive oil
    • 1 tbsp vinegar
    • 4 tbsp orange juice freshly squeezed
    • 1/4 tsp salt
    • 1/4 tsp black pepper freshly ground

    For Salad:

    • 2 oranges peeled, seeded, sectioned and chopped
    • 3 red apples cored and cut into small pieces
    • 1/2 cup raisins
    • 1/2 cup walnuts roughly chopped
    • few mint leaves chopped (optional)

    Instructions

    • In a large bowl, whisk the olive oil, vinegar, orange juice, salt and black pepper.
    • Set it aside.
    • Peel the orange and cut it into small pieces.
    • Core the apples and cut them in small pieces.
    • Add the oranges, apples, walnuts to the bowl with raisins.
    • Toss everything together very well.
    • Adjust the seasoning.
    • If desired, garnish with fresh mint leaves.
    • Delicious Apple and Orange Salad is ready to serve.
    • Enjoy!

    Notes

    Want more Salad Inspiration? 

    If you’re looking for more side salad inspiration, here are a few more of my faves:

    Hope that you all enjoy this one as much as we have!  Enjoy:)

    Pin It For Later

    Feel-Good Apple and Orange Salad Recipe
    Feel-Good Apple and Orange Salad Recipe

    What are your favorite salads? Leave me a comment below to inspire my next salad recipe!

  • Very Veggie Box Patties Recipe

    Very Veggie Box Patties Recipe

    Very Veggie Box patties, the name itself rings in your ear, doesn’t it?
    You must be wondering is it a box or a patty 😉

    The unique and interesting name is because of the way the these patties are folded and made, like wrapping a box. A savory veggie filling is put inside samosa wrappers and then deep fried.

    Very Veggie Box Patties Recipe

    So what exactly are Very Veggie Box Patties? 

    If you are not familiar with box Patties, they are a deep-fried Pakistani pastry snack usually filled with something savory. They are called box patties because their shape resembles a square box which is made by overlapping two samosa wrapper sheets. They are loved all throughout the year but they become almost a staple in every household during Ramadan on the Iftar tables.

    Very Veggie Box Patties Recipe ~ Ramadan snack doesn’t get better than this!

    Ingredients in This Very Veggie Box Patties?

    Not only are these simple to make (they require nothing more than few veggies, seasoning and samosa sheets), but the stuffing possibilities are endless!

    1. Veggies: I used carrots, green peas, sweet corn, capsicum, boiled potatoes, cabbage.
    2. Olives: Green and Black Olives
    3. Seasoning: Black pepper, red Pepper flakes, salt
    4. Sauce: red chili Sauce and soy sauce
    That’s all you need to make this Very Veggie Box Patties ! Surprisingly simple ?

    How to Make this Veggie Box Patties:

    This Very Veggie Box Patties recipe is so easy to make and simple that definitely it’s worth trying.

    1. Prepare the Filling: I start off with sautéing veggies to which I add boiled green peas, potatoes, carrot, capsicum, cabbage and sweet corn and olives. Then season it with salt, black pepper, red chili flakes, soy sauce and for an extra kick red chili sauce . 

    2. Prepare the Box Patties: Then put two samosa sheets in a cross pattern, one over the other so they make a + (plus) sign. Then put some veggie filling in the middle. Fold each of the edges one by one over each creating a parcel.
    3. Frying: Then deep fry on medium flame till crispy and golden. You can fry these in advance and keep them in the oven on warm mode and serve when required.

    Very Veggie Box Patties Recipe

    Can I play around with the filling?

    Yes, you can! In this recipe, I have used vegetables carrot, cabbage, capsicum, corn and olives. Some options that I suggest are:

    • For a meaty version use chicken or beef instead of veggies or use shredded cottage cheese (paneer) instead of meat for a vegetarian option. Just make sure that the protein in the filling is cooked through. As the box patties are only fried for a few minutes, I wouldn’t suggest to put raw meat.
    • Skip the vegetables, or add more vegetables. Such as French beans carrots, black olives, green chilies, mushrooms or broccoli. 
    • If you are using large vegetables like broccoli or carrots, make sure they are finely chopped. Pulsing them in the processor for a few seconds will work.
    • Add some taco seasoning for a Mexican twist or experiment with other spice blends. 😛
    • To give a different taste to the patties box, you can also add pizza seasoning or Oregano and Chili Flakes to the vegetable stuffing.
    Very Veggie Box Patties Recipe
    Very Veggie Box Patties Recipe

    Other variations to this Very Veggie Box Patties?

    • Healthy Alternative: These square shaped patties are filled with a flavorful veggie filling. The chewiness of the veggie stuffing and the crunchiness of the covering, is a delicious combination. There are two options, baking or frying. If you do not like oil, you can bake it in pre-heated oven for 15 minutes or until crispy and golden brown. Deep frying obviously gives best results but they can also be baked or air-fried.
    • Wrappers: If you do not get samosa sheets , then cut the spring roll sheets into strips. The trimmings you can fry and keep them to garnish your soups or salads.
    • Extra Crispness: For extra crispiness, roll them with Bread Crumbs before frying.
    Very Veggie Box Patties Recipe
    Very Veggie Box Patties Recipe

    Can I freeze them? 

    Definitely!

    1. Grease a tray (can be plastic or a baking tray) and lay out the box patties one by one on it, making sure there is space between each one of them.
    2. Keep them in the freezer for an hour or so till they are partially frozen. Once they are frozen, carefully remove them from the tray and place them in a plastic box or  zip lock bags.
    3. To make the box patties, just take them out of the freezer, thawed and deep fry on medium heat until crispy and golden brown. 
    4. This recipe actually makes a large batch that can be easily frozen and is just the thing to have on hand for impromptu guests or if you are in the mood for a light snack to enjoy with your evening tea.

    Bismillah let’s get started.
    Check it out Very Veggie Box Patties Recipe and printable version here!!

    Want more Tea Time Snack Inspiration? 

    Here are some other Snack recipes on my blog:

    Hope that you all enjoy this one as much as we have!  Cheers!

    Pin it for Later:

    Very Veggie Box Patties Recipe

    What are your favorite Tea Time Snacks? Leave me a comment below to inspire my next snack recipe!

  • Lamb Corn Fritters Recipe

    Lamb Corn Fritters Recipe

    Imagine if you will that a lamb meat patty married a corn fritter and they had babies = Lamb corn Fritters. I’m not sure why I hadn’t thought of this sooner. They are healthier than regular lamb fritters; being half meat and half veggie and they are super juicy and flavorful.

    Lamb Corn Fritters Recipe

    Here’s a healthy recipe for Lamb Corn Fritters – without deep frying! Because nobody likes soggy fritters. And nobody wants to deal with a vat of oil tonight! Dinner really doesn’t get any easier than this! These Lamb Corn Fritters are so easy, you can practically whip up these juicy fritters in no time!

    These fritters are ideal to make with fresh corn cut off the cob, but can be made with canned or frozen corn. Serve for breakfast, lunch, dinner!

    Lamb Corn Fritters Recipe
    Lamb Corn Fritters Recipe

    What you need to make really great, Lamb Corn Fritters

    Here’s what you need to make these Lamb Corn fritters:

    Ground Lamb: I like to grind my lamb at a ratio of about 80% lean. I feel this brings out the most flavor. The best places to buy fresh ground lamb is your local butcher shop. If you want to use lamb, ask your butcher to grind it for you or, to make your own ground lamb, start with a lean cut. You can also use lean ground beef or turkey instead.
    Corn: as noted above, fresh is better for both flavor and crispiness. But canned and frozen work too, you just need to make an effort to dry it out as much as you can.
    Egg: egg to bind the meat and corns. It will help to get mince to stick together better.
    Ricotta Cheese: – for a good hit of savory flavor AND to make the fritters extra juicy and flavorful!
    Green Masala: Green onion, green chilies and coriander – for a hit of freshness.
    Seasoning: salt, black pepper and red pepper flakes (my fav)
    Olive oil: to sauté

    Lamb Corn Fritters Recipe

    How to make Lamb Corn Fritters

    And here’s how to make them.

    1. Mixing: Place lamb mince and corn in a bowl. Then add 1 lb fresh ground lamb. 1 egg, finely sliced green chilies, green onions, fresh coriander, salt, black pepper, red pepper and 1 cup ricotta cheese. Mix until well combined. Let it rest for 15 minutes.
    2. Cooking: Heat a large non-stick skillet over medium heat and add 2 Tbsp. extra light olive oil. Place a heaping tablespoon of the mixture into your hand and form a oval or round shaped patty about 1/3-inch thick. Cook over medium heat uncovered for 5-7 minutes, then flip, cover and cook for another 5 minutes more or until meat cooked through. Add more oil to the pan as needed for subsequent batches.
    3. The fritters take a good 12-15 minutes to cook so they’re golden on the outside and for the raw meat to cook through (remember, these are fritters so they are not very thick).
    4. Pro Tip: You can use an ice cream scooper with a lever to scoop the batter into the pan. Then flatten using a greased spatula! But don’t crowd the skillet, adding more oil to pan if required.
    Lamb Corn Fritters Recipe

    How to serve corn fritters

    Corn fritters is one of those rare foods that truly spans the breakfast-lunch-dinner spectrum! Here’s how to serve it.

    Though having suggested those various ways to serve it, the reality is that you will want to snatch them fresh off the stove, before you’ve even had a chance to plate them up properly. And that’s totally ok too! – Bushra

    Lamb Corn Fritters Recipe

    Bismillah let’s get started.
    Check it out The Lamb Corn Fritters Recipe and printable version here!!

    Want more Fritters recipes? 

    If you’re looking for more fritters inspiration, here are a few more of my faves:

    Hope that you all enjoy this one as much as we have!  Cheers!

    HUNGRY FOR MORE? Subscribe to my newsletter and follow along on FacebookPinterest and Instagram for all of the latest updates.

    Pin it For Later

    Lamb Corn Fritters Recie
  • Best Ever Roasted Lamb Burgers Recipe

    Best Ever Roasted Lamb Burgers Recipe

    Do something different on burger night…take it to another level ! If you’ve made roast lamb but don’t know what to do with the leftovers, then make this best Ever Roasted Lamb Burgers Recipe. This burger is next-level!

    Best Ever Roasted Lamb Burgers Recipe
    Best Ever Roasted Lamb Burgers Recipe

    Who said that roasted lamb is just a one-hit wonder, right? You can pretty much reuse the leftovers from a roasted lamb dinner for a couple or more days in the week. There are plenty of fantastic ways to revamp leftover roast and give them delicious, new life! The simplest way to revamp leftover roast is to make tasty Roasted Lamb Burgers!

    In essence, some of the leftover roasted lamb might get a bit dry if you don’t use the leftovers immediately. So shoving those pieces of meat into a burger with a rich sauce is the perfect solution. With this roasted lamb burger recipe, you’ll feel like you’re having a cosy Sunday meal any day of the week you want.

    Best Ever Roasted Lamb Burgers Recipe
    Best Ever Roasted Lamb Burgers Recipe

    There’s nothing more satisfying than making a delicious roasted lamb burger. You know the kind….fluffy bun topped with a juicy meat that’s piled high in flavorful toppings?

    Best Ever Roasted Lamb Burgers Recipe
    Best Ever Roasted Lamb Burgers Recipe

    Ingredients in Roasted Lamb Burgers?

    Take your burger night to the next level with homemade lamb burgers! Not only are these simple to make (they require nothing more than leftover roasted lamb, burger buns, sauce and salad leaves), but the topping possibilities are endless, ensuring a little something for every member of your family!

    Best Ever Roasted Lamb Burgers Recipe
    That’s all you need to make this Best Ever Roasted Lamb Burgers ! Surprisingly simple ?

    This Best Ever Roasted Lamb Burgers Recipe is the EASIEST way to transform your leftover roast into a hearty, scrumptious breakfast/brunch sandwich recipe the next day. Experiment with different sauces or fillings and put your own twist on these burgers. Just make sure that you guard it well if you happen to take it to work. It’s a total standout burger and other colleagues will be eyeing it. Yes, it’s that good!

    How do you make Roasted Lamb Burgers?

    Best Ever Roasted Lamb Burgers Recipe
    Best Ever Roasted Lamb Burgers Recipe

    Dry meat isn’t going to make this roasted lamb burger particularly appetizing. Sure, gravy can fix it to an extent, but not really. Your tender, juicy, succulent meat roast from the previous day quickly turns dry and insipid the next day as you reheat it, and that’s enough to ruin a great burger. So here’s the secret to keeping that lamb roast juicy the following day as well – steam the leftover roast in the oven so that the meat stays tender and juicy without drying up!!

    Gently reheating the lamb roast wrapped in foil or parchment paper is a simple way to ensure that your leftover lamb roast tastes just as good as it did the previous day. These Best Ever Roasted Lamb Burgers are juicy, flavorful and super easy to make. Unexpected, yet super homey and familiar!  You’ll love every bite! Be sure to grab my tips below.

    Best Ever Roasted Lamb Burgers Recipe
    Best Ever Roasted Lamb Burgers Recipe

    What To Serve With Roasted Lamb Burgers?

    These roasted lamb burgers don’t require a whole lot else to serve along, but if you’re stuck for what to serve alongside your roasted and pulled masterpiece? Don’t worry… here’s some delicious recipes for a little divine inspiration:

    • Crunchy Pickled Kachumber Salad– a sumptuous side dish that’s incredibly easy to whip up, pickled salad take minutes to make and taste amazing
    • Smiley Face Fries – serve these wonderful smiley face fries alongside your roasted classic burger. It’s a very easy side to prepare and tastes fantastic.
    • Creamed peas – these are no ordinary peas. If you want your peas to pack a punch, make these creamy peas. Add them to the side of any roast recipe and you won’t go wrong.
    • Herb Roasted Potatoes with Sour Cream – serve up a batch of sweet potato fries on the side to mop up the gravy and sweet spicy liquid
    • Roasted Lemon Potatoes – another easy sweet potato side that would make a perfect pairing with this roast recipe

    Other Extra Additions for this Burger

    • Egg (fried, poached, scrambled, omelet – whatever you like!)
    • Cheese (I didn’t want cheese in mine, but a slice of cheddar would be delicious too)
    • Ice burg leaves
    • carnalized onions
    • jalapeno

    But the bottom line is that you just can’t go wrong with this leftover roasted lamb burger! Steam the meat so that it retains that tender, juicy texture, and then go ahead and add whatever you want to add!

    Best Ever Roasted Lamb Burgers Recipe
    Best Ever Roasted Lamb Burgers Recipe

    So, are you ready for the tastiest, most tender melt in your mouth Lamb Burger you’ve ever had? These Roasted Lamb Burgers are, quite simply, sensational.

    Best Ever Roasted Lamb Burgers Recipe
    And that’s it! This Best Ever Roasted Lamb Burgers Recipe is just awesome!

    Bismillah let’s get started.
    Check it out The Best Meatball Pizza Recipe and printable version here!!

    Want more Sandwiches or Burgers Inspiration? 

    Here are some other sandwich recipes on my blog:

    More Luscious Lamb Recipes

    Got a taste for lamb? Check out some more incredible recipes that get the best out of this underrated meat:

    • Roasted Leg of Lamb – fast cooking doesn’t get better than this! Cook up these sensational steaks in less than 20 minutes for a quick and easy Sunday lunch
    • Lamb Karahi  – if you’ve never had lamb karahi, you’re in for a treat. It’s a spicy slow-cooked masterpiece!
    • Kashmiri Lamb Curry – a heavenly Kashmiri style curry that’s hearty and intensely flavored, yet mildly spiced with cumin, cardamom, cinnamon and curry powder.
    • Lamb Champ Pulao – this lamb champ pulao recipe is the ultimate Sunday lunch comfort food!
    • Lamb Leg with Hara Masala – just one mouthful of this amazing recipe will be enough to have you hooked. When it comes to taste, smoked meat is in a different league and this is the perfect recipe for smoking newbies and experts alike.
    • Easy Lamb Jalfrezi – traditional curry recipes like lamb jalfrezi are the perfect way to use up leftover lamb
    • Lamb Cashew Korma – a hearty, nutty stew-like curry that’s super comforting, the lamb is simmered in until tender.
    • Juicy Lamb Tikka Boti – can you believe that you can make a healthy kebab? Here’s the proof. The whole family will love these quick and easy, incredibly tasty kebabs 
    • Lamb Kebab Karahi  – Have you ever made a kebab karahi? If not, this succulent lamb kebab karahi is soon to become a firm favorite of yours!

    If you’re looking for more easy, family friendly dinner ideas, you might also enjoy my Meatball Pizza Recipe or this Restaurant Style Tawa Fish Recipe,  Homemade Lamb Burgers, Flavorful Mint Chicken Curry Recipe and Leftover Mashed Potato Pancakes Recipe are also fun recipes for the family!

    What are your favorite burger toppings? Leave me a comment below to inspire my next burger recipe!

    Put your own spin on it. And lemme know how it turns out and do take a few seconds to rate it! I would love to see your recreations so tag me on instagram @recipestable or Facebook (Recipestable) or on Twitter so I can see how lovely yours turn out.

  • The Best Meatball Pizza Recipe

    The Best Meatball Pizza Recipe

    This meatball pizza, made with a secret sauce, mozzarella cheese, and the surprise element of juicy chicken meatballs piled atop pizza dough, takes homemade pizza to a whole new and indulgent level. That’s better than takeout.

    The Best Meatball Pizza Recipe

    Chewy crust, spicy sauce, meatballs and plenty of melted cheese? Ummmm…. yes, please.

    The Best Meatball Pizza Recipe
    The Best Meatball Pizza Recipe

    Pizza is always a winner in our house and cheesy meatballs are definitely comfort food around here, so we threw together a super easy, super cheesy meatball pizza. Make a big batch of meatballs and freeze in portions along with this fresh pizza dough recipe so you’ll have meatball pizzas ready to go when you want them.

    The Best Meatball Pizza Recipe
    The Best Meatball Pizza Recipe

    You can use frozen meatballs to save on time but you will have to adjust points accordingly, I prefer to make my own and I added a little pizza flare to mine.

    How do you make Meatball Pizza?

    1. A pizza pan is rubbed with a little bit of oil. Pizza dough is spread into the pan, poked with a fork. Then spread prepared sauce over it.

    Spread pizza sauce over the dough

    2. The topping is assembled by cooking the meatballs in a hot pan.

    The Best Meatball Pizza Recipe
    Meatballs 🙂

    3. Then pizza dough is topped with the cheddar cheese, meatballs, red and green bell pepper and a generous portion of mozzarella cheese.

    The Best Meatball Pizza Recipe
    Meatball Pizza ready to go in the oven!!

    4. Then baked in the preheated oven until the cheese is golden and crust is cooked! Remove from the oven and cut into the wedges. ENJOY 🙂

    The Best Meatball Pizza Recipe
    The Best Meatball Pizza Recipe

    Where is the best place to buy Pizza dough?

    1. Most markets have some sort of pizza dough that they sell.  You’ll probably be able to find the kind of pizza dough in the can (not my favorite), and some will offer it in a little plastic baggie (probably a better product and likely more fresh).
    2. I do have a tip for the best place to buy pizza dough.  Most pizza restaurants will likely be willing to sell you a ball of their pizza dough.  Just ask!  That’s going to be your best bet for good pizza dough!
    3.  You can also make your own. I have good recipe for Easy Pizza Dough.

    What are the best toppings for pizza?

    1. If you’re a meat lover, you’ll most likely enjoy some sort of meat lover’s pizza like this Meatball Pizza!  BBQ Chicken Pizza is my another favorite. 
    2. And my personal choice for pizza topping is Bell Peppers, Olives and Pineapple.  Chicken Chunks, Sausage are also popular pizza toppings ( but I don’t like it that much).
    3. Some people like to add olives, corn, goat cheese, spinach and more.  The possibilities are endless!

    It’s pretty likely that everyone in your family will enjoy this Meatball Pizza.  It’s a nice, quick and easy dinner for those nights that are crazy!

    Bismillah let’s get started.
    Check it out The Best Meatball Pizza Recipe and printable version here!!

    The Best Meatball Pizza Recipe

    Instead of ordering pizza tonight, try this perfectly pleasing meatball pizza recipe! Great for light dinner or go-with — so simple! So delish!
    Keyword 30 minutes meals, Baking, cheese, chicken mince, Dinner, meatball, Pizza, Quick and Easy
    Prep Time 10 minutes
    Cook Time 25 minutes
    Total Time 35 minutes
    Servings 4
    Author Bushra Waheed

    Ingredients

    For The Meatballs:

    • 500 gm chicken mince
    • 1 bread slice crust removed
    • 1/3 cup warm water
    • 1 large egg white lightly beaten
    • 1 tsp chopped garlic
    • 1 small garlic clove minced
    • 1 tsp onion powder
    • 1 tbsp fresh parsley chopped
    • 1 tbsp fresh basil chopped
    • 1 tsp red pepper crushed
    • freshly ground black pepper to taste
    • salt to taste
    • oil for frying

    For the Meatball Pizza:

    • 1 pound homemade pizza dough for recipe click here
    • 12 meatballs halved and thawed
    • 1/4 cup pizza sauce
    • 2 tbsp mayonnaise
    • 1 cup Mozzarella Cheese shredded
    • 1/4 cup cheddar cheese
    • 1 small green pepper chopped
    • 1 small red pepper chopped
    • few fresh basil optional
    • a pinch of crushed red pepper to add a extra kick
    • and/or other toppings of your choice

    Instructions

    To Make The Meatballs:

    • In a bowl, combine the bread and water. Let stand, turning the bread occasionally to thoroughly moisten it, for 10 minutes.
    • Squeeze the bread gently to remove most of the water.
    • Discard the water. Tear the bread into 1-inch chunks and toss them into a large bowl.
    • Add the chicken mince, ginger, garlic, onion powder, parsley, basil, egg white, red pepper, 1/4 teaspoon salt, and black pepper to taste.
    • Mix thoroughly with moistened hands.
    • Shape the meat mixture into 12 mini balls.
    • Place the meatballs on the lined sheet, cover with plastic wrap, and refrigerate for at least 2 hours or up to overnight.
    • Now heat oil in a frying pan over medium heat and cook meatballs for 6-8 minutes or until golden, flip and cover the pan fry additional 5 minutes to cook from inside(make sure not to over cooked).
    • Remove meatballs from the oil and drain on kitchen paper.
    • Let the meatballs cool slightly and then cut each one in half.
    • Set aside.

    To Prepare the Sauce:

    • In a small bowl, mix together the pizza sauce, mayonnaise, basil and a pinch of crushed red pepper. Set aside.

    To Assemble The Meatball Pizza:

    • Preheat the oven at 180 degre C or 425 F.
    • Drizzle a round pizza pan or a rectangular baking sheet with olive oil or non-stick spray.
    • On lightly floured surface, roll out pizza dough into a 12-inch circle, with a rolling pin.
    • Spread bases evenly with prepared pizza sauce. Scatter evenly with cheddar cheese.
    • Top with meatballs halves and pressing lightly into base. Scatter evenly with Mozzarella cheese.
    • Top with chopped green and red bell pepper.
    • Bake 25 minutes or until the crust is crisp and golden and the cheese is hot and bubbly.
    • Let pizza sit for a few minutes then cut into 4 slices.
    • Delicious Meatball Pizza is ready to serve.
    • ENJOY 🙂

    Notes

    Serve with salad mix.

    Some Useful Tips & Hints:

    1. For make-ahead meatballs, you can make the meatballs up to the end of step 1 and freeze them layered between baking paper in an airtight container. Store them for up to 2 months. Defrost in the fridge overnight and continue recipe from step 2.
    2. Chicken mince is easily available at major supermarkets or local butchers.
    3. Use a store-bought pizza base for quicker version.
    4. You can add your favorite herbs and spices for a spicy version.

    Want more Pizza Inspiration? 

    Here are some other pizza recipes on my blog:

    If you’re looking for more easy, family friendly dinner ideas, you might also enjoy my The Best and Easiest Spaghetti Meatballs Recipe or this Butter Chicken Pasta,  Homemade Lamb Burgers and Keema Macaroni are also fun recipes for the family!

    Put your own spin on it. And lemme know how it turns out and do take a few seconds to rate it! I would love to see your recreations so tag me on instagram @recipestable or Facebook (Recipestable) or on Twitter so I can see how lovely yours turn out.

  • The Best Stuffed Chicken Buns Recipe You Will Ever Make

    The Best Stuffed Chicken Buns Recipe You Will Ever Make

    There’s nothing like Stuffed Chicken Buns: perfectly baked ,soft, warm buns stuffed with hot savory chicken filling. You’ll amaze your family and friends with my easy to make “stuffed chicken buns recipe”.

    Stuffed Chicken Buns

    Breads & Buns are one of my favorite things to make and with this Stuffed Chicken Buns recipe it’s really simple to make that you cannot go wrong with this and tastes delicious. They’re so easy to make, and the possibilities are endless! You can stuffed with ground beef, mutton, chicken, cheese or mushrooms for a healthier option. Even if you don’t eat meat, you can make a great-tasting veggie buns! Whatever it is you’re craving, you can satisfy it with it a stuffed bun!

    Stuffed Chicken Buns

    Why I like these Stuffed Chicken Buns?

    I love all breads but I have a special soft corner for stuffed buns and bread rolls. It makes for sumptuous snacks and the possibilities are endless. Stuffed buns are my favorite gateway to finish up leftovers and clear out the refrigerator. Though I did not use leftovers for this one since I had guests over but feel free to go where your imagination takes you.

    On the outside, these golden buns resemble ordinary dinner rolls. But one bite reveals the tasty filling inside! You know that saying: It’s not what is outside but its what is inside that counts? Yeah, well its kind of the case here. Only that the outside is just as good. Soft and fluffy Stuffed Chicken buns with the most unexpected surprise ever!
    Most scrumptious Cheesy Chicken filing!

    I just love it when something looks so innocent and unassuming and then when you bite into it! Hits you with an unexpected but most pleasant burst of flavor.

    Stuffed Chicken Buns Recipe
    Stuffed Chicken Buns Recipe

    Ingredients in Stuffed Chicken Buns Recipe?

    • For Dough:  flour, dry milk powder, sugar, yeast, salt, egg, oil, warm milk
    • Creamy Chicken Filling: boiled chicken shredded, butter, onion, plain flour, milk, Cheddar Cheese, black pepper, red pepper, salt , few coriander and mint leaves.
    • For Buns Topping: Egg white, sesame seeds for sprinkling, melted butter for brushing
    Stuffed Chicken Buns

    How to Bake Perfect Stuffed Chicken Buns every time!

    Stuffed Chicken Buns
    1. Dough: These stuffed buns are an easy bake with only a single rise needed for the dough. That makes it a comparatively quicker snack. When making anything with yeast, including these buns, let the dough rise to the point the recipe says it should, e.g., “Let the dough rise till it’s doubled in bulk.” Rising times are only a guide; there are so many variables in yeast baking (how you knead the dough; what kind of yeast you use) that it’s impossible to say that bread dough will ALWAYS double in bulk in a specific amount of time.
    2. Stuffing: They prepared a cheesy chicken filling and stuff into these soft buns and life will be so much simpler for you. You can fill up your buns with lots of different things. I like to add some mushrooms and olives to mine, but you can use any kind of vegetables, meat stuffing you prefer! Pizza sauce would be another great addition. Or throw in some fresh herbs. Oh, the possibilities are endless!
    3. Shaping: Shape them as per your liking and bake. For slightly smaller buns, divide the dough into 12 pieces instead of 10. Bake the buns for 12 to 15 minutes, instead of 15 to 18 minutes. And how about “slider buns” — about 3″ in diameter? Divide the dough into 24 pieces, and bake for 12 to 15 minutes. Proceed with the recipe as written.
    4. Alternative way of Shaping: What’s another easy way to shape buns, besides rolling them into balls and flattening? Gently deflate the dough, and form it into a smooth 8″ log. Slice the log as though you were slicing cinnamon buns. Gently pull each slice into a circle.
    5. Brushing: Brushing buns with melted butter will give them a soft, light golden crust. Brushing with an egg-white wash (1 egg white beaten with 1/4 cup water) will give them a shinier, darker crust. For seeded buns, brush with the egg wash; it’ll make the seeds adhere. And, feel free to add the extra yolk to the dough, reserving the white for the wash.
    stuffed chicken buns recipe
    stuffed chicken buns recipe

    And serve with your favorite dips and sauces.

    Stuffed Chicken Buns

    Double Up and Freeze a Batch:

    I highly recommended freezing a batch of these after they’ve cooled so you can pop them into the oven for a fast, warm breakfast or as side for dinner that will delight your fellow tablemates.

    Stuffed Chicken Buns

    Bismillah let’s get started.
    Check it out The Stuffed Chicken Buns Recipe and printable version here!!

    Other versions of this Stuffed Buns:

    I’ve shared some of the tastiest buns recipes out there for you to enjoy…check them out!

    Want more Bread Inspiration? 

    Here are some other Bread or Buns recipes on my blog:

    Pin it For Later

    Pin it for Later ~ Stuffed Chicken Buns

    Put your own spin on it. And lemme know how it turns out and do take a few seconds to rate it! I would love to see your recreations so tag me on instagram @recipestable or Facebook (Recipestable) or on Twitter so I can see how lovely yours turn out.

  • Seekh Kebab Pizza Bites Recipe (A Flavorful Desi Twist)

    Seekh Kebab Pizza Bites Recipe (A Flavorful Desi Twist)

    Craving pizza but your taste buds is calling for some desi twist?

    Satisfy your cravings with these Seekh Kebab Pizza Bites that are ready in 30 minutes or less and featuring everyone’s favorite flavor combo: Pizza, Seekh Kebab and  cheesy goodness—are sure to be the talk of the party.

    A Flavorful Desi Twist - Seekh Kebab Pizza Bites Recipe
    A Flavorful Desi Twist – Seekh Kebab Pizza Bites Recipe

    You all know I love pizza, and I couldn’t go too long without experimenting different pizza toppings. (For you newbies, they happen to be one of my favorite finger food!) These days pizzas come with many desi variations like butter chicken, spicy tikka or seekh kebabs.

    Seekh Kebab Pizza Bites (A Flavorful Desi Twist)

    So, Today why not take the classic Italian and make them unabashedly Pakistani ?

    Creativity, especially when it comes to food has absolutely no limits. There are some flavor combinations that are so brilliant —like seekh kebabs, pizza sauce, and cheese. All three of these offer undeniable flavor on their own, but when paired together, the result is nothing less than perfect. So, I changed the shape of pizza and turned it everyone’s favorite pizza ingredients into these cute little “Seekh Kebab Pizza Bites”!

    The smokiness of seekh kebabs, the sharp flavor of cheddar, the cheesy goodness of Mozzarella and the zest of pizza sauce combine like they were always meant to be together. All this ohso yummy !

    Seekh Kebab Pizza Bites Recipe
    Seekh Kebab Pizza Bites Recipe

    Does your family love pizza as much as mine does?

    Then this weekend, try something new : “Seekh Kebab pizza Bites”! These adorable little pizza bites are yours to enjoy. And let me tell ya – they will easily disappear quickly!

    Seekh Kebab Pizza Bites Recipe
    These Seekh Kebab Pizza Bites make a fun and delicious way to serve everyone’s favorite pizza! 

    Ingredients in Seekh Kebab Pizza Bites?

    To make these seekh kebab pizza bites, you’ll need pizza dough, pizza sauce, leftover seekh kebabs, onion, green bell pepper, Cheddar & Mozzarella cheese and Italian seasoning.

    Seekh Kebab Pizza Bites Recipe
    Seekh Kebab Pizza Bites Recipe

    How to make the Seekh Kebab Pizza Bites

    First I line up the muffin pan with homemade pizza dough and cut it into round circles (No need to be extremely accurate with the measurements).  I just wanted the pizza bites to be about the same size. Then I top it with the pizza sauce. I always keep a jar of homemade pizza sauce in my pantry to make these kinds of easy pizzas at a moment’s notice. Next is the cheese then the leftover seekh kebabs with onion and peppers then sprinkle herb seasoning and bake at 180 degree C for 10-15 minutes!

    These couldn’t be more simple.

    Seekh Kebab Pizza Bites Recipe
    Seekh Kebab Pizza Bites Recipe

    Once they have cooked, I remove them from the oven and allow them to cool enough so that they can be safely eaten, about 5 minutes and serve.

    Voila!!!

    Make-Ahead Seekh Kebab Pizza Bites Recipe

    They also make a great make-ahead meal or snack!

    Seekh Kebab Pizza Bites Recipe
    Seekh Kebab Pizza Bites Recipe

    How to Freeze Seekh Kebab Pizza Bites

    Once they have cooled completely, place them onto a sheet pan and allow them to flash freeze for about 30 minutes. Then, package them in freezer-safe zip top bags or containers for up to 2 weeks. To serve from frozen, just thaw overnight in the refrigerator and then reheat in the oven for about 10 minutes until heated throughout.

    Extra Bounce Tip:

    The fun thing is that they are completely customizable. And if you have kids around, or want to get friends involved in customizing their own, these are a great idea for a make-your-own-appetizer set up. Everyone will love tossing in their favorite toppings.

    Seekh Kebab Pizza Bites Recipe
    Seekh Kebab Pizza Bites Recipe

    Definitely a fun twist on serving pizza.  And in my opinion, much cuter — which is of course the bigger issue. enjoy 🙂

    Bismillah let’s get started.
    Check it out Seekh Kebab Pizza Bites Recipe and printable version here!!

    Want more Pizza Inspiration? 

    Here are some other pizza recipes on my blog:

    Put your own spin on it. And lemme know how it turns out and do take a few seconds to rate it! I would love to see your recreations so tag me on instagram @recipestable or Facebook (Recipestable) or on Twitter so I can see how lovely yours turn out.

  • The Low-Carb Solution to Egg in a Hole Recipe

    The Low-Carb Solution to Egg in a Hole Recipe

    Can’t decide whether to make a grilled kabab or an egg in a hole? Make both!
    Two of my favorite food groups—eggs and toast—unite in this take on the playful dish also known as egg in a hole, Egg in a Basket or Egg in a Boat or, more simply, egg in toast. I fancy it up by filling the bread center with mince crust and topping with basil or chili flakes. And It came out so delicious!

    Egg in-a-hole – Look at that perfect texture !!

    For this recipe, I used a normal mince kabab mixture for filling the bread , to keep it low carb. The outside was crunchy and crispy and inside was so juicy and tasted so good with the egg in the middle. A nice way to add some more protein to a sandwich, while also providing something of a sauce from the egg yolk (depending on how you cook your egg). It’s adds just a little oomph of flavor to the sandwich.

    Watch carefully as you cook the mince crust, and don’t raise the heat higher than medium: The goal is for the mince crust to brown and the egg to set simultaneously. Save the crust center for making breadcrumbs.

    Also how well the eggs must be cooked is a personal choice. Some like over easy, sunnyside up or completely cooked through. No matter how you make it, this will remain a favorite breakfast option passed on for many generations to come. When you make this cute breakfast-for-dinner recipe, you can vary it by using cheese, vegetables or sauteed Spinach in place of the mince filling.

    This Low-Carb Solution to Egg in a Hole Recipe can be an excellent addition to a healthy weight loss diet. They’re not only low-carb and low in calories but also high in protein and fiber that keep you feeling full.

    I’m really excited to share this recipe with you.
    So, Bismillah let’s get started and Check it out Low Carb Egg in a Hole Recipe and printable version here!!

    I have also posted Chocolate Date Bars recipe  and Vegetable Fried Brown Rice recipe which are another easiest & tastiest version of Healthy Eating. Do check it out as well.

    Put your own spin on it. And lemme know how it turns out. Post a photo on Facebook (Recipestable) or Instagram on Twitter so I can see how lovely yours turn out.

    Happy Healthy Eating!!
    Do you have another name for this classic breakfast? Please leave a comment below, and let me know!

  • Unbelievably Awesome BBQ Chicken Pizza Recipe

    Unbelievably Awesome BBQ Chicken Pizza Recipe

    Let’s take a quick break from dessert and talk about pizza. Thick style homemade pizza crust topped with BBQ sauce, Barbecue flavored Chicken Chunks, onions, capsicum, jalapeno, and tons of cheese. Your soon-to-be favorite pizza!

    It’s Cheesy, doughy, crispy on the edges, soft in the middle, loaded, homemade pizza. All you need is 35 minutes and a few fresh ingredients for this Unbelievably Awesome BBQ Chicken Pizza recipe.

    Unbelievably Awesome BBQ Chicken Pizza

    What’s your favorite kind? For me, nothing beats my Italian Herb Crusted Cheese Pizza. But this BBQ chicken pizza is in close 2nd place! Sweet BBQ sauce, chicken chunks, red onions, a dash of jalapeno, and tons of cheese.

    My version of savory heaven, right here.

    Unbelievably Awesome BBQ Chicken Pizza

    Unbelievably Awesome BBQ Chicken Pizza

    When I make homemade pizza, I like to get the cheese extra melted and bubbly. I love the sides to get a little brown and the bottom to be extra crispy. To obtain all this goodness, I switch my oven to broil for a quick minute as the pizza is finishing up. I suggest you try it! What I don’t suggest you try is walking out of the kitchen to answer your phone, only to come back finding your pizza burnt to a black crisp with the oven still on broil.

    Whoops! Yeah, I make mistakes too.

    UNBELIEVABLY AWESOME BBQ CHICKEN PIZZA

    UNBELIEVABLY AWESOME BBQ CHICKEN PIZZA

    My love affair with barbecue chicken pizza began long, long ago. The flavors and textures in this pizza are incredible! You have the sweet tang from the BBQ sauce, the meaty chicken, the zesty red onion, fresh green pepper, smoky jalapeno, soft crust, crispy edges, and ultra cheesy mozzarella covering it all. Does anything sound better?

    Ditch the delivery guy, you’re eating homemade tonight! It’s easy, cheesy, and fun, especially on the weekends!  While you can never go wrong with traditional cheese and pepperoni, give BBQ chicken chunks a chance and you wont be disappointed!  You can cook your own chicken and shred it for this recipe, or use a rotisserie chicken, which gives great flavor and cuts the prep time in half!  This is the easiest recipe and tastes super delicious!

    Bismillah let’s get started. 

    UNBELIEVABLY AWESOME BBQ CHICKEN PIZZA

    First, get your oven heated up to Gas Mark 180 degrees C.  Then, grab some pizza dough. You can use a ready made pizza base which would make dinner appear a lot faster. I used one batch of my Fresh Pizza Dough. 

    Place it onto a floured surface. And, roll and shape the dough into a 9-inch triangle. Roll out to fit your pizza tray. Next, You need barbecue sauce. Use shop bought or make it homemade which I did using this Homemade Barbecue Sauce recipe.  It’s really easy and uses ingredients that I bet you already have in the cupboard. Now, grab the rest of your ingredients. Top with chicken chunks and play with your favorite toppings.  

    UNBELIEVABLY AWESOME BBQ CHICKEN PIZZA

    UNBELIEVABLY AWESOME BBQ CHICKEN PIZZA

    Finally, take some Grated Mozzarella. And, then the jalapeno slices. 

    UNBELIEVABLY AWESOME BBQ CHICKEN PIZZA

    UNBELIEVABLY AWESOME BBQ CHICKEN PIZZA

    Place the pizza into the hot oven to bake .. for about 20 minutes or until golden brown and bubbling.

    UNBELIEVABLY AWESOME BBQ CHICKEN PIZZA

    UNBELIEVABLY AWESOME BBQ CHICKEN PIZZA

    Slice and serve immediately! Try not to burn yourself when eating!
    Btw, feel free to add anything else to the pizza that you like.
    UNBELIEVABLY AWESOME BBQ CHICKEN PIZZA

    Check it out the Unbelievably Awesome BBQ Chicken Pizza and printable version here!!

    Consider serving this with:

    More pizza inspiration:

    Put your own spin on it. And lemme know how it turns out. Post a photo on Facebook (Recipestable) or Instagram on Twitter so I can see how lovely yours turn out.

  • Bakery Style Chicken Mayo Sandwiches Recipe

    Bakery Style Chicken Mayo Sandwiches Recipe

    Looking for an amazing, delicious and cheap Tea Party recipe for a busy day? Then look no further, these Bakery Style Chicken Mayo sandwiches takes about 15 minutes prep work and it’s flavor is phenomenal.

    Bakery Style Chicken Mayo Sandwiches Recipe

    Bakery Style Chicken Mayo Sandwiches

    Just 4 ingredients and 15 minutes is all it takes to make these Bakery Style Chicken Mayonnaise Sandwiches. The crowd will go crazy over them at your next get together!

    Bakery Style Chicken Mayo Sandwiches

    Bakery Style Chicken Mayo Sandwiches

    These Bakery Style Chicken Mayo sandwiches are loaded with shredded chicken, mayonnaise, lettuce and simple seasoning. Lettuce leaves are optional but I’d say it’s a must, it perfectly compliments all the flavors of the chicken.

    Serve this sandwich with a side of french fries, roasted potatoes and you’ve get a dinner that couldn’t get any simpler. Enjoy!

    Bakery Style Chicken Mayo Sandwiches recipe

    Bakery Style Chicken Mayo Sandwiches

    Chicken sandwiches are eternally popular and often the first item to disappear when handed around. The key is well-toasted bread, which prevents any filling from soaking in and making the bread soggy. 

    Bakery Style Chicken Mayo Sandwiches recipe

    Bakery Style Chicken Mayo Sandwiches

    Very handy and easy to make, these sandwiches are just perfect for picnic, tea time snack, lunch box etc. If you have a tea party at your home and your friends are invited. You can make quick and easy bakery style sandwiches by following this recipe.

    Make it, enjoy the deliciousness and 
    serve it to your family with love

    Bismisllah Let’s Get This Started !

    Bakery Style Chicken Mayo Sandwiches Recipe with Step by Step Pictures

    Ingredients You will Need:

    • 4 bread slices
    • 1/2 cup boiled Chicken, (shredded)
    • 2 lettuce leaves, (optional)
    • 4 tablespoon mayonnaise
    • salt and pepper to taste

    How to make Bakery Style Chicken Mayo Sandwiches

    Step 1: Place shredded chicken in a large bowl. Now add the mayonnaise bit by bit, depending on the consistency you like. Add the lettuce leaves (if using) and season with salt and pepper. Stuffing is ready.

    Bakery Style Chicken Mayo Sandwiches Recipe: Step 1

    Step 2: Toast bread slices and cut out their edges if you want otherwise you can use as it is.

    Bakery Style Chicken Mayo Sandwiches Recipe: Step 2

    Step 3:Place a slice bread in a clean-surface and spread the chicken mayo filling on it. Cover the Bread with another piece of the toasted Bread and repeat three layers. Lightly press to complete the sandwich.

    Bakery Style Chicken Mayo Sandwiches Recipe: Step 3

    Step 4:  Now cut the sandwich diagonally and following the same process prepare rest of the Sandwiches.

    Bakery Style Chicken Mayo Sandwiches Recipe: Step 4

    Give it a try and You have bakery-style Chicken mayo sandwiches that will mystify your friends and family as to how you made them. Go you.

    Check it out the Bakery Style Chicken Mayo Sandwiches recipe and printable version here!!

    Bakery Style Chicken Mayo Sandwiches

    Prep Time 10 minutes
    Cook Time 2 minutes
    Total Time 12 minutes
    Servings 2
    Author Bushra Waheed

    Ingredients

    • 4 bread slices
    • 1/2 cup boiled Chicken (shredded)
    • 2 lettuce leaves
    • 4 tablespoon mayonnaise
    • salt and pepper to taste

    Instructions

    • In a large bowl, combine together the shredded chicken and mayonnaise.
    • Now add lettuce leaves.
    • Season with salt and pepper.
    • Mix until well combined.
    • Toast bread slices and cut out their edges if you want otherwise you can use as it is.
    • Place a slice bread in a clean-surface and spread the chicken mayo filling on it.
    • After filling, take another bread slice and put it on the above of filling.
    • Repeat again and make three layers withit.
    • After that, put the forth one slice of bread on the third layer of filling and lightly press to complete the sandwich.
    • Now Secure with wooden picks and cut the sandwich diagonally and following the same process prepare rest of the Sandwiches.
    • Your Bakery Style Chicken Mayonnaise sandwiches are ready to serve. ENJOY!!

    Notes

    Serving Suggestions:
    You can serve with french fries and your favorite dipping sauce.

    Extra Bonus Tips :

    1. This is a good recipe to use the left over Rotisserie or boiled chicken.
    2. It’s very good for outdoor entertaining and picnics.
    3. You can make the filling hours or even a day before and assemble it when needed.
    4.  If making ahead of time, cover with a damp tea towel to ensure they don’t dry out. I have sprinkled a mint leaves over the sandwiches, but this is only for garnish(you can skip it).

    Put your own spin on it. And lemme know how it turns out. Post a photo on Facebook (Recipestable) or  on Twitter so I can see how lovely yours turn out.

    Happy Cooking

    Pin it for Later:

    Bakery Style Chicken Mayo Sandwiches Pinterest
    Pin it for Later

    ATTENTION: All photos and content are copyright protected. Please do not use our photos without prior written permission. If you wish to republish this recipe, please rewrite the recipe in your own unique words and link back to Bakery Style Chicken Sandwiches Recipe on Recipestable. Thank you!

  • The Easiest Bread Pizza Recipe

    The Easiest Bread Pizza Recipe

    No time to make your own dough? Same here. Skip the homemade crust for easy, cheesy love in 10 minutes. Use bread slices for the crust and have dinner ready in no time. Loaded with great taste and ready in under 15 minutes start-to-finish, it’s sure to become a family favorite! A fun and flexible recipe you’re sure to make over and over again!

    The Easiest Bread Pizza Recipe
    Just try saying no to that

    The Easiest Bread Pizza

    I could eat pizza all day, every day. But I don’t always have the time to make my own crust. Delivery adds up, and store bought crusts tend to be pretty low quality. That’s where this bread pizza recipe comes in. It isn’t even so much of a recipe, per se, but a guideline for happiness.

    The Easiest Bread Pizza Recipe

    I love it for many reasons.

    1. First, it fits the quick and easy bill beautifully. Simply places the bread slices, brush with butter, and give it a little broil to create that crunchy-on-the-outside but soft-and-chewy-on-the-inside texture that’s so wonderful in this easiest bread pizza. Then slather on some prepared sauce, load on the toppings, and give it all a quick 6 to 8 minute bake in the oven. Done. Add a side salad or some fresh fruit, and dinner’s served.
    2. Second, it tastes delicious. Before piling on the toppings, the bread itself is seasoned with garlic powder and oregano for a little added flavor touch. And then with the classic “supreme” combination of toppings, how could it not be tasty, right?
    3. Third, it’s versatile. Change up the toppings to suit any personal tastes. Don’t like veggies? No problem … leave them off. Want more cheese? Great! … load it up. Or hey, get totally crazy and prepare each bread toast differently … perhaps Supreme for one slice, and just pepperoni and cheese for the other. Or, if you like more unique pizza flavor combinations, give My Favorite French Bread Pizza a whirl.
    4. Fourth, it reheats well. If you don’t mind soft bread all around, a quick zap in the microwave works great. For that classic bread pizza touch-of-crunch, pop the pizza back in a preheated oven for just a couple of minutes and you’re good to go.
    5. And fifth, The Easiest Bread Pizza isn’t just great for a quick and easy dinner, it’s always fabulous for game-day {or any day} snacking, too. Bake some up and slice into fingers for a tasty treat while you’re cheering on your favorite team.
    The Easiest Bread Pizza
    The Easiest Bread Pizza

    Bread pizza is one of the quickest & easiest snacks that you can make with minimal ingredients. All you need is of course some bread slices, veggies of your choice, pizza sauce, cheese, leftover chicken, and some seasoning. Easy right?

    To make the bread pizza healthier use whole wheat breads or any bread that you fancy. Garlic bread would taste great too. 

    The Easiest Bread Pizza recipe
    The Easiest Bread Pizza

    There are a few tricks to making this bread pizza taste its best. First, you’ll want to toast the bread for about 5 minutes by itself to crisp it up a bit. Then you’ll add the pizza sauce , cheese (a good melty mozzarella) and your favorite toppings (I liked veggie version, but you can add leftover tikka, seekh kebabs,  cooked mince, mushrooms etc choices are endless ) before returning it to the oven to get the cheese melty and the pizza glistening.

    And that’s all there is to it! This is great recipe to make with your kids or better yet, let your kids make themselves.

    So easy, so yummy!

    The Easiest Bread Pizza recipe
    The Easiest Bread Pizza

    Allow to cool for a few minutes, slice and enjoy!

    For dinner, I’ll serve it alongside a big salad. For lunch, I usually put out veggies and hummus to go with it. And for an ea  snack, I cut each toast into fourths and serve it with fruit. They’re easy to make, easy to eat and easy to clean up after. YES!!

    Check it out the The Easiest Bread Pizza recipe and printable version here!!

    Happy Baking!!

    Pin it For Later: 

    The Easiest Bread Pizza Recipe
    The Easiest Bread Pizza Recipe _ Pin it For Later

    I have also posted The Easiest Naan Pizza  and Pizza Sandwiches  which are another easiest & tastiest version of making Pizza at home. Do check it out as well.  It’s finger lickin’ good. You’ll be coming back for more. 


    Put your own spin on it. And lemme know how it turns out. Post a photo on Facebook (Recipestable) or  on Twitter so I can see how lovely yours turn out.

  • Flower Shaped Buns Recipe with Step by Step Pictures

    Flower Shaped Buns Recipe with Step by Step Pictures

    Baking is an assortment of pure love, garnished with utmost care into a culmination of all the good things that life has to offer. These gorgeous Flower Shaped Buns are truly spectacular, and they taste just as amazing as they look! 

    Flower Shaped Buns recipe
    Warm, freshly baked Buns tastes very good with chicken filling.

     The Flower Shaped Buns. So elusive. So Cute. So majestic. So eye-catching

    How do you make them? Is there too hard to shape? Is there a complicated technique? Is it wizardry?

    Just a few of the thoughts I had before attempting these beauties. However, I’m elated to report that if you can master my Vegetable Stuffed Buns & Baby Chicken Bread (and you totally can), you can master the Flower Shaped Buns, too!

    These flower shaped buns are simple to make and cute to look at. 

    Flower Shaped Buns Recipe
    Flower Shaped Buns 

    It all starts with a simple dough that rises in 1 hour. To keep things a little on the healthier side, I went with a 2:1  mix of unbleached all purpose and whole wheat pastry flour for slightly-hearty-but-still-decadent buns.

    You could also go entirely all-purpose for true bakery style, all whole-wheat pastry for a healthier buns, or some other combination that I haven’t thought of! 

    So how are these simple? I’m glad you asked.

    13 ingredients including seasonings (sesame seeds being the 14th and optional ingredient)
    One true rise = less waiting
    Fool-proof methods
    No fancy techniques or equipment involved

    See? You can totally do this. Believe it.

    So what do these studs taste like? Amazing. They’re

    Soft
    Tender
    Fluffy
    Perfectly spiced
    Loaded with creamy chicken filling
    & Better with each bite

    Give it a try and You have bakery-worthy stuffed buns that will mystify your friends and family as to how you made them. Go you.

    Bismisllah Let’s Get This Started !

    Ingredients You will Need:

    For Buns Dough
    • 3 1/2 cups all-purpose flour
    • 1 cup milk
    • 2 tablespoon milk powder
    • 1/2 cup water (might use less)
    • 1 egg, lightly beaten
    • 1 tablespoon sugar
    • 4 tablespoon oil
    • 4 tablespoon melted butter
    • 1 1/2 teaspoon instant yeast
    • 1 teaspoon salt
    Chicken Filling
    • 2 cups boiled chicken, shredded
    • 1 large red onion, finel chopped
    • 2 tablespoon butter
    • 2 tablespoon plain flour
    • 1 teaspoon salt
    • 1 teaspoon black pepper
    • 1/2 teaspoon red chili, crushed
    • 4 tablespoon coriander leaves
    • 4 green chilies, finely chopped
    • 1 cup milk
    For Assembling Buns
    • white & black sesame seeds, as required
    • 1 egg yolk, beaten with 1 tsp milk, for brushing the buns before baking

    How to Make Flower Shaped Buns:

    Step 1: Sieve the flour and dry milk powder in a large mixing bowl. Make three holes in the flour, and then put sugar, yeast, and salt in each hole. Gently cover the holes with the flour. Then add the oil, melted butter and the egg, and combine together.

    Flower Shaped Buns Step 1
    Flower Shaped Buns Step 2

    Step 2: Pour lukewarm milk in the flour mix. Start kneading together and gradually add the lukewarm water a little at a time. You may not need to use all the water, so add it sparingly until your dough comes together and is nice and soft. Knead for a good 10-15 minutes.When the dough becomes smooth and elastic, it is done. (Note: The more you knead the dough, the softer the buns will be).

    Step 3: Touch a bit of oil with your fingertips and apply all over the ball of dough. Loosely cover the bowl with plastic wrap or cover with a damp cloth and set it in a warm place for 40 minutes to an hour for it to double in size.

    Flower Shaped Buns Step 3

    Step 4 :To Make Chicken Filling – Melt 2 tablespoon butter in a frying pan or wok. Saute onion in butter until transculant. Add flour, salt, pepper and red chili and cook for 2-3 minutes. Now add milk and cook for 4-5 minutes or until sauce is thickened. Add shredded chicken, green chilies, fresh coriander leaves. Stir until well combined and remove from the heat. Let it cool completely.

    Flower Shaped Buns Recipe Step 4

    Step 5: When the dough has risen into a nice big size, take the dough out of the bowl and Punch it down to remove some of the air in the dough.

    Flower Shaped Buns Recipe Step 5

    Step 6: Divide the dough into 16-18 balls, depending on the size of buns you would like.

    Flower Shaped Buns Recipe Step 6

    Step 7: Gently roll out each piece of dough and make a round ball. Flatten a ball until it is about 3 inches in diameter and place 2 tablespoon of chicken filling in the center.

    Flower Shaped Buns Recipe Step 7

    Step 8: Pull up the edges of the rolled out dough and pinch together to firmly seal the filling within.

    Flower Shaped Buns Recipe Step 8

    Step 9: Put the sealed part face down on the board and press the dough into about a 2 inch diameter. Make 8 decorative slits around the edge, equally spaced apart (either using a pizza cutter or sharp knife or even a pair of kitchen scissors).

    Flower Shaped Buns Recipe Step 9

    Step 10 : Place the prepared buns on a greased cooking sheet or tray and cover with a light cloth and let them rise for about 20 minutes to half an hour.

    Flower Shaped Buns Recipe Step 10

    Step 11: Brush each bun with beaten egg yolks and put some black and white sesame seeds in the center of the each bun.

    Flower Shaped Buns Recipe Step 11

    Step 12: Bake the buns, in the preheated oven for about 20 minutes or until golden.

    Flower Shaped Buns Recipe Step 12

    Step 13: Remove and brush the buns top with melted butter (it will give nice shiny look) and let it rest covered with a cloth for 2-3 min to soften the bread completely.. Flower Shaped Buns are ready to serve. ENJOY with your favorite dipping sauce.

    Flower Shaped Buns Recipe Step 13

    These Flower Shaped Buns are definitely a treat for weekend Tea Party. Especially when served with a luxurious garlic sauce generously topped with mayonnaise.

    Check it out the Flower Shaped Buns recipe and printable version here!!

    I believe that homemade cooking is delicious and healthy. If you love savory breads or rolls, but want to eat a little healthier, this recipe can be good to try. 🙂 Put your own spin on it. And lemme know how it turns out. Post a photo on Facebook (Recipestable) or  on Twitter so I can see how lovely yours turn out.


    Happy Baking!!

    Pin it For Later: 


    ATTENTION: All photos and content are copyright protected. Please do not use our photos without prior written permission. If you wish to republish this recipe, please rewrite the recipe in your own unique words and link back to Super Easy, Super Moist Chocolate Cupcakes on Recipestable. Thank you!

  • Vegetable Stuffed Buns Recipe

    Vegetable Stuffed Buns Recipe

    Homemade Vegetable Stuffed Buns?  These Stuffed buns are loaded with veggies and are topped with two types of sesame seeds.  So warm, soft, Fluffy, fragrant and stuffed with fresh veggies – no can or frozen veggies, all real – totally yummy  ( + point is it contains only 200 calories). Try making these if you’re looking for the ultimate comfort food.

    Vegetable Stuffed Buns

    Photo: Vegetable Stuffed Buns

    This.

    I’ve made it twice in the last week, once for bringing life to the original recipe concept and taking some photos, and once for “recipe testing”. Aka licking the filling and testing the dough. Again. More. Soft Buns In my mouth. I like this recipe a lot, you guys.

    Unlike store bought buns, these are healthy and homemade, and can be packed with any filling of your choice, be it cheese, chicken, lamb or mutton, mushrooms (choices are endless). These vegetable stuffed buns are a fun way of using leftover dough and any stuffing of your choice. These can be eaten for tea or breakfast or a satisfying meal with some salad. It works well as a snack for children to take to school, or to simply enjoy with a favorite drink at any time of the day.

    These stuffed buns succeeds in titillating your senses with its soft, tenderness, and that fresh sesame-ish flavour makes these buns more appetizing. Bake Stuffed buns not because you must but because it tastes so yummy that you would regret not making it at your earliest once you devour its first bite! Having said that, I am not dropping more clues, get ready with some all purpose flour and some basic ingredients (filling of your choice) and get ready to bake fresh stuffed buns this weekend! So, are you ready to read the recipe?

    Vegetable Stuffed Buns

    Photo: Vegetable Stuffed Buns

    When you make these Vegetable Stuffed Buns, all you have to do is open your windows and let the divine baking aromas drift and I will come to you. My nose can find these things. Okay? See you soon.

    Check it out the Vegetable Stuffed Buns recipe and printable version here!!

    Extra Bonus Tips:

    1. It can last  for a week in an air tight container in the refrigerator or it can be frozen for longer. Any time you wish to serve these heat them in the microwave for 15-20 seconds or preheat in the oven for 2-3 minutes and enjoy the warm, soft vegetable-y stuffed buns!
    2. What I really love is that once you have this basic idea, the variety of stuffing you can make for these buns is absolutely endless.

    I have also posted Baby Chicken Bread recipe which is another easiest & tastiest version of making stuffed bread at home. Do check it out as well.  It’s finger lickin’ good. You’ll be coming back for more. 


    Put your own spin on it. And lemme know how it turns out. Post a photo on Facebook (Recipestable) or  on Twitter so I can see how lovely yours turn out.


    Happy Baking!!

  • Full-of-Herbs Fish Cakes Recipe

    Full-of-Herbs Fish Cakes Recipe

    Who says making fish cakes is tedious?
    Who says you need some clever work?

    Today, I am going to share My favorite ‘Full-of-Herbs Fish Cakes recipe’ with all of you!!

    Fish cakes are real comfort food and so easy to make with some leftover fish(you can use salmon, tuna cod or haddock etc). Delicious, family-friendly Full-of-Herbs Fish Cakes. Perfect for a quick and healthy dinner.

    Full-of-Herbs Fish Cakes
    Full-of-Herbs Fish Cakes

    Yes, its so easy to make!!
    The process is done in less than 15 minutes with a food processor, plus some manual work.. stirring and forming patties and frying.
    That’s all. 

    Full-of-Herbs Fish Cakes
    Full-of-Herbs Fish Cakes

    This is a full-of herbs fish cakes indeed! The herbs ; dill, coriander, basil, parsley and ginger. The herb mixture is so fragrant, the basil leaves gave a wonderful aroma that no other herbs can give, do not leave it out. I have always used fresh basil leaves for my cooking, a common ingredient over here in my Kitchen. Basil leaves are so fragrant. And I do have many pots of basil plants in my potted garden.

    Full-of-Herbs Fish Cakes
    Full-of-Herbs Fish Cakes

    White-fleshed fish meat (boneless and skinless, I’ve used sole) are cut to chunks and process briefly in the food processor just so they are broken into small pieces. They are then added to the herb mixture, along with chopped green onion, half an egg, cornflour, ground coriander, sauce, lemon zest, and salt. Shape into cakes, flatten a little, and fry in hot oil on both sides until cooked through. Fish meat cooked pretty quickly, So I have cooked the fish cakes on the stove over medium-low heat on both sides, turning them over a couple of times until they are cooked through.

    Full-of-Herbs Fish Cakes
    Full-of-Herbs Fish Cakes: they get a high score on the flavour front.

    Bright, bold and richly flavored, these are not your typical fish cakes. There are a lot of herbs and various other aromatics in these fish cakes, which gets them a high score on the flavour front. That flavor is layered into every step: the fish is mixed with green onions along with vibrant herbs and fragrant lemon zest. If you use less, they will still taste pretty good, and the fish will stand out more. These quantities make 12-16 cakes (depending on size), or enough for four as a first course; or serve as a main with a substantial salad and some good crusty bread.  Serve these crisp-edged cakes with a dollop of garlic mayonnaise — or mayonnaise spiked with garlic sauce or preserved lemons.

    Full-of-Herbs Fish Cakes
    Full-of-Herbs Fish Cakes

    Fish cakes are an economical way of making fish go further. You can, if necessary, replace some of the fish by adding some mashed potatoes but check the seasoning carefully to make sure the finished cakes don’t taste too bland. The addition of herbs gives flavour and also produces attractive green flecks.

    Full-of-Herbs Fish Cakes
    Full-of-Herbs Fish Cakes

    Very tasty and really fragrant from the basil leaves. These fish cakes taste the best when hot (as recommended in the recipe), as when they cool down to room temperature, they do get a little fishy! I ate these with some green salad as part of my dinner dish.

    Extra-Bonus Tip:

    1. You can fry, bake or grill them.
    2. Food processor might smell for sometime. You can remove the smell bu pulsing the food processor with vinegar or lemon juice mixed with some very warm water, and put it out to dry properly.

    If you make this recipe, be sure to snap a photo and hashtag it #Recipestable. I’d love to see what you cook!


    What are your holiday traditions guys? I would love to hear some from you all. Are there recipes passed down to you from your grand mom? Or the one from many generations? Share them all in comments below.

    Happy Cooking!!

  • Super Easy, Super Moist Chocolate Cupcakes Recipe

    Super Easy, Super Moist Chocolate Cupcakes Recipe

    Like the title says, these are the ‘Super Easy,Super Moist Chocolate Cupcakes’. They are perfectly moist and insanely chocolaty, topped with More Chocolate Ganache & Coconut. Royal Treat ♥

    Super Moist Chocolate Cupcakes recipe
    Photo: Super Moist Chocolate Cupcakes

    Looking for the perfect recipe can be exhausting because there are just so many out there. I’ve tried countless cupcakes over the years, but this is my top favorite recipe. I know we all have different preferences when it comes to our taste buds, but I honestly don’t think you can go wrong with this.

    The absolute best recipe to make Chocolate Cupcakes that are super easy, super moist, chocolaty and really delicious. If chocolate is what makes you go weak in the knees, then these are for you. This one is a must try for all Chocolate Lovers out there.

     Super Moist Chocolate Cupcakes
    Photo: Super Moist Chocolate Cupcakes
     
    Super easy, Super Moist Chocolate Cupcakes
    Super easy, Super Moist Chocolate Cupcakes
     
    Super easy, Super Moist Chocolate Cupcakes
    Super easy, Super Moist Chocolate Cupcakes

    One of the great things about this happy little dessert is that it doesn’t take long to make and it doesn’t break the bank!  Not only is the dessert met with smiles and giggles, it’s an easy and inexpensive way to make everyone at the table happy!  And making everyone happy is what its all about.

    Super easy, Super Moist Chocolate Cupcakes
    Super easy, Super Moist Chocolate Cupcakes

    I made the Chocolate Coffee ganache with hot cream, good quality chocolate, butter and coffee extract. The higher the quality of chocolate used, the better the flavor and texture your ganache will have in the end. Coffee and coffee extract enhances the flavor of chocolate. It enhances the chocolate, and brings out the flavors in the chocolate while adding richness to the taste. I love to add coffee to all of my chocolate cakes. Some things are classics.I put chocolate cupcakes in that category. Pillows of rich chocolate cake. Top with chocolate ganache.

    Super easy, Super Moist Chocolate Cupcakes
     Pillows of rich chocolate cake. Top with chocolate ganache.

    Check it out the Super Easy, Super Moist Chocolate Cupcakes recipe and printable version here!!

    Extra Bonus Tips:

    1. If you would like to add coffee to the recipe, either add 1 teaspoon espresso powder or instant coffee granules along with the sifted dry ingredients, or replace the water with room temperature brewed coffee.
    2. Please make sure that you bake these for 20 minutes and not more. Baking timing is the most crucial thing for any cake recipe. A few minutes over and you’ll have a hard rock in the name of muffin. So keep checking!
    3. And yes..no peeking and opening the oven door for the first 15 minutes at  least.
    4. Cupcakes are best the same day they’re made, but can be kept in an airtight container at room temperature for up to 3 days.
    5. Un-frosted cupcakes can be kept in the freezer for up to 2 months. Thaw, still covered, on the counter or overnight in the fridge.

    I have also posted Vanilla Cupcakes with Chocolate Frosting recipe which is another easiest & tastiest version of making cupcakes home. Do check it out as well.  It’s finger lickin’ good. You’ll be coming back for more. 


    Put your own spin on it. And lemme know how it turns out. Post a photo on Facebook (Recipestable) or  on Twitter so I can see how lovely yours turn out.


    Happy Cupcakes Making!!

    ATTENTION: All photos and content are copyright protected. Please do not use our photos without prior written permission. If you wish to republish this recipe, please rewrite the recipe in your own unique words and link back to Super Easy, Super Moist Chocolate Cupcakes on Recipestable. Thank you!

  • Chicken Shashlik Sticks Recipe

    Chicken Shashlik Sticks Recipe

     Delicious, tender, juicy Chicken Shashlik Sticks the whole family loves in less than 40 minutes! These Shashlik Sticks are EASY to make and so versatile.

    Chicken Shashlik Sticks Recipe
    Photo: Chicken Shashlik Sticks

    Chicken Shashlik Sticks

    When a friend blogger posted Chicken Shashlik Sticks recipe on Instagram AND I saw it pinned on Pinterest on the same day, I knew it was a sign that I had to make this. The pictures looked so good, and the recipe seemed too easy to be true (spoiler alert, it isn’t!). So I added it to my weekly meal plan. I finally got a chance to make it yesterday, and I am praising the convenience and tastiness of this dish.

    This is an easy recipe for Tender & Juicy Chicken Shashlik Sticks. The shashlik sticks were loaded with tender pieces of chicken between juicy tomato chunks, sweet peppers and flavorful onions. The chicken was marinated in a sweet and tangy sauce before firing and the sticks were brushed with the leftover marination while they were being cooked. What a great combination of flavors!

    Chicken Shashlik Sticks recipe
    Photo: Chicken Shashlik Sticks

    Remove from the grill or griddle and serve immediately. The combination of the juicy chicken bites and colorful veggies with the Shashlik sauce is fantastic! I loved how juicy they turned out.

    Check it out the Chicken Shashlik Sticks recipe and printable version here!!

    Extra-Bonus Tip: 

    Make sure you don’t use too big of pieces of chicken because you want everything to cook evenly. I have had one too many (okay, two total- but still that is more than necessary) meals ruined because my chicken wasn’t all the way cooked. 


    I have also posted Pineapple Chicken Tenders and Light Chicken Kabobs recipes which are another easiest & tastiest version of making Pasta home. Do check it out as well.  It’s finger lickin’ good. You’ll be coming back for more. 


    Put your own spin on it. And lemme know how it turns out. Post a photo on Facebook (Recipestable) or  on Twitter so I can see how lovely yours turn out.


    Happy Dinner Making!!